


Before you begin
- Labs create a Google Cloud project and resources for a fixed time
- Labs have a time limit and no pause feature. If you end the lab, you'll have to restart from the beginning.
- On the top left of your screen, click Start lab to begin
Create a Kubernetes Cluster with Binary Authorization
/ 20
Update Binary Authorization Policy to add Disallow all images rule at project level and allow at cluster level
/ 10
Update cluster specific policy to Disallow all images
/ 10
Create a Nginx pod to verify cluster admission rule is applied for disallow all images (denies to create)
/ 10
Update BA policy to denying images except from whitelisted container registries (your project container registry)
/ 10
Update BA policy to modify cluster specific rule to allow only images that have been approved by attestors
/ 20
Tear Down (delete cluster)
/ 20
One of the key security concerns for running Kubernetes clusters is knowing what container images are running inside each pod and being able to account for their origin. Establishing "container provenance" means having the ability to trace the source of a container to a trusted point of origin and ensuring your organization follows the desired processes during artifact (container) creation.
Some of the key concerns are:
From a security standpoint, not enforcing where images originate from presents several risks:
To help system operators address these concerns, Google Cloud offers a capability called Binary Authorization. Binary Authorization is a Google Cloud managed service that works closely with GKE to enforce deploy-time security controls to ensure that only trusted container images are deployed. With Binary Authorization you can allowlist container registries, require images to be signed by trusted authorities, and centrally enforce those policies. By enforcing this policy, you can gain tighter control over your container environment by ensuring only approved and/or verified images are integrated into the build-and-release process.
This lab deploys a Kubernetes Engine Cluster with the Binary Authorization feature enabled demonstrates how to allowlist approved container registries, and walks you through the process of creating and running a signed container.
This lab was created by GKE Helmsman engineers to give you a better understanding of GKE Binary Authorization. We encourage any one to contribute to our assets!
The Binary Authorization and Container Analysis APIs are based upon the open-source projects Grafeas and Kritis.
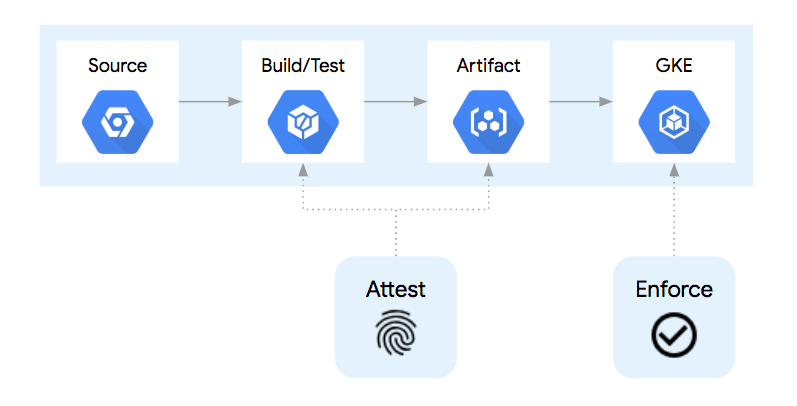
In a simplified container deployment pipeline such as this:
The container goes through at least 4 steps:
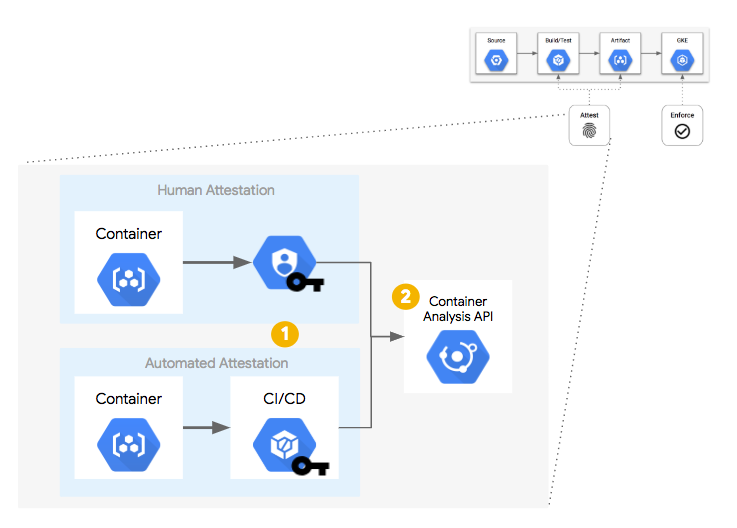
In a container build pipeline, there are opportunities to inject additional processes to signify or "attest" that each step was completed successfully. Examples include running unit tests, source control analysis checks, licensing verification, vulnerability analysis, and more. Each step could be given the power or "attestation authority" to sign for that step being completed. An "attestation authority" is a human or system with the correct PGP key and the ability to register that "attestation" with the Container Analysis API.
By using separate PGP keys for each step, each attestation step could be performed by different humans, systems, or build steps in the pipeline (a). Each PGP key is associated with an "attestation note" which is stored in the Container Analysis API. When a build step "signs" an image, a snippet of JSON metadata about that image is signed via PGP and that signed snippet is submitted to the API as a "note occurrence".
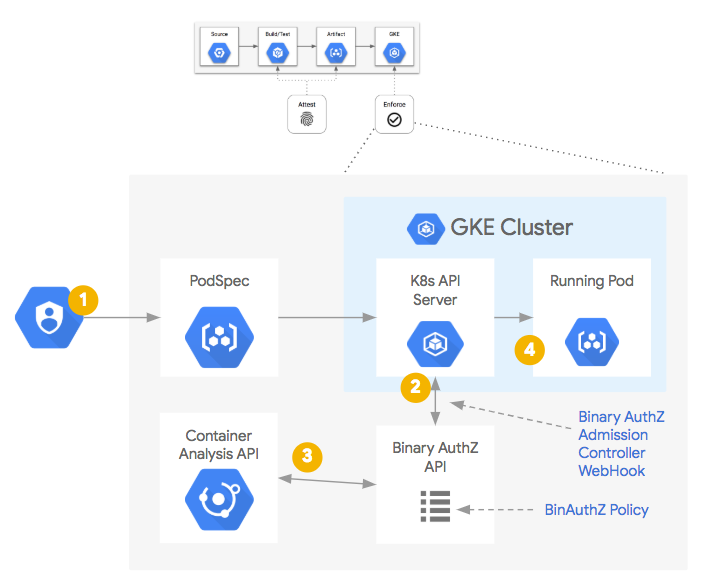
(b).Once the container image has been built and the necessary attestations have been stored centrally, they are available for being queried as a part of a policy decision process. In this case, a Kubernetes Admission Controller, upon receiving an API request to create or update a Pod:
Read these instructions. Labs are timed and you cannot pause them. The timer, which starts when you click Start Lab, shows how long Google Cloud resources are made available to you.
This hands-on lab lets you do the lab activities in a real cloud environment, not in a simulation or demo environment. It does so by giving you new, temporary credentials you use to sign in and access Google Cloud for the duration of the lab.
To complete this lab, you need:
Click the Start Lab button. If you need to pay for the lab, a dialog opens for you to select your payment method. On the left is the Lab Details pane with the following:
Click Open Google Cloud console (or right-click and select Open Link in Incognito Window if you are running the Chrome browser).
The lab spins up resources, and then opens another tab that shows the Sign in page.
Tip: Arrange the tabs in separate windows, side-by-side.
If necessary, copy the Username below and paste it into the Sign in dialog.
You can also find the Username in the Lab Details pane.
Click Next.
Copy the Password below and paste it into the Welcome dialog.
You can also find the Password in the Lab Details pane.
Click Next.
Click through the subsequent pages:
After a few moments, the Google Cloud console opens in this tab.

Cloud Shell is a virtual machine that is loaded with development tools. It offers a persistent 5GB home directory and runs on the Google Cloud. Cloud Shell provides command-line access to your Google Cloud resources.
Click Activate Cloud Shell 
Click through the following windows:
When you are connected, you are already authenticated, and the project is set to your Project_ID,
gcloud is the command-line tool for Google Cloud. It comes pre-installed on Cloud Shell and supports tab-completion.
Output:
Output:
gcloud, in Google Cloud, refer to the gcloud CLI overview guide.
Certain Compute Engine resources live in regions and zones. A region is a specific geographical location where you can run your resources. Each region has one or more zones.
Run the following to set a region and zone for your lab (you can use the region/zone that's best for you):
create.sh's GKE_VERSION variable to defaultClusterVersion:my-cluster-1 with the name of the cluster that you would like to create.The create script will output the following message when complete:
The script will:
container, containerregistry, containeranalysis, and binaryauthorization.kubectl usage.It is safe to ignore warnings.
If the script fails, it will output:
And / Or
If the script passes, it will output:
Click Check my progress to verify your performed task. If you have successfully created a Kubernetes cluster with Binary Authorization, you will see an assessment score.
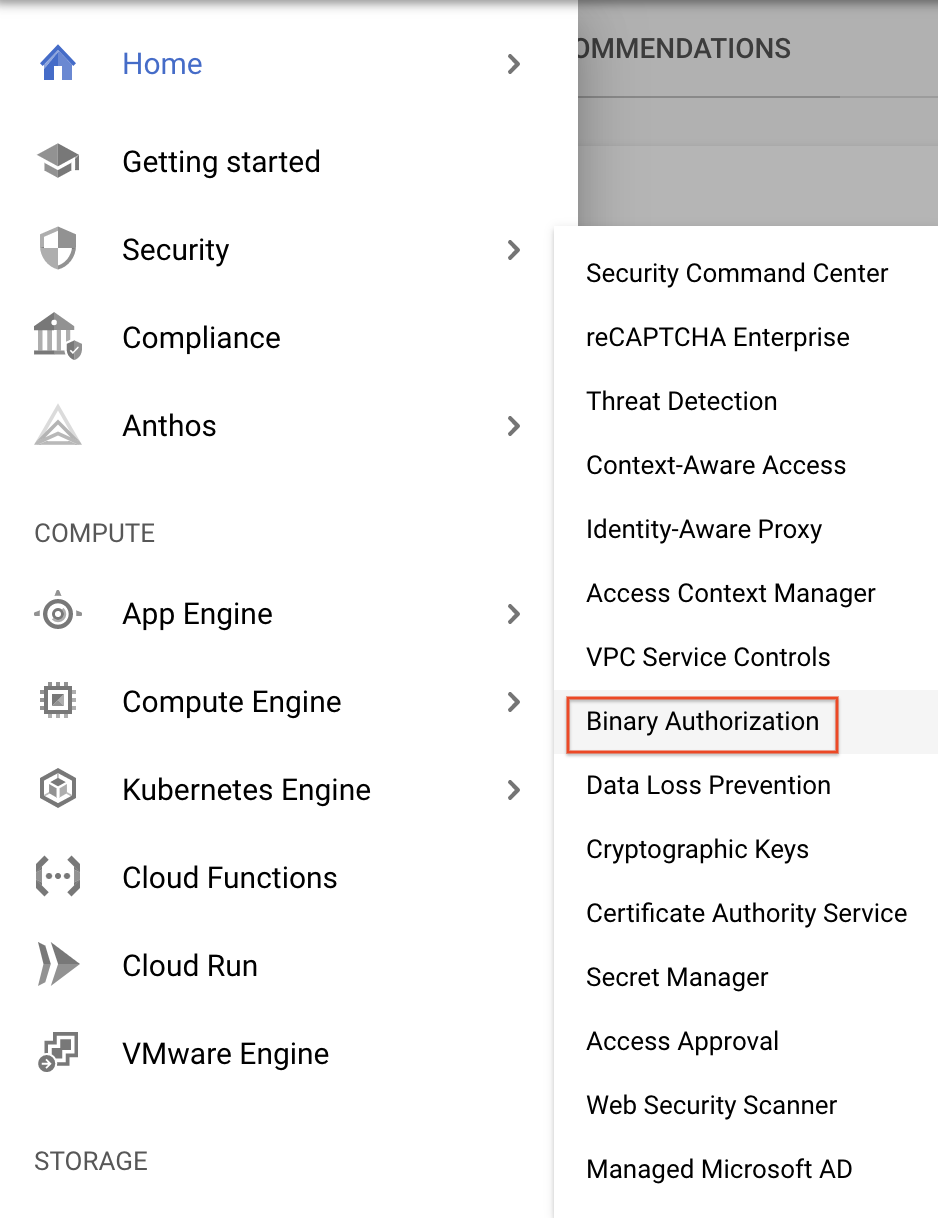
To access the Binary Authorization Policy configuration UI, perform the following steps:
gcloud:
gcloud beta container binauthz policy export > policy.yaml
policy.yaml
gcloud beta container binauthz policy import policy.yaml
The policy you are editing is the "default" policy, and it applies to all GKE clusters in the Google Cloud project unless a cluster-specific policy is in place.
The recommendation is to create policies specific to each cluster and achieve successful operation (allowlisting registries as needed), and then set the default project-level policy to "Deny All Images". Any new cluster in this project will then need its own cluster-specific policy.
The default policy rule is to Allow all images. This mimics the behavior as if Binary Authorization wasn't enabled on the cluster.
If the default rule is changed to Disallow all images or Allow only images that have been approved by all of the following attestors, then images that do not match the exempted registry image paths or do not have the required attestations will be blocked, respectively.
Next, you will make some edits to the policy:
Change your Default rule to Disallow all images
In Additional settings for GKE and Anthos deployments, click Create Specific Rules.
Select GKE Cluster from the dropdown and click Change.
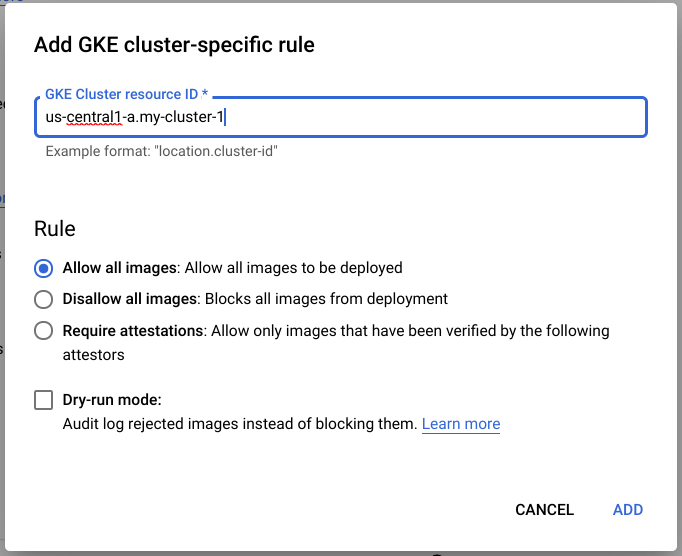
Under GKE Cluster-specific rules, Click Add Specific Rule.
In the Add GKE Cluster-specific rule field, enter your location and cluster name in the form location.clustername. e.g. my-cluster-1.
Select the default rule of Allow all images for your cluster.
Click ADD.
Click Check my progress to verify your performed task. If you have successfully updated Binary Authorization Policy to add Disallow all images rule at project level and allow all images at cluster level, you will see an assessment score.
To simulate a real-world configuration, create a private GCR container image in your project.
You will pull down the nginx container from nginx project and push it to your own GCR repository without modification.
In Cloud Shell, pull down the latest nginx container:
When prompted, Do you want to continue (Y/n)? Enter Y.
To prove that image denial by policy will eventually work as intended, first verify that the cluster-specific allow rule is in place and allows all containers to run.
nginx pod:You should see a message stating that pod/nginx created.
Output:
If this fails recheck your cluster-specific region and name and try again.
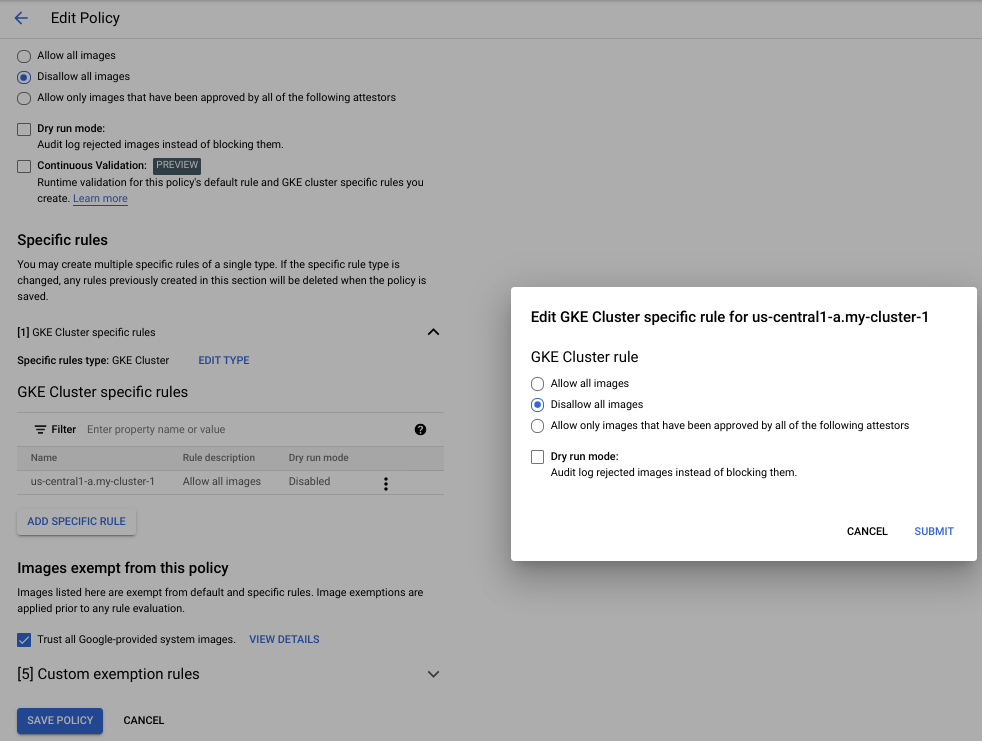
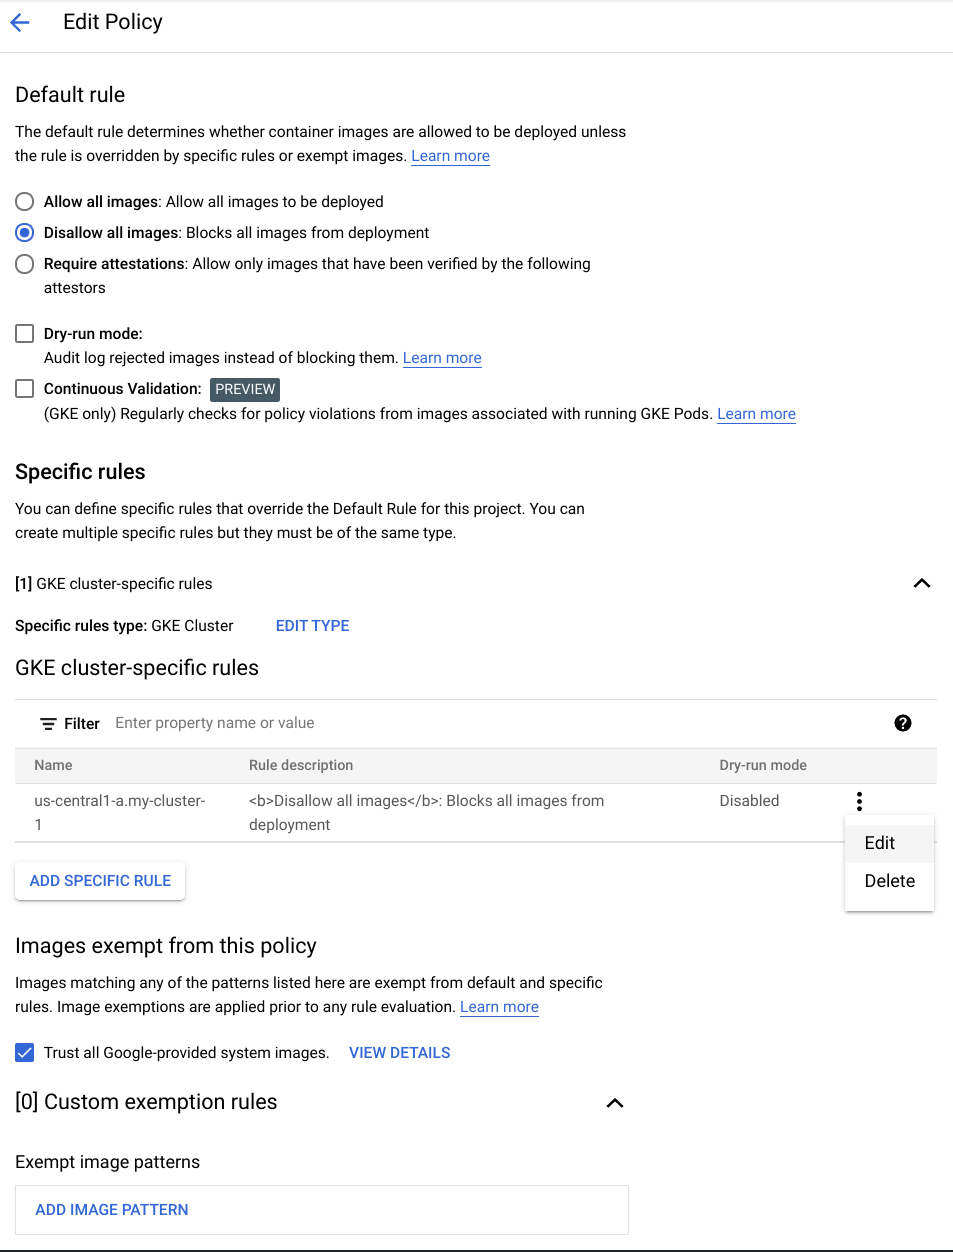
On the Binary Authorization page, click Edit Policy,
Click on the three vertical dots to the right of your GKE Cluster specific rule, and click edit.
Then, select Disallow all images, click Submit.
Your policy should look similar to the following:
Click Check my progress to verify your performed task. If you have successfully updated Binary Authorization Policy to Disallow all images rule at cluster level, you will see an assessment score.
nginx pod:This time, though, you should receive a message from the API server indicating that the policy prevented this pod from being successfully run:
To be able to see when any and all images are blocked by the Binary Authorization Policy, navigate to the GKE Audit Logs in Stackdriver and filter on those error messages related to this activity.
nginx pod from running.Click Check my progress to verify your performed task. If you have successfully verified cluster admission rule, you will see an assessment score.
Let's say that you actually want to allow just that nginx container to run. The quickest step to enable this is to allowlist the registry that it comes from.
You will use the output of the following command as your image path:
Copy the image path output to your buffer.
Navigate to the Navigation menu > Security > Binary Authorization.
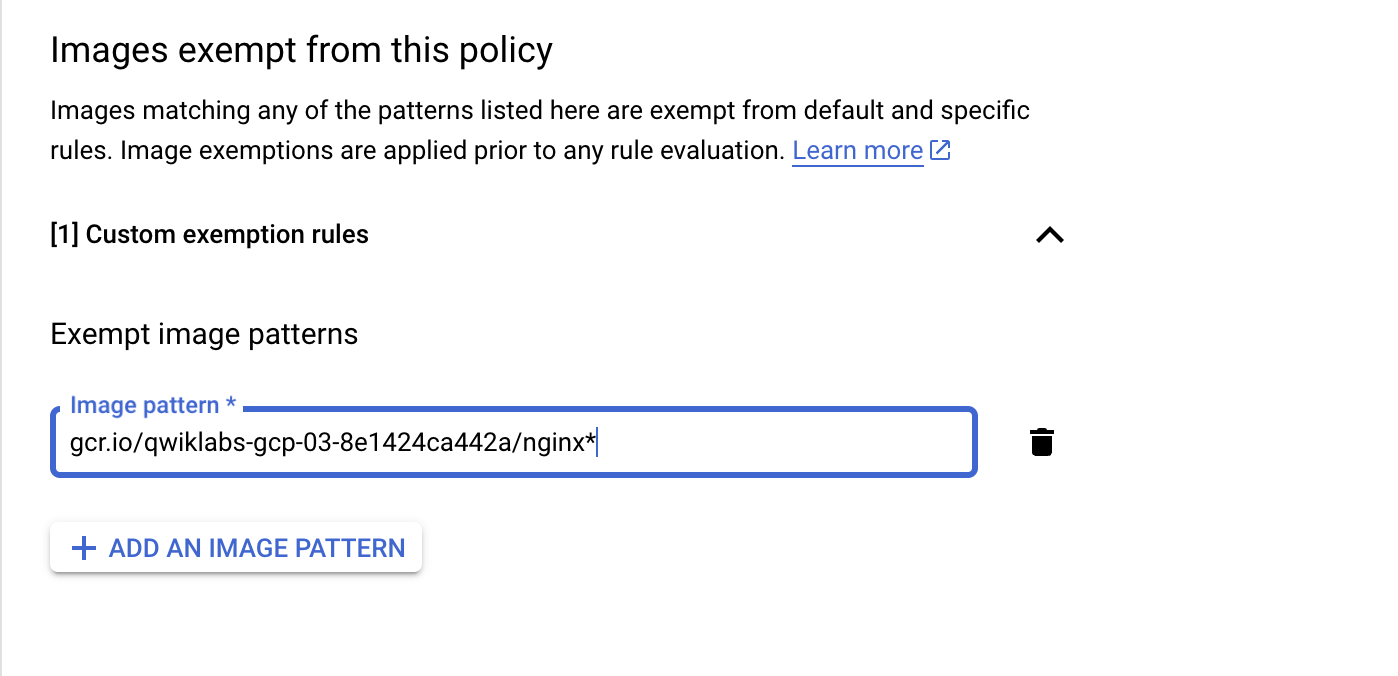
Edit the Binary Authorization Policy, under Custom exemption rules display the image paths, then click Add an Image Pattern.
Paste in the image path you copied earlier. The image below shows an example path.
You should now be able to launch this pod and prove that registry allowlisting is working correctly.
Click Check my progress to verify your performed task. If you have successfully updated Binary Authorization policy to allowlist the container registry, you will see an assessment score.
Allowlisting container image registries is a great first step in preventing undesired container images from being run inside a cluster, but there is more you can do to ensure the container was built correctly.
You want to cryptographically verify that a given container image was approved for deployment. This is done by an "attestation authority" which states or attests to the fact that a certain step was completed. The attestation authority does this by using a PGP key to sign a snippet of metadata describing the SHA256 hash of a container image and submitting it to a central metadata repository--the Container Analysis API.
Later, when the Admission Controller goes to validate if a container image is allowed to run by consulting a Binary Authorization policy that requires attestations to be present on an image, it will check to see if the Container Analysis API holds the signed snippet(s) of metadata saying which steps were completed. With that information, the Admission Controller will know whether to allow or deny that pod from running.
Next, perform a manual attestation of a container image. You will take on the role of a human attestation authority and will perform all the steps to sign a container image, create a policy to require that attestation to be present on images running inside your cluster, and then successfully run that image in a pod.
The first step is to register the attestation authority as a Container Analysis note with the Container Analysis API. To do this, you'll create an ATTESTATION note and submit it to the API.
ATTESTATION note payload:ATTESTATION note to the Container Analysis API:You should see the output from the prior command display the created note, but the following command will also list the created note:
As your attestation authority uses a PGP key to perform the cryptographic signing of the image metadata, create a new PGP key and export the public PGP key.
Press Enter to use an empty passphrase and acknowledge warnings.
Extract the public PGP key:
The next step is to create the "attestor" in the Binary Authorization API and add the public PGP key to it.
The output should look similar to the following:
The preceeding steps only need to be performed once. From this point on, this step is the only step that needs repeating for every new container image.
The nginx image at nginx:latest is already built and available for use. Perform the manual attestations on it as if it were your own image built by your own processes and save the step of having to build it.
The next step is to change the Binary Authorization policy to enforce that attestation is to be present on all images that do not match the allowlist pattern(s).
edit the GKE Cluster specific rule.Click the three dots by your cluster name to Edit your cluster-specific rules.
Require attestations (Allow only images that have been verified by all of the following attestors) instead of Disallow all images in the pop-up window.:Add Attestors followed by Add by attestor resource ID. Enter the contents of your copy/paste buffer in the format of projects/${PROJECT_ID}/attestors/${ATTESTOR}, then click Add 1 Attestor, and then click Submit, and finally click Save Policy.The default policy should still show Disallow all images, but the cluster-specific rule should be requiring attestation.
Congratulations! You have now manually attested to a container image and enforced a policy for that image inside your GKE cluster.
Click Check my progress to verify your performed task. If you have successfully updated Binary Authorization policy to modify cluster specific rule to allow only images that have been approved by attestors, you will see an assessment score.
From a user's perspective, the Binary Authorization policy may incorrectly block an image or there may be another issue with the successful operation of the admission controller webhook.
In this "emergency" case, there is a "break glass" capability that leverages a specific annotation to signal to the admission controller to run the pod and skip policy enforcement.
In this case, though, your response procedures can be started within seconds of the activity occurring. The logs are available in Stackdriver:
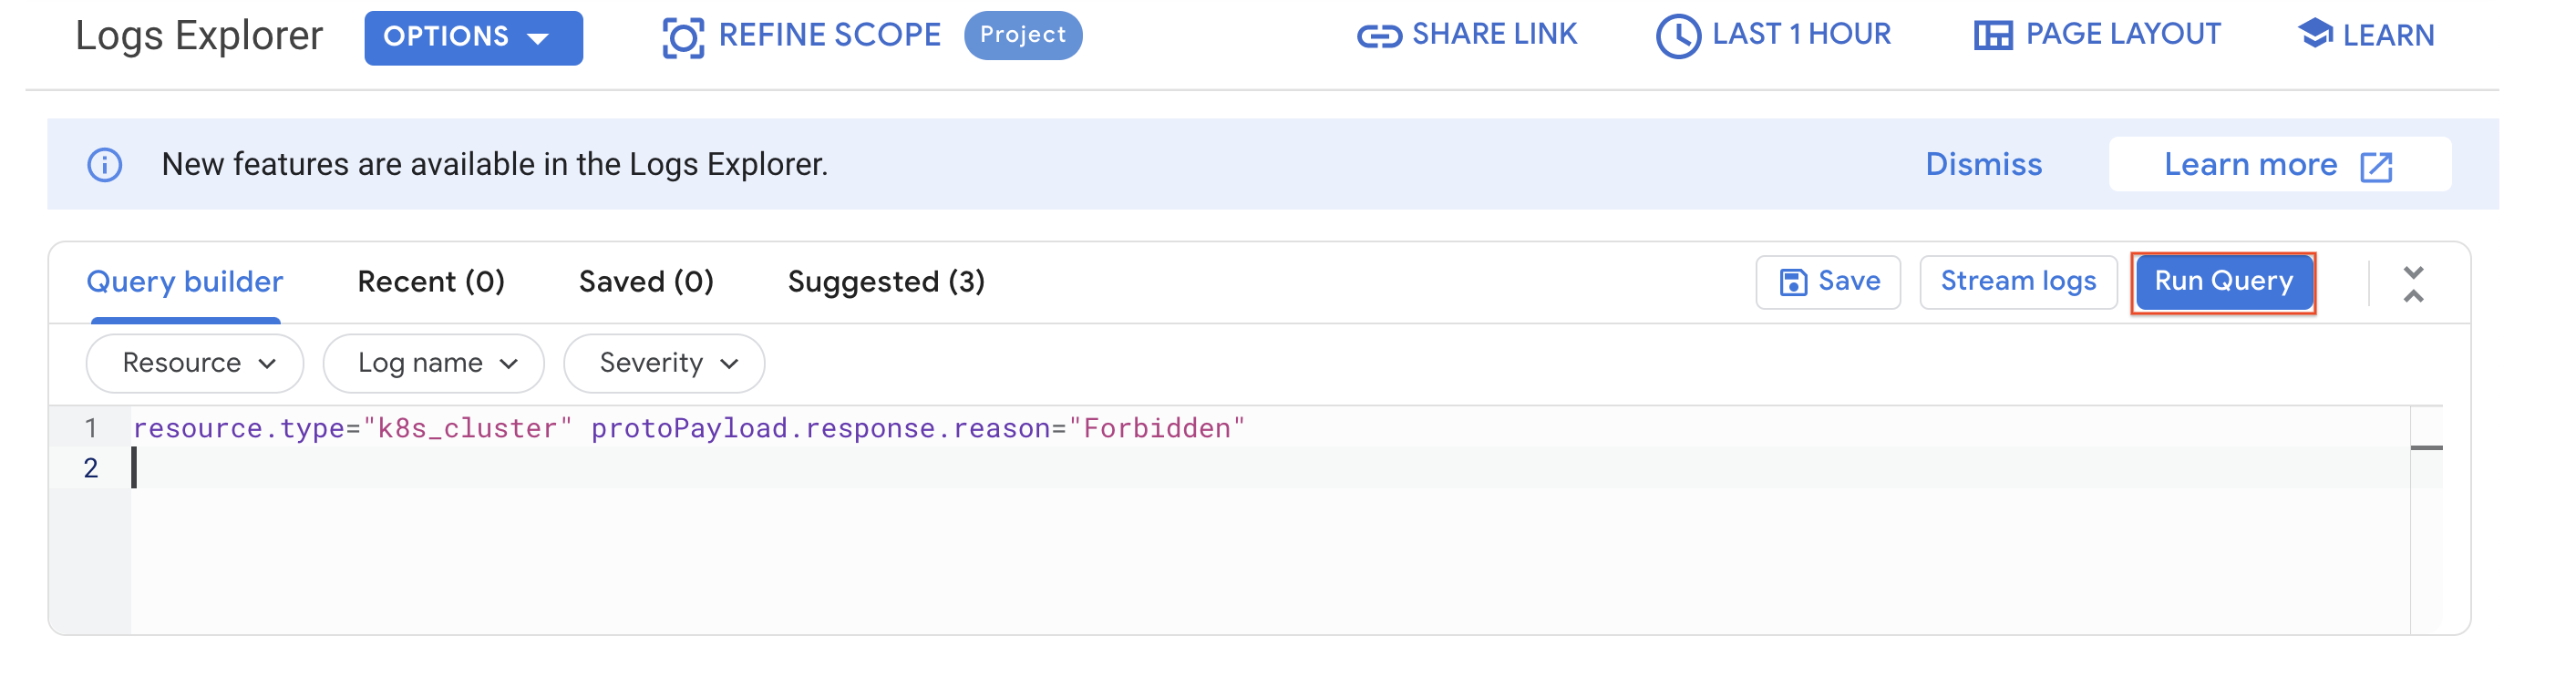
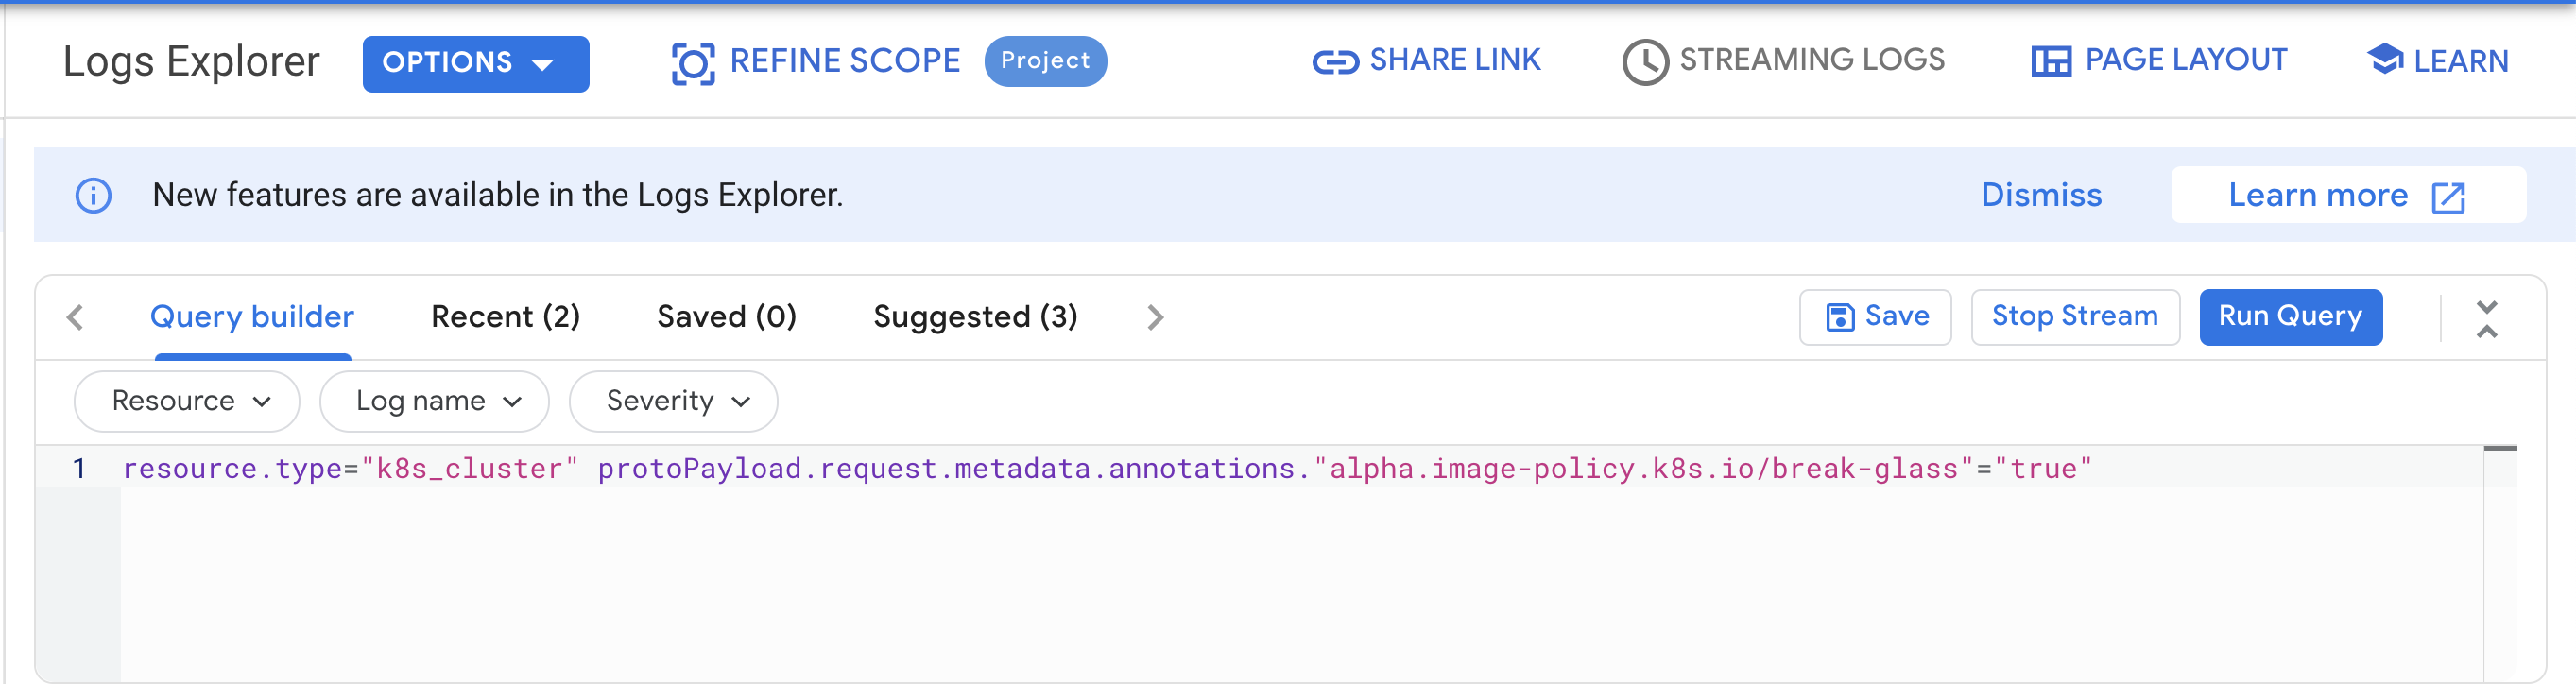
nginx container with the "break glass" annotation, run:In the Google Cloud console, navigate to the Navigation menu > Logging > Logs Explorer page.
Populate the Query builder box with below and then Click Run Query:
You should see events when the admission controller allowed a pod due to the annotation being present. From this filter, you can create a Sink which sends logs that match this filter to an external destination.
Qwiklabs will remove all resources you created for this lab, but it's good to know how to clean up your own environment.
If you created your own cluster name at the beginning of the lab, use that name. In this example the name my-cluster-1 was used.
The last lines of the output will be:
gcloud container clusters list command to track the progress if desired. Wait until cluster get removed.
Click Check my progress to verify your performed task. If you have successfully deleted your cluster, you will see an assessment score.
The following commands will remove the remaining resources.
If prompted, Do you want to continue (Y/n)? enter Y.
Delete the Attestor:
kubectl delete <podname> and resubmit the pod creation command.gcloud container clusters list command to check the cluster status.--enable-network-policy, --accelerator, --enable-tpu, or --enable-metadata-concealment, you may need to add additional registries to your Binary Authorization policy allowlist for those pods to be able to run. Use kubectl describe pod <podname> to find the registry path from the image specification and add it to the allowlist in the form of gcr.io/example-registry/* and save the policy.Manual Last Updated October 4, 2024
Lab Last Tested April 4, 2024
Copyright 2024 Google LLC. This software is provided as-is, without warranty or representation for any use or purpose. Your use of it is subject to your agreement with Google.


