Checkpoints
Create a service account and a key (SA Name: terraform)
/ 10
Grant your Service Account the Owner role on your project
/ 20
Create and configure a GCS bucket
/ 10
Run Terraform for the first time
/ 10
Add a subnet
/ 10
Allow https traffic
/ 10
Create an image from the boot disk
/ 10
Deploy the VM using Terraform
/ 20
VM Migration: Planning
- GSP616
- Overview
- Setup and requirements
- Task 1. Setting up your environment
- Task 2. Configure variables
- Task 3. Set up Google Cloud access credentials
- Task 4. Set up remote state
- Task 5. Run Terraform
- Task 6. Add a subnet
- Task 7. Allow https traffic
- Task 8. Add a Terraform output
- Task 9. Create the initial VM
- Task 10. Capture the base image
- Task 11. Update Terraform config
- Task 12. Deploy VM via Terraform
- Task 13. Update the application VM
- Task 14. Destroy the infrastructure
- Congratulations!
GSP616

Overview
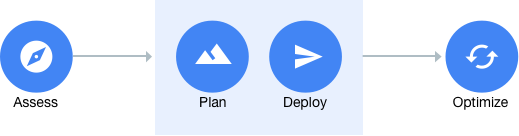
Google Cloud’s four steps for structured Cloud Migration Path Methodology provides a defined, repeatable migration path for users to follow:
-
Assess the current environment to gain a solid understanding of existing resources and define migration move groups.
-
Plan how to move your apps and create the basic cloud infrastructure for your workloads to live. This planning includes identity management, organization and project structure, networking, sorting your apps and developing a prioritized migration strategy.
-
Deploy the existing on-premise or cloud-based servers in Google Cloud leveraging one of Google Cloud’s recommended migration tools like Google’s Velostrata or CloudEndure’s Live Migration Tool
-
Optimize your newly migrated workloads to realize the true cost benefits and operational efficiencies that Google Cloud can bring to the enterprise
This lab focuses on the Plan phase and how to deploy your basic infrastructure on Google Cloud.
What you'll learn
Terraform is a popular open-source tool for defining and provisioning infrastructure (Infrastructure as Code). In this lab, you'll leverage pre-built Infrastructure as Code templates to set up a cloud network, configure access, and deploy your first application—all in a secure and automated fashion.
More specifically, you will learn how to:
- Create access credentials for automation in Google Cloud.
- Create a functional environment for using Terraform.
- Create a custom mode Virtual Private Cloud (VPC) network, with related firewall rules.
- Bake an image on Compute Engine.
- Deploy an instance onto Compute Engine using Terraform.
- Reference resources across multiple Terraform deployments.
Setup and requirements
Before you click the Start Lab button
Read these instructions. Labs are timed and you cannot pause them. The timer, which starts when you click Start Lab, shows how long Google Cloud resources will be made available to you.
This hands-on lab lets you do the lab activities yourself in a real cloud environment, not in a simulation or demo environment. It does so by giving you new, temporary credentials that you use to sign in and access Google Cloud for the duration of the lab.
To complete this lab, you need:
- Access to a standard internet browser (Chrome browser recommended).
- Time to complete the lab---remember, once you start, you cannot pause a lab.
How to start your lab and sign in to the Google Cloud console
-
Click the Start Lab button. If you need to pay for the lab, a pop-up opens for you to select your payment method. On the left is the Lab Details panel with the following:
- The Open Google Cloud console button
- Time remaining
- The temporary credentials that you must use for this lab
- Other information, if needed, to step through this lab
-
Click Open Google Cloud console (or right-click and select Open Link in Incognito Window if you are running the Chrome browser).
The lab spins up resources, and then opens another tab that shows the Sign in page.
Tip: Arrange the tabs in separate windows, side-by-side.
Note: If you see the Choose an account dialog, click Use Another Account. -
If necessary, copy the Username below and paste it into the Sign in dialog.
{{{user_0.username | "Username"}}} You can also find the Username in the Lab Details panel.
-
Click Next.
-
Copy the Password below and paste it into the Welcome dialog.
{{{user_0.password | "Password"}}} You can also find the Password in the Lab Details panel.
-
Click Next.
Important: You must use the credentials the lab provides you. Do not use your Google Cloud account credentials. Note: Using your own Google Cloud account for this lab may incur extra charges. -
Click through the subsequent pages:
- Accept the terms and conditions.
- Do not add recovery options or two-factor authentication (because this is a temporary account).
- Do not sign up for free trials.
After a few moments, the Google Cloud console opens in this tab.

Activate Cloud Shell
Cloud Shell is a virtual machine that is loaded with development tools. It offers a persistent 5GB home directory and runs on the Google Cloud. Cloud Shell provides command-line access to your Google Cloud resources.
- Click Activate Cloud Shell
at the top of the Google Cloud console.
When you are connected, you are already authenticated, and the project is set to your Project_ID,
gcloud is the command-line tool for Google Cloud. It comes pre-installed on Cloud Shell and supports tab-completion.
- (Optional) You can list the active account name with this command:
- Click Authorize.
Output:
- (Optional) You can list the project ID with this command:
Output:
gcloud, in Google Cloud, refer to the gcloud CLI overview guide.
Task 1. Setting up your environment
- Verify that Terraform is installed in the Cloud Shell environment:
Command output:
- Clone the git repo which contains the lab code by running the following command:
- Change the current directory to the networking directory:
Task 2. Configure variables
In this section, you will set variables for the Terraform configuration. Variables allow you to parameterize Terraform configurations for reuse.
If variables are not set, Terraform will prompt you to set them when it runs.
For ease of use, you can store variable values in a terraform.tfvars file which Terraform automatically loads when it runs.
- Create a
terraform.tfvarsfile in Cloud Shell:
- Open the
terraform.tfvarsfile in Code Editor:
vi and nano if you are more comfortable with it.- Paste this into your
terraform.tfvarsfile:
- Update the project ID variable to match your Qwiklabs Project ID. E.g.
<my project id>should be replaced withqwiklabs-gcp-xx-xxxxxxxxxxxx.
Task 3. Set up Google Cloud access credentials
In this section, you will create and download service account keys to use as access credentials for Google Cloud. You will also update your template files to use these access credentials.
Terraform requires access rights to your projects and/or environments in Google Cloud. Although the Terraform Google Cloud provider offers multiple ways to supply credentials, in this lab you create and download a credentials file associated with a Google Cloud service account. Using Google Cloud service-account authentication is a best practice.
Create and download default service account access credentials
- In your Cloud Shell session, run the following command to create a Service Account for running Terraform:
Command output:
- List your Service Accounts to get the email for your new Terraform account:
Command output:
- Create and download a key for using the Terraform service account, replacing
<service account email>with the Terraform email that was outputted from the previous command:
Command output:
Test completed task
Click Check my progress to verify your performed task. If you have successfully created a service account and a key, you will see an assessment score.
- Grant your Service Account the Owner role on your project by running the following command, replacing
<my project id>with your Qwiklabs Project ID and<service account email>with your terraform service account email:
Test completed task
Click Check my progress to verify your performed task. If you have successfully granted an owner role to your service account on the project, you will see an assessment score.
Task 4. Set up remote state
Terraform stores a mapping between your configuration and created resources in Terraform state. By default, this state is stored in a local file but the best practice is to store it remotely on Cloud Storage.
In this section, you will create a Cloud Storage bucket to store Terraform state and update your Terraform configuration to point to this bucket.
Create and configure a Cloud Storage bucket
- Create a new bucket to store Terraform state. A Cloud Storage bucket needs to be globally unique, so be sure to prefix its name with your Qwiklabs Google Cloud project ID as shown in the command below:
Command output:
Test completed task
Click Check my progress to verify your performed task. If you have successfully created a Cloud Storage bucket, you will see an assessment score.
- Open the backend config stored in
backend.tf:
- Update the bucket name to match your choice and save the file:
Task 5. Run Terraform
Now that you have configured credentials and remote state, you are ready to run Terraform. When using Terraform, you will generally follow these steps to deploy and clean up an environment, as outlined in the following image.

Run Terraform for the first time
- First, initialize Terraform to download the latest version of the Google and Random providers. Run the following command in Cloud Shell to do so:
- If you run this command and receive an error regarding your Cloud Storage bucket not existing, make sure you have the correct name in backend.tf. Then, run the commands below:
This will clean your local Terraform state and produce a successful initialization.
- Run a plan step to validate the configuration syntax and show a preview of what will be created:
The plan output shows Terraform is going to create 8 resources for your network.
- Now execute Terraform apply to apply those changes:
You will see output like this:
- Enter yes to the prompt. After the apply has finished, you should see an output similar to the following:
- Once you have applied the changes, you can display the list of resources in the Terraform state with the show command:
Test completed task
Click Check my progress to verify your performed task. If you have successfully run Terraform for the first time, you will see an assessment score.
Task 6. Add a subnet
The repo you downloaded includes a module defining your network and subnets. You will add an additional subnet to host migrated VMs.
Create an additional network
- Open the network config stored in
network.tf. The network config in this file is managed via the network module:
- Add an additional subnet in the
subnetsblock of the file (on line 40). You can choose your own name and CIDR range, such as10.10.30.0/24.
- You also need to add a section defining the secondary ranges for your subnet (line 49), which can be an empty list:
- Now execute Terraform apply to add your new subnet:
Error waiting to create Subnetwork, Re-run the above command
You will see output like this:
- Enter yes to the prompt. After the apply has finished, you should see an output similar to the following.
Test completed task
Click Check my progress to verify your performed task. If you have successfully applied changes to add a subnet using Terraform script, you will see an assessment score.
Task 7. Allow https traffic
The lab includes code for managing firewall rules in Terraform. You can extend this to add additional firewall rules for inbound or outbound traffic.
- Open the firewall config stored in
firewall.tf:
- Edit the
allow-httprule to also allow https traffic on port 443 (line 51):
- Now execute Terraform apply to update the firewall rule:
You will see output like this:
- Enter yes to the prompt. After the apply has finished, you should see an output similar to the following.
Test completed task
Click Check my progress to verify your performed task. If you have successfully applied changes to update a firewall rule using Terraform script, you will see an assessment score.
Task 8. Add a Terraform output
Terraform outputs can be used to capture the most important and useful information for your environment, both for human and machine consumption. This might include key IP addresses, instance names, or other information.
In this section, you will add an output to share the ID of your new subnet.
- Open the network config stored in
outputs.tf:
- Add a section which outputs the name of your new subnet, based on the existing outputs. Note that the subnets are zero-indexed:
- Now execute Terraform apply to update the firewall rule:
-
Enter yes when prompted to enter a value.
-
View the outputs using the Terraform output command:
Command output:
Task 9. Create the initial VM
You will extend the work you completed earlier by creating a VM and deploying it onto your network. You will also learn how to create a base image and dynamically layer configuration information for VMs.
To build an image, you should start by launching a VM where you will install the software which you want to be included in your image.
Launch the initial VM
- Launch a VM using
gcloudon your first subnetwork:
- SSH into the VM:
Command output:
-
Enter Y and then when asked for a passphrase press ENTER twice.
-
Install Apache on the VM:
- Exit the ssh session:
Task 10. Capture the base image
Now that you have a machine running the software you need, you can capture it as a base image to spin up additional identical virtual machines.
Create image
- Stop the VM. It is always best practice to stop VMs before capturing images if possible:
- Create an image from the boot disk:
By including the family parameter, we tied our image to a family. This allows us to easily get information or deploy the latest image from that family.
- Use gcloud to get info on the latest
my-apache-webserverimage:
Test completed task
Click Check my progress to verify your performed task. If you have successfully created an image from the boot disk, you will see an assessment score.
Task 11. Update Terraform config
Now that we have an image to work from, we would like to deploy it via Terraform. However, it is a best practice to separate Terraform configurations into logical units and VM instances into application-layer concerns.
So, we will switch to a new application-specific Terraform config and make updates there—leaving our networking Terraform alone.
Set up application Terraform config
- Switch to the application lab directory in your Cloud Shell:
- Copy the credentials and variables files over from your networking configuration:
- Update the backend configuration for your application Terraform code by editing
backend.tf:
- You should also update the Terraform remote state data source. Terraform remote state is very useful for sharing information/outputs across multiple projects—for example, for a central networking team to share subnet information with application teams. Make sure to update the bucket setting here to match the same bucket you used before:
Task 12. Deploy VM via Terraform
Terraform can now be pointed at our baked image to launch an instance. Before launching the instance, let's investigate the details of this Terraform config.
Review VM config
- The Terraform configuration for your VM is stored in vm.tf:
- Because we tagged our image to an image family, we can grab the latest image from that family via Terraform. If needed, update this data source to match the image family name you chose:
- We're also able to use a reference to choose the subnet name to deploy on. The
data.terraform_remote_state.network.my_subnet_namedeclaration automatically grabs themy_subnet_nameoutput from the networking config you created earlier:
- Assuming everything looks good in this configuration, you can apply the Terraform to deploy the VM:
- Enter yes when prompted to enter a value.
This will output the external IP of your VM.
- Open the http://<your ip> address in your web browser to see a welcome message.
Test completed task
Click Check my progress to verify your performed task. If you have successfully deployed VM insatnce using Terraform, you will see an assessment score.
Task 13. Update the application VM
Thanks to defining the VM configuration via Terraform, you can declaratively change the application's configuration merely by tweaking your Terraform config.
- Open your vm.tf file:
- Change the
metadata_startup_scriptto have a new welcome message:
- Run Terraform to recreate your VM with the new config:
- Enter yes when prompted to enter a value.
You should receive a similar output:
- After the VM is fully recreated, open the http://<your ip> address in your web browser to see the new welcome message.
terraform apply again.Task 14. Destroy the infrastructure
Terraform configuration also allows you to easily tear down infrastructure after you're done using it. This can be particularly helpful for temporary development or testing infrastructure.
Update VM config
- Destroy the VM infrastructure via Terraform:
This will prompt you to confirm you want to destroy the VM.
- Enter yes when prompted to enter a value.
Once you confirm, Terraform will begin to tear down your infrastructure.
- Feel free to destroy the networking infrastructure as well. It will be automatically destroyed when your lab expires.
Congratulations!
This concluded the self-paced lab, Datacenter Migration: Automated Foundations & Deployments. In this lab, you completed the entire workflow for automating the deployment of your networking resources in Google Cloud. You set up access credentials, set up Terraform, created resources including a VPC network, subnet, and firewall rules, modified the existing resources, carefully verified the capabilities of those resources, and then outputted them.
You also learned how to create an initial VM, capture a base image, update Terraform configurations, and deploy the VM via Terraform.
Finish your quest
This self-paced lab is part of the VM Migration quest. A quest is a series of related labs that form a learning path. Completing this quest earns you a badge to recognize your achievement. You can make your badge or badges public and link to them in your online resume or social media account. Enroll in this quest and get immediate completion credit. Refer to the Google Cloud Skills Boost catalog for all available quests.
Take your next lab
Continue your quest with Migrate for Anthos: Qwik Start, or check out a different Google Cloud Skills Boost lab, for example VM Migration: Introduction to StratoZone Assessments.
Next steps / Learn more
If you would like to learn more, you can explore additional resources to manage via Terraform using these resources:
Google Cloud training and certification
...helps you make the most of Google Cloud technologies. Our classes include technical skills and best practices to help you get up to speed quickly and continue your learning journey. We offer fundamental to advanced level training, with on-demand, live, and virtual options to suit your busy schedule. Certifications help you validate and prove your skill and expertise in Google Cloud technologies.
Manual Last Updated December 08, 2023
Lab Last Tested December 08, 2023
Copyright 2024 Google LLC All rights reserved. Google and the Google logo are trademarks of Google LLC. All other company and product names may be trademarks of the respective companies with which they are associated.