Checkpoints
Assign roles to service account
/ 10
Set up Service Accounts
/ 20
Set up a new ONTAP Storage Environment
/ 30
Access the Volume
/ 40
Getting Started with NetApp BlueXP & Cloud Volumes ONTAP for Google Cloud
This lab was developed with our partner, NetApp. Your personal information may be shared with NetApp, the lab sponsor, if you have opted-in to receive product updates, announcements, and offers in your Account Profile.
GSP770

Overview
In this lab, you will learn about NetApp BlueXP and how to deploy NetApp Cloud Volumes ONTAP for Google Cloud on top of Compute Engine, Persistent Disk, and Cloud Storage. You will get an initial practical experience in setting up Cloud Volumes ONTAP and use it as an NFS storage for your applications.
This lab is derived from the BlueXP’s documentation published by NetApp.
What you'll learn
In this lab, you will learn how to:
- Log in to the NetApp BlueXP
- Deploy a Cloud Volumes ONTAP instance
- Create a FlexVol volume
- Access FlexVol volume from a Linux VM using NFS
Setup and requirements
Before you click the Start Lab button
Read these instructions. Labs are timed and you cannot pause them. The timer, which starts when you click Start Lab, shows how long Google Cloud resources will be made available to you.
This hands-on lab lets you do the lab activities yourself in a real cloud environment, not in a simulation or demo environment. It does so by giving you new, temporary credentials that you use to sign in and access Google Cloud for the duration of the lab.
To complete this lab, you need:
- Access to a standard internet browser (Chrome browser recommended).
- Time to complete the lab---remember, once you start, you cannot pause a lab.
How to start your lab and sign in to the Google Cloud console
-
Click the Start Lab button. If you need to pay for the lab, a pop-up opens for you to select your payment method. On the left is the Lab Details panel with the following:
- The Open Google Cloud console button
- Time remaining
- The temporary credentials that you must use for this lab
- Other information, if needed, to step through this lab
-
Click Open Google Cloud console (or right-click and select Open Link in Incognito Window if you are running the Chrome browser).
The lab spins up resources, and then opens another tab that shows the Sign in page.
Tip: Arrange the tabs in separate windows, side-by-side.
Note: If you see the Choose an account dialog, click Use Another Account. -
If necessary, copy the Username below and paste it into the Sign in dialog.
{{{user_0.username | "Username"}}} You can also find the Username in the Lab Details panel.
-
Click Next.
-
Copy the Password below and paste it into the Welcome dialog.
{{{user_0.password | "Password"}}} You can also find the Password in the Lab Details panel.
-
Click Next.
Important: You must use the credentials the lab provides you. Do not use your Google Cloud account credentials. Note: Using your own Google Cloud account for this lab may incur extra charges. -
Click through the subsequent pages:
- Accept the terms and conditions.
- Do not add recovery options or two-factor authentication (because this is a temporary account).
- Do not sign up for free trials.
After a few moments, the Google Cloud console opens in this tab.

Activate Cloud Shell
Cloud Shell is a virtual machine that is loaded with development tools. It offers a persistent 5GB home directory and runs on the Google Cloud. Cloud Shell provides command-line access to your Google Cloud resources.
- Click Activate Cloud Shell
at the top of the Google Cloud console.
When you are connected, you are already authenticated, and the project is set to your Project_ID,
gcloud is the command-line tool for Google Cloud. It comes pre-installed on Cloud Shell and supports tab-completion.
- (Optional) You can list the active account name with this command:
- Click Authorize.
Output:
- (Optional) You can list the project ID with this command:
Output:
gcloud, in Google Cloud, refer to the gcloud CLI overview guide.
Task 1. Set up Service Accounts
- Run the following commands in the cloud shell to set some environment variables:
- Next, run the following commands to assign roles to the pre-created
netapp-cloud-managerservice account:
Click Check my progress to verify that you've performed the above task.
- Lastly, create the
netapp-cvoservice account and assign it the relevant roles:
Click Check my progress to verify that you've performed the above task.
Task 2. Set up a new ONTAP storage environment
In this section, you will log in to NetApp BlueXP, NetApp’s data lifecycle management platform, and create a new Cloud Volumes ONTAP storage environment on Google Cloud infrastructure.
-
From the Navigation Menu, go to Compute Engine > VM instances. You should see the
cloudmanagerVM already deployed for you. -
Click the External IP to connect to the VM in a new window. Use
http://<IP Address>/
-
Note: If you are unable to see External IP then, click on
cloudmanagerVM and scroll down, you can find the external IP under Network interfaces. - Note: If Chrome gives you a privacy error, you can still continue by clicking Advanced, then Proceed.
Once you are on the BlueXP SaaS setup page, you can set up your NetApp Account.
- First click Sign Up, then enter in your email address and a password. Fill out the rest of the fields to authenticate yourself with NetApp’s Cloud Central and click Sign Up to log in to BlueXP.
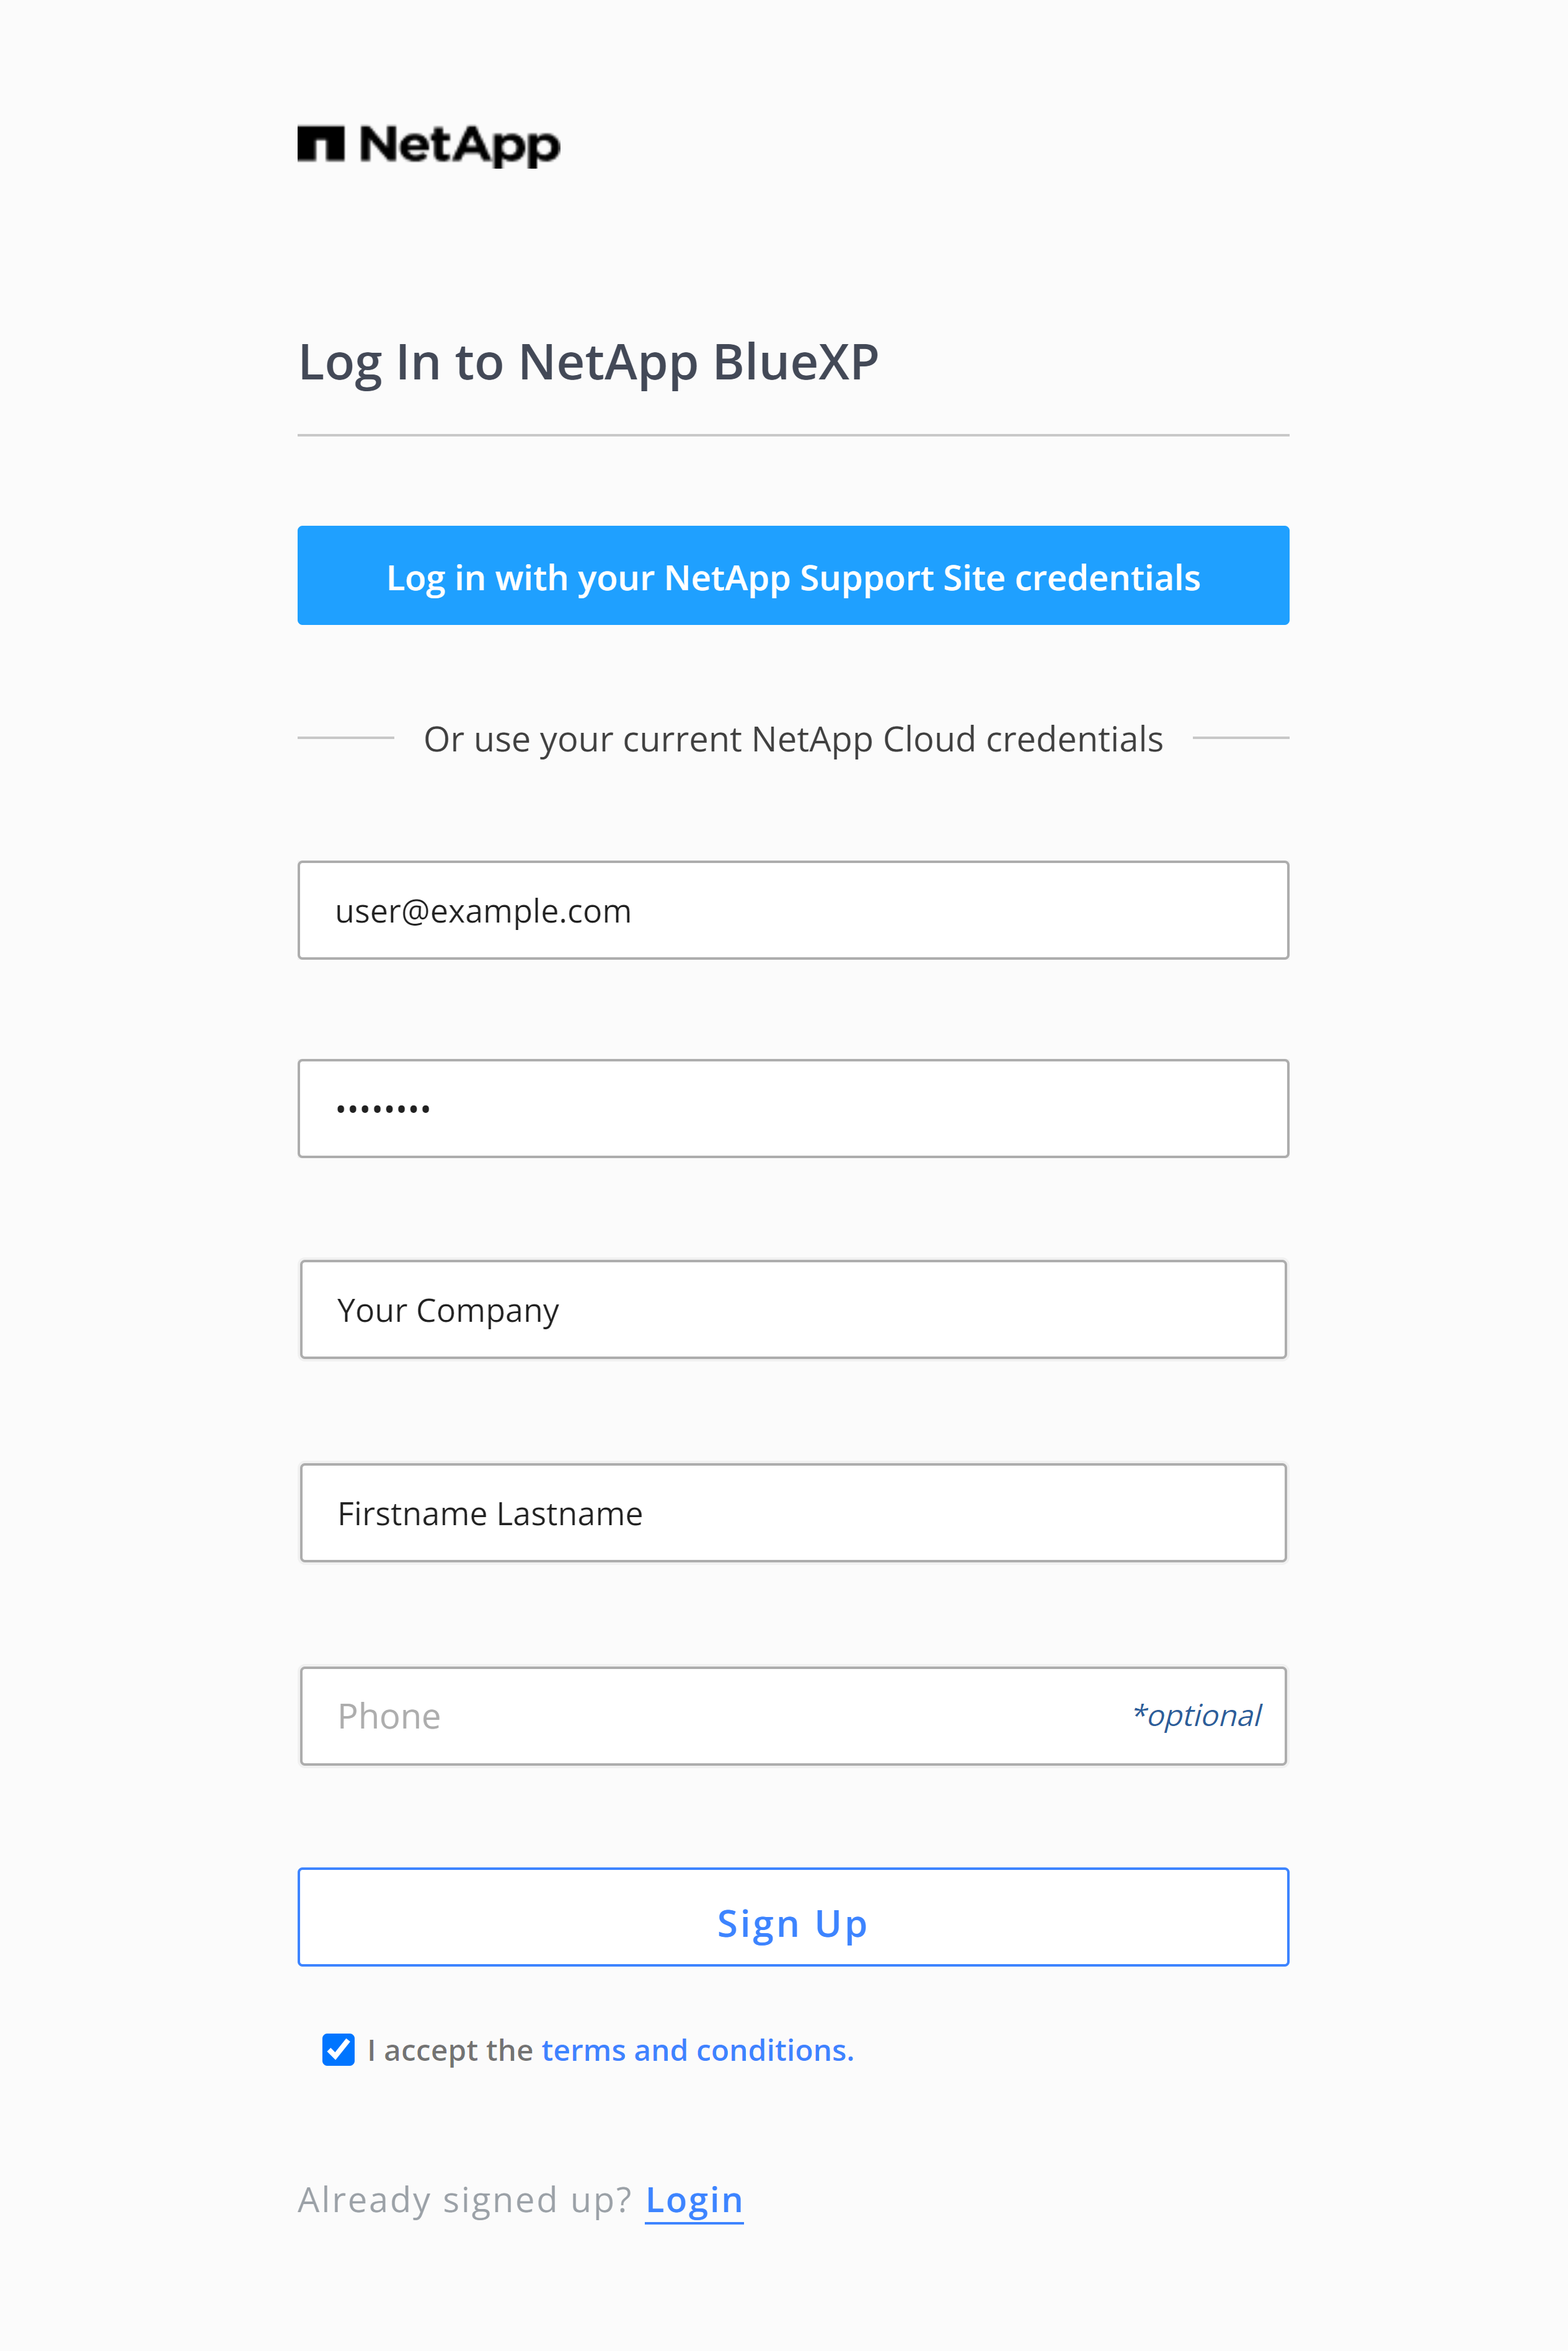
- Next, you will be prompted to create an Account Name and a BlueXP name. For these, you can just use
user. Click Let's Start. Click on Lets go to BlueXP.
Welcome to NetApp BlueXP, click Continue.-
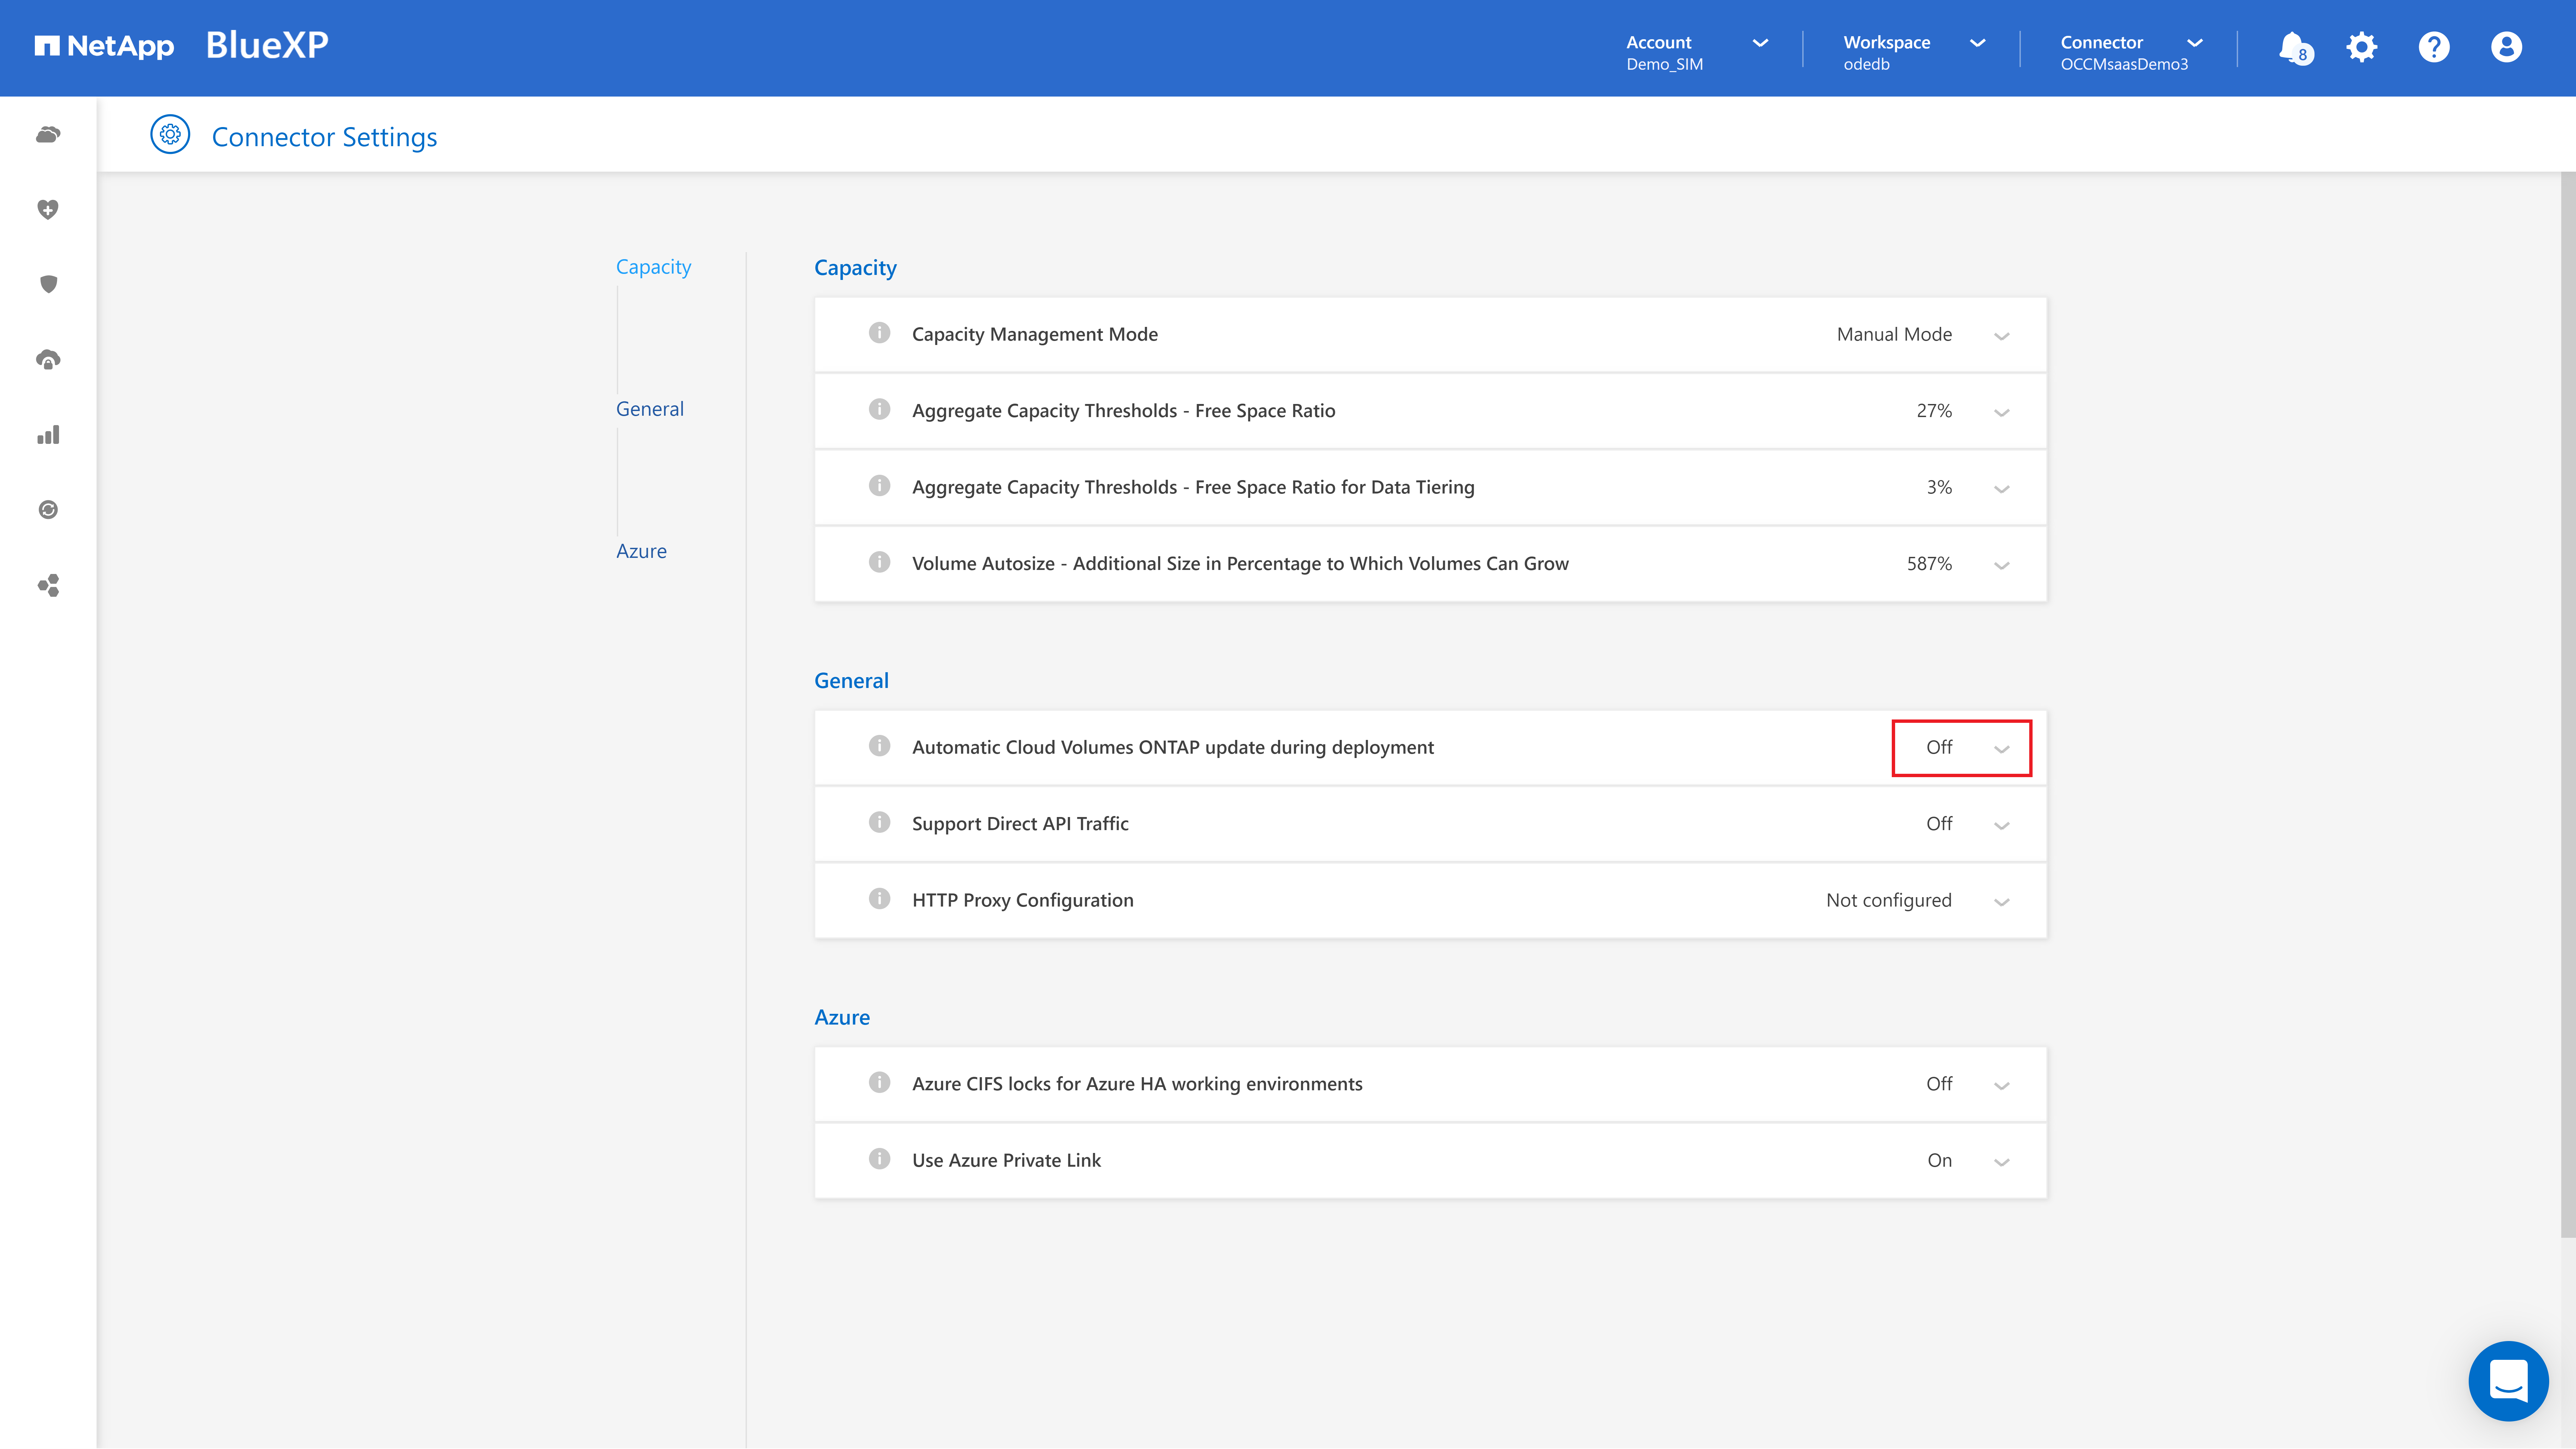
Before you add a working environment, navigate to the gear icon on the top-right of the page then click Connector Settings.
-
For Automatic Cloud Volumes ONTAP update during deployment, click the box and then uncheck the
Automatically update Cloud Volumes ONTAPbox to turn the updates off. -
Click Save. Your configuration settings should resemble the following:
- Click BlueXP on the top left to navigate to the home page, then click Add Working Environment.
-
Choose a Location: select Google Cloud Platform.
-
Choose Type: For Cloud Volumes ONTAP, click on Add New.
-
Specify a cluster name, optionally add labels, and then specify a new password for the default admin account.
-
Click Continue.
netapp-cvo has been pre-created for you with the Storage Admin role.
-
For Data Sense & Compliance, leave the default configuration and click Continue.
-
Location & Connectivity: For the Google Cloud Region and Google Cloud Zone, use
us-central1andus-central1-a, respectively. For VPC, select the value from the dropdown. For the Subnet, and Firewall Policy, leave as default. Select the checkbox to confirm network connectivity to Google Cloud storage for data tiering, and click Continue. -
Cloud Volumes ONTAP Charging Methods & NSS Account: Select Freemium (Up to 500 GiB) and click on Continue.
-
Preconfigured Packages: click Change Configuration.
-
On the Licensing section, first click Change version and select
ONTAP-9.7P5 versionfrom the drop down. -
Click Apply. Next, from the Machine Type dropdown list select
n1-highmem-4. -
Click Continue.
-
Underlying Storage Resources: Choose
Standardand for the GCP Disk Size select100 GB. Click Continue. -
WORM (write once, read many): keep the settings as default and click Continue.
-
Create Volume: Skip this as you will create a volume and access it in the next sections.
-
Review & Approve: Review and confirm your selections:
- Review details about the configuration.
- Click More information to review details about support and the Google Cloud resources that BlueXP will purchase.
- Select both checkboxes.
- Click Go.
Great! You’re done. Now, sit back while BlueXP deploys your Cloud Volumes ONTAP system on top of Google Cloud resources (Compute Engine and Persistent Disks + Cloud Storage). This should take around ten minutes to complete. In the meantime, you can check out the NetApp documentation for Cloud Volumes ONTAP for Google Cloud.
Click Check my progress to verify that you've performed the above task.
Task 3. Create an ONTAP volume
In this section, you will learn how to create a Cloud Volumes ONTAP volume, choose the access protocol to be used, and enable storage efficiencies and cold data tiering.
-
After your Cloud Volumes ONTAP system is deployed, on the Working Environments page, double click the new Working Environment added to enter the Volumes page.
-
Navigate to the Volumes page on the top, right side and, click on Add Volume.
-
Edit the Volume Details, Protection & Tags, Protocol section with the following information:
- Name your volume
data1 - Set size to
10(size set in GiB) - Leave Snapshot Policy with
default, and click Next. - Select
NFSas protocol - Verify Access Control is set to
Custom export policy, and click Next
- Update the Disk Type, Usage Profile & Tiering Policy with the following:
- For disk type, pick
Standard, then click Next. - Verify the Storage Efficiency is marked (to enable NetApp’s data footprint reduction technologies).
- Leave Tiering data to object storage with
defaultsettings.
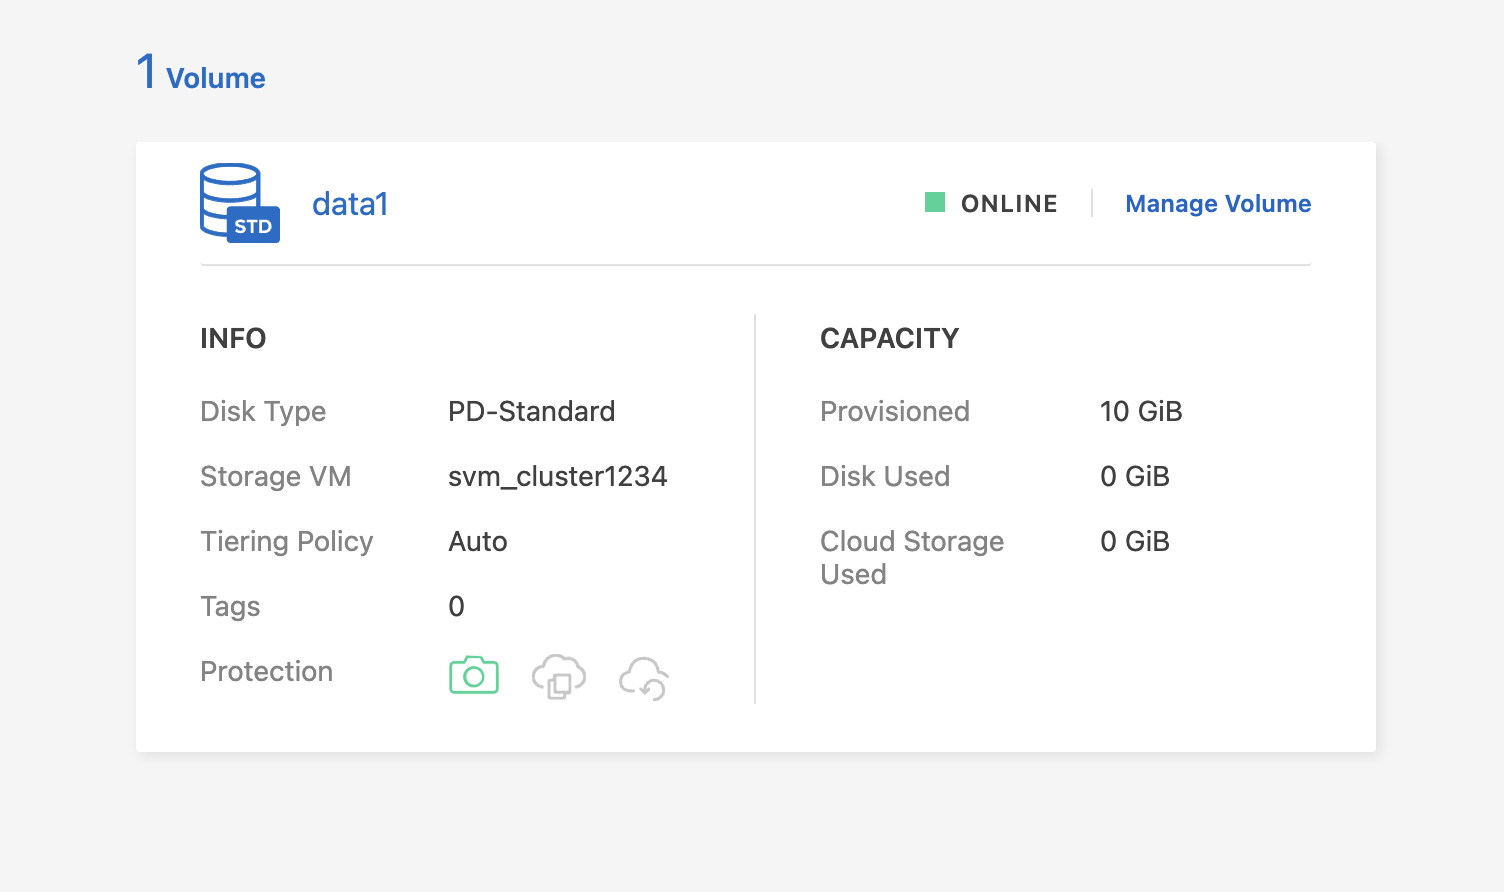
- Click Next and then click Add. Refresh the page to see the
data1volume.
Great! You have just created your first Cloud Volumes ONTAP volume to store your applications data optimized for capacity and cost, leveraging NetApp’s data footprint reduction technologies (thin provisioning, deduplication and compression) with intelligent data management - frequently accessed (hot) data remains on SSD-backed PD while infrequently accessed (cold) data is seamlessly moved to Cloud Storage.
Task 4. Access the volume
In this section, you will access the Cloud Volumes ONTAP volume created in Section 2 from a Linux VM using the NFS protocol.
-
Go back to the Cloud Console.
-
Run the following commands in Cloud Shell to reset your
PROJECT_IDenvironment variable and create a newlinux-vminstance:
-
After the VM has been deployed, navigate back to the NetApp BlueXP page and refresh the page.
-
On the Volumes page, locate the
data1volume and click on Manage volume.
-
From the list of operations revealed, click on Mount Command, and then click on Copy to copy the command to your clipboard.
-
Back in the Cloud Console, from the Navigation Menu, navigate to Compute Engine > VM instances
-
On the VM instances page, locate the
linux-vminstance and connect to it by clicking on SSH. -
In the linux VM SSH window, create a local directory under
/mntnameddata1that would serve as a mount point:
- Before mounting, use the following command to install
nfs-common:
- Next, paste the Mount Command (copied on step 5) and replace
<dest_dir>with the/mnt/data1directory created. Press Enter to mount Cloud Volumes ONTAP volume using NFS:
- Verify that your volume is properly mounted using the following native Linux command:
You should see the data1 volume mounted on /mnt/data.
Great! You have just mounted the volume created in the previous section, and it’s ready to be accessed by your applications that use NFS.
Click Check my progress to verify that you've performed the above task.
Congratulations!
In this lab, you got your first NetApp Cloud solutions skills by using BlueXP to deploy Cloud Volume ONTAP for Google Cloud on top of Google Cloud infrastructure. You have also learned how to create volumes that serve as data containers, and provide your applications with an optimized NFS storage.
Next steps / Learn more
Be sure to check out the following to receive more hands-on practice with NetApp:
- NetApp on the Google Cloud Marketplace!
- Get started with your 30-days Cloud Volumes ONTAP free trial
Google Cloud training and certification
...helps you make the most of Google Cloud technologies. Our classes include technical skills and best practices to help you get up to speed quickly and continue your learning journey. We offer fundamental to advanced level training, with on-demand, live, and virtual options to suit your busy schedule. Certifications help you validate and prove your skill and expertise in Google Cloud technologies.
Manual Last Updated April 28, 2023
Lab Last Tested April 28, 2023
Copyright 2024 Google LLC All rights reserved. Google and the Google logo are trademarks of Google LLC. All other company and product names may be trademarks of the respective companies with which they are associated.