Checkpoints
Lab Completion
/ 10
Flutter Startup Namer
- GSP886
- Overview
- Setup
- Task 1. Open the Frontend Service
- Task 2. Create the starter Flutter app
- Task 3. Explore the Flutter app
- Task 4. Run the Flutter code
- Task 5. Using an external package
- Task 6. Run the Flutter code
- Task 7. Adding a stateful widget
- Task 8. Creating an infinite scrolling ListView
- Congratulations!
GSP886

Overview
Flutter is Google's UI toolkit for building beautiful, natively compiled applications for mobile, web, and desktop from a single codebase. Flutter works with existing code, is used by developers and organizations around the world, and is free and open source.
You’ll implement a simple app that generates proposed names for a startup company. The user can select and unselect names, saving the best ones. The code lazily generates 10 names at a time. As the user scrolls, more names are generated. There is no limit to how far a user can scroll.
What you'll learn
- How to write a Flutter app that looks natural on iOS, Android, and the web
- Basic structure of a Flutter app
- Finding and using packages to extend functionality
- Using hot reload for a quicker development cycle
- How to implement a stateful widget
- How to create an infinite, lazily loaded list
Prerequisites
Based on the content, it is recommended to have some familiarity with:
- Flutter
- Dart
Setup
Before you click the Start Lab button
Read these instructions. Labs are timed and you cannot pause them. The timer, which starts when you click Start Lab, shows how long Google Cloud resources will be made available to you.
This hands-on lab lets you do the lab activities yourself in a real cloud environment, not in a simulation or demo environment. It does so by giving you new, temporary credentials that you use to sign in and access Google Cloud for the duration of the lab.
To complete this lab, you need:
- Access to a standard internet browser (Chrome browser recommended).
- Time to complete the lab---remember, once you start, you cannot pause a lab.
Task 1. Open the Frontend Service
In this lab, we will use a custom editor that includes the Flutter and Dart extensions. The lab environment is preprovisioned.
- Based on VS Code
- Supports Extensions
- Copy the
Flutter Editoraddress from the Lab Details panel.
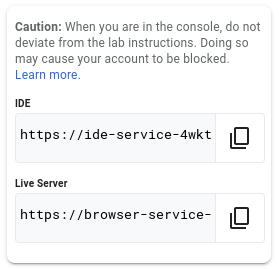
- Paste the IDE address into a Browser.
Task 2. Create the starter Flutter app
In this section create a template Flutter application for the Web. Use the in-built terminal to set up a template codebase for the web application.
- User account pre-provisioned
- Flutter and Dart extensions pre-loaded
- Clone code direct to the machine
- Select the
Application Menubutton (i.e. three horizontal lines).
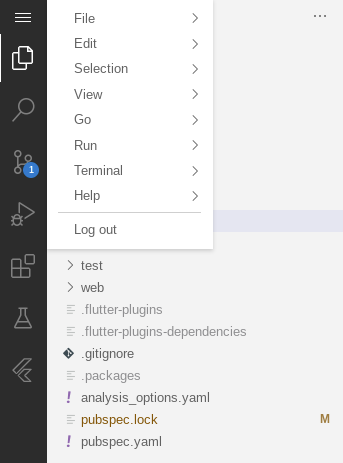
-
Use the menu option to open a new Terminal.
-
In the terminal, create a new web application:
- Change to the new application directory:
The Flutter application has now been created. In the next section explore the codebase.
Task 3. Explore the Flutter app
In this section view the template Flutter application.
- Select the
Explorerbutton (highlighted in white).
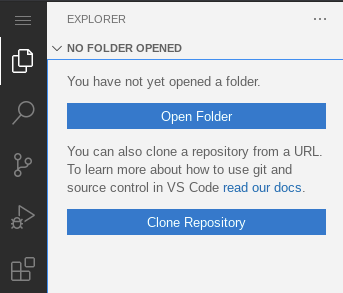
-
Select the
Open Foldermenu option. -
Use the following folder location and click Ok:
- Confirm the on screen notification(s) to update packages and editor settings.
The editor has now been updated with the code and terminal window. In the next section run the code to view the template application.
Task 4. Run the Flutter code
In this section run the Flutter Web application from the command line.
- Building a Web application
- Flutter application will be run in the browser
- Tell Flutter to use the browser on a specific port
- Note reload can take approximately 20s on the Flutter device
- Leave the web-server running during development to take advantage of hot-restart
- In the editor, open a Terminal, if not already available.
- Ensure the directory is set to
startup_namer. - Run the Flutter web server:
- The running web server should look similar to below:

- Copy the
Flutter Deviceand paste into a new Incognito Browser tab
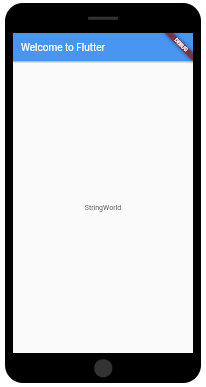
- The Flutter device will show an image similar to below:
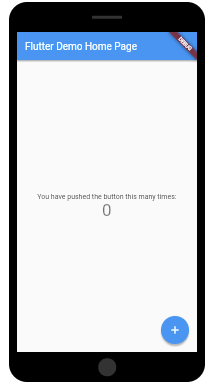
- This example creates a Material app. Material is a visual-design language that's standard on mobile and the web. Flutter offers a rich set of Material widgets.
- The main method uses arrow (=>) notation. Use arrow notation for one-line functions or methods.
- The app extends StatelessWidget, which makes the app itself a widget. In Flutter, almost everything is a widget, including alignment, padding, and layout.
- The Scaffold widget, from the Material library, provides a default app bar, a title, and a body property that holds the widget tree for the home screen. The widget subtree can be quite complex.
- A widget's main job is to provide a build method that describes how to display the widget in terms of other, lower-level widgets.
- The body for this example consists of a Center widget containing a Text child widget. The Center widget aligns its widget subtree to the center of the screen.
With the template application up and running, it is time to make some alterations to the application. In the next section learn how to integrate an external package.
Task 5. Using an external package
In this section learn how to integrate an open-source package named english_words.
The package, as well as many other open-source packages are available at pub.dev.
|
File |
Description |
|
lib/main.dart |
This file contains the main entry point and the application widget. |
|
lib/config.dart |
This file contains the environment settings. |
|
pubspec.yaml |
This file contains the package configuration for the application. |
- In the editor, open the pubspec.yaml file.
- Append the following package to dependencies:
- The dependencies section should look similar to below:
-
Open the file
lib/main.dart. -
Delete the entire codebase and replace with the following code:
In the above code, the original code has been replaced. The new application will present a new random word each time it is run. In the next section run the updated application to test the output.
Task 6. Run the Flutter code
In this section run the updated Flutter Web application from the command line.
- The running web server should look similar to below:
-
Press the
rorRkey to perform a hot restart -
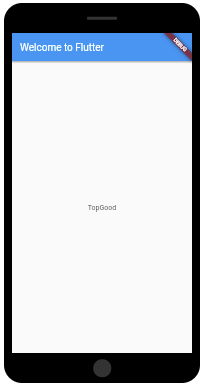
The Flutter device will show an image similar to below:
- If the app is running, hot reload can be used to update the running app. (From the command line, you can enter r to hot reload.)
- Each time you click hot reload or save the project, you should see a different word pair, chosen at random, in the running app. That's because the word pairing is generated inside the build method, which runs each time the MaterialApp requires rendering, or when toggling the Platform in the Flutter Inspector.
Having successfully made basic changes to the Flutter application, it is time for the next step. In the next section add a stateful widget.
Task 7. Adding a stateful widget
In this section, add a stateful widget, RandomWords, which creates its State class, _RandomWordsState. Then use RandomWords as a child inside the existing MyApp stateless widget.
- Stateless widgets are immutable, meaning that their properties can't change all values are final.
- Stateful widgets maintain state that might change during the lifetime of the widget.
- Implementing a stateful widget requires at least two classes. A StatefulWidget that creates an instance of a State class. The StatefulWidget object is, itself, immutable and can be thrown away and regenerated, but the State object persists over the lifetime of the widget.
- In the editor, open the
lib/main.dart. - At the bottom of the file, add the following code:
- In the
MyApp build method, delete the following line:
- Replace the
child:Text(wordPair.asPascalCase):
The MyApp build method now looks like this:
Optional: Running the application at this point, it shows two words combined.
Extending the random word generation has meant word combinations are easy to generate. In the next section, extend the application by introducing an infinite ListView.
Task 8. Creating an infinite scrolling ListView
In this section, expand _RandomWordsState to generate and display a list of word pairings.
As the user scrolls, the list (displayed in a ListView widget) grows infinitely.
A builder factory constructor in ListView enables lazily building a list view on demand.
- The ListView class provides a builder property, itemBuilder, that's a factory builder and callback function specified as an anonymous function.
- Two parameters are passed to the function the BuildContext and the row iterator, i. The iterator begins at 0 and increments each time the function is called, once for every suggested word pairing.
- This model allows the suggestion list to continue growing as the user scrolls.
- Edit
lib/main.dart. - Add the lines marked NEW to
_RandomWordsState:
- Add a new Widget to the
_RandomWordsStateclass:
- Add
_buildRowto the_RandomWordsStateclass:
At this point the class _RandomWordsState should look like below:
- Replace the
_RandomWordsStateclass build method:
- Replace the
MyAppclass build method:
- Perform a hot restart to see changes and refresh the Flutter device in the browser.
Click Check my progress to verify the objective.
Congratulations!
You have successfully completed the lab and demonstrated your knowledge of Flutter. Over the course of this lab, you have performed the following tasks:
- Installed the Flutter + Dart extensions
- Developed a simple Flutter web application
- Learned to use hot reload feature
- Tested code updates in the web device
Finish your quest
This self-paced lab is part of the Flutter Development quest. A quest is a series of related labs that form a learning path. Completing this quest earns you a badge to recognize your achievement. You can make your badge or badges public and link to them in your online resume or social media account. Enroll in this quest and get immediate completion credit. Refer to the Google Cloud Skills Boost catalog for all available quests.
Take your next lab
Continue your quest with Material Components for Flutter Basics or try out these suggestions:
Google Cloud training and certification
...helps you make the most of Google Cloud technologies. Our classes include technical skills and best practices to help you get up to speed quickly and continue your learning journey. We offer fundamental to advanced level training, with on-demand, live, and virtual options to suit your busy schedule. Certifications help you validate and prove your skill and expertise in Google Cloud technologies.
Manual Last October 14, 2022
Lab Last Tested October 13, 2021
Copyright 2024 Google LLC All rights reserved. Google and the Google logo are trademarks of Google LLC. All other company and product names may be trademarks of the respective companies with which they are associated.