Checkpoints
Create a virtual machine instance
/ 100
Compute Engine: Qwik Start - Windows
GSP093

Overview
Compute Engine lets you create and run virtual machines on Google infrastructure. Compute Engine offers scale, performance, and value that allows you to easily launch large compute clusters on Google's infrastructure.
You can run your Windows applications on Compute Engine and take advantage of many benefits available to virtual machine instances, such as reliable storage options, the speed of the Google network, and Autoscaling.
In this hands-on lab, you learn how to launch a Windows Server instance in Compute Engine and use Remote Desktop Protocol (RDP) to connect to it.
Setup and requirements
Before you click the Start Lab button
Read these instructions. Labs are timed and you cannot pause them. The timer, which starts when you click Start Lab, shows how long Google Cloud resources will be made available to you.
This hands-on lab lets you do the lab activities yourself in a real cloud environment, not in a simulation or demo environment. It does so by giving you new, temporary credentials that you use to sign in and access Google Cloud for the duration of the lab.
To complete this lab, you need:
- Access to a standard internet browser (Chrome browser recommended).
- Time to complete the lab---remember, once you start, you cannot pause a lab.
How to start your lab and sign in to the Google Cloud console
-
Click the Start Lab button. If you need to pay for the lab, a pop-up opens for you to select your payment method. On the left is the Lab Details panel with the following:
- The Open Google Cloud console button
- Time remaining
- The temporary credentials that you must use for this lab
- Other information, if needed, to step through this lab
-
Click Open Google Cloud console (or right-click and select Open Link in Incognito Window if you are running the Chrome browser).
The lab spins up resources, and then opens another tab that shows the Sign in page.
Tip: Arrange the tabs in separate windows, side-by-side.
Note: If you see the Choose an account dialog, click Use Another Account. -
If necessary, copy the Username below and paste it into the Sign in dialog.
{{{user_0.username | "Username"}}} You can also find the Username in the Lab Details panel.
-
Click Next.
-
Copy the Password below and paste it into the Welcome dialog.
{{{user_0.password | "Password"}}} You can also find the Password in the Lab Details panel.
-
Click Next.
Important: You must use the credentials the lab provides you. Do not use your Google Cloud account credentials. Note: Using your own Google Cloud account for this lab may incur extra charges. -
Click through the subsequent pages:
- Accept the terms and conditions.
- Do not add recovery options or two-factor authentication (because this is a temporary account).
- Do not sign up for free trials.
After a few moments, the Google Cloud console opens in this tab.

Activate Cloud Shell
Cloud Shell is a virtual machine that is loaded with development tools. It offers a persistent 5GB home directory and runs on the Google Cloud. Cloud Shell provides command-line access to your Google Cloud resources.
- Click Activate Cloud Shell
at the top of the Google Cloud console.
When you are connected, you are already authenticated, and the project is set to your Project_ID,
gcloud is the command-line tool for Google Cloud. It comes pre-installed on Cloud Shell and supports tab-completion.
- (Optional) You can list the active account name with this command:
- Click Authorize.
Output:
- (Optional) You can list the project ID with this command:
Output:
gcloud, in Google Cloud, refer to the gcloud CLI overview guide.
Create a virtual machine instance
-
In the Cloud Console, on the Navigation menu (
), click Compute Engine > VM instances, and then click Create Instance.
-
Select:
- region:
- zone:
- region:
-
In the Machine configuration section, for Series select E2.
-
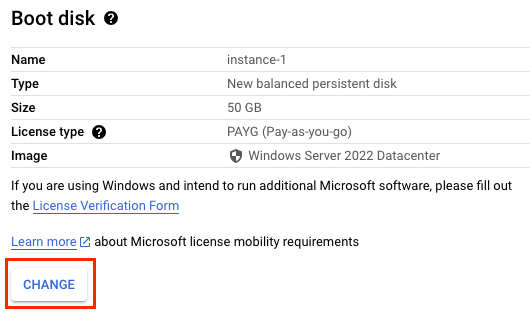
In the Boot disk section, click Change to begin configuring your boot disk.
-
Under Operating system select Windows Server and under Version select Windows Server 2022 Datacenter, and then click Select. Leave all other settings as their defaults.
- Click Create to create the instance.
Test completed task
Click Check my progress to verify your performed task.
Remote Desktop (RDP) into the Windows Server
Test the status of Windows Startup
After a short time, the Windows Server instance will be provisioned and listed on the VM Instances page with a green status icon
The server instance may not be ready to accept RDP connections, as it takes a while for all OS components to initialize.
- To see whether the server instance is ready for an RDP connection, run the following command at your Cloud Shell terminal command line:
- If prompted, type N and press ENTER.
Repeat the command until you see the following in the command output, which tells you that the OS components have initialized and the Windows Server is ready to accept your RDP connection.
RDP into the Windows Server
- To set a password for logging into the RDP, run the following command in Cloud Shell. Be sure you replace
[instance]with the VM Instance that you created,[zone]that you defined earlier and set[username]as admin.
-
If asked
Would you like to set or reset the password for [admin] (Y/n)?, enter Y. Record the password for use in later steps to connect. -
Connect to your server. There are different ways to connect to your server through RDP, depending on whether you are on Windows or not:
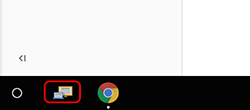
- If you are using a Chromebook or other machine at a Google Cloud event there is likely an RDP app already installed on the computer. Click the icon as below, if it is present, in the lower left corner of the screen and enter the external IP of your VM.
- If you are not on Windows but using Chrome, you can connect to your server through RDP directly from the browser using the Spark View extension. Click on Add to Chrome. Then, click Launch app.
-
Once launched, the Spark View (RDP) window opens. Use your Windows username admin and password you previously recorded in Step 2.
-
Add your VM instance's External IP as your Domain. Click Connect to confirm you want to connect.
If you are on a Macintosh, there are several freely accessible RDP Client packages available to install, such as CoRD. After installing, connect as above to the External IP address of the Windows server. Once it has connected, it will open up a login page where you can specify Windows username admin and password from the output of above mentioned command to log in (ignore the Domain: field).
Once logged in, you should see the Windows desktop!
Copy and paste with the RDP client
Once you are securely logged into your instance, you may find yourself copying and pasting commands from the lab manual.
To paste, hold the CTRL-V keys (if you are a Mac user, using CMND-V will not work.) If you are in a Powershell window, be sure that you have clicked into the window or else the paste shortcut won't work.
If you are pasting into putty, right click.
Test your understanding
The following multiple-choice questions can reinforce your understanding of this lab's concepts.
Congratulations!
You know how to create a Compute Engine virtual machine with a Windows image and can connect to it with RDP.
Next steps/Learn more
This lab is part of a series of labs called Qwik Starts. These labs are designed to give you a little taste of some experience with the many features available with Google Cloud. Search for "Qwik Starts" in the Google Cloud Skills Boost catalog to find the next lab you'd like to take!
Google Cloud training and certification
...helps you make the most of Google Cloud technologies. Our classes include technical skills and best practices to help you get up to speed quickly and continue your learning journey. We offer fundamental to advanced level training, with on-demand, live, and virtual options to suit your busy schedule. Certifications help you validate and prove your skill and expertise in Google Cloud technologies.
Manual Last Updated January 26, 2024
Lab Last Tested October 11, 2023
Copyright 2024 Google LLC All rights reserved. Google and the Google logo are trademarks of Google LLC. All other company and product names may be trademarks of the respective companies with which they are associated.