체크포인트
Configure the case study application
/ 50
Configure Identity Platform Authentication
/ 50
App Dev: Adding User Authentication to your Application - Python
GSP186

Overview
This lab shows how to add authentication to your application using Identity Platform. This authorization identifies who you are, and determines what you can do. For more information, see Authentication Overview.
Identity Platform provides a drop-in, customizable authentication service for user sign-up and sign-in. Development and admin activities are made easier with a range of app SDKs (Android, iOS, and web) as well as admin SDKs (Node.js, Java, Python, and more). For more information about Identity Platform, see Identity Platform.
The application used in this lab is an online Quiz application. You add Identity Platform authentication, and then configure authentication to use a simple email address and password credential. Finally you ensure that users must register and log in before taking a quiz.
What you'll learn
In this lab, you perform the following tasks:
- Add Identity Platform configuration to a client-side web application
- Write Python code to integrate Identity Platform Authentication into a client-side web application
Setup and requirements
Before you click the Start Lab button
Read these instructions. Labs are timed and you cannot pause them. The timer, which starts when you click Start Lab, shows how long Google Cloud resources will be made available to you.
This hands-on lab lets you do the lab activities yourself in a real cloud environment, not in a simulation or demo environment. It does so by giving you new, temporary credentials that you use to sign in and access Google Cloud for the duration of the lab.
To complete this lab, you need:
- Access to a standard internet browser (Chrome browser recommended).
- Time to complete the lab---remember, once you start, you cannot pause a lab.
How to start your lab and sign in to the Google Cloud console
-
Click the Start Lab button. If you need to pay for the lab, a pop-up opens for you to select your payment method. On the left is the Lab Details panel with the following:
- The Open Google Cloud console button
- Time remaining
- The temporary credentials that you must use for this lab
- Other information, if needed, to step through this lab
-
Click Open Google Cloud console (or right-click and select Open Link in Incognito Window if you are running the Chrome browser).
The lab spins up resources, and then opens another tab that shows the Sign in page.
Tip: Arrange the tabs in separate windows, side-by-side.
Note: If you see the Choose an account dialog, click Use Another Account. -
If necessary, copy the Username below and paste it into the Sign in dialog.
{{{user_0.username | "Username"}}} You can also find the Username in the Lab Details panel.
-
Click Next.
-
Copy the Password below and paste it into the Welcome dialog.
{{{user_0.password | "Password"}}} You can also find the Password in the Lab Details panel.
-
Click Next.
Important: You must use the credentials the lab provides you. Do not use your Google Cloud account credentials. Note: Using your own Google Cloud account for this lab may incur extra charges. -
Click through the subsequent pages:
- Accept the terms and conditions.
- Do not add recovery options or two-factor authentication (because this is a temporary account).
- Do not sign up for free trials.
After a few moments, the Google Cloud console opens in this tab.

Activate Cloud Shell
Cloud Shell is a virtual machine that is loaded with development tools. It offers a persistent 5GB home directory and runs on the Google Cloud. Cloud Shell provides command-line access to your Google Cloud resources.
- Click Activate Cloud Shell
at the top of the Google Cloud console.
When you are connected, you are already authenticated, and the project is set to your Project_ID,
gcloud is the command-line tool for Google Cloud. It comes pre-installed on Cloud Shell and supports tab-completion.
- (Optional) You can list the active account name with this command:
- Click Authorize.
Output:
- (Optional) You can list the project ID with this command:
Output:
gcloud, in Google Cloud, refer to the gcloud CLI overview guide.
Launch the Cloud Shell code editor
From Cloud Shell toolbar, move Cloud Shell to a new window by clicking the Open in new window icon 

In the Cloud Shell terminal, run the following command to configure your Project ID, replacing <YOUR-PROJECT-ID> with your lab Project ID:
Authorize Cloud Shell.
Task 1. Prepare the case study application
In this task, you clone, configure, and run the Quiz application.
Clone source code in Cloud Shell
-
Clone the application skeleton from a repository on GitHub.com:
git clone https://github.com/GoogleCloudPlatform/training-data-analyst -
Create a soft link as a shortcut to the working directory:
ln -s ~/training-data-analyst/courses/developingapps/v1.3/python/firebase ~/firebase
Configure and run the case study application
-
Navigate to the directory that contains the sample files for this lab:
cd ~/firebase/start -
Run the following command to change the region from
us-centralto your default assigned region:export REGION={{{ project_0.startup_script.app_region | REGION }}} sed -i "s/us-central/$REGION/g" prepare_environment.sh -
Configure the application:
. prepare_environment.sh This script file:
- Creates an App Engine application.
- Creates a Cloud Storage bucket named
gs:[Project-ID]-media. - Exports two environment variables:
GCLOUD_PROJECTandGCLOUD_BUCKET. - Creates a
virtualenvisolated Python environment for Python 3 and activates it. - Runs
> pip install -r requirements.txt. - Creates entities in Cloud Datastore.
- Prints out the Google Cloud Platform Project ID.
Click Check my progress to verify the objective.
-
Run the application:
python run_server.py
Start the case study application
- In Cloud Shell, click Web preview
> Preview on port 8080 to preview the Quiz application.
Leave this window open because you need the Cloud Shell Web preview domain later in this lab.
Task 2. Examine the case study application code
In this task you examine the case study application code. You can use the shell editors that are installed on Cloud Shell, such as nano or vim or the Cloud Shell code editor.
This lab uses the Cloud Shell code editor to review the Quiz application code.
Launch the Cloud Shell code editor
- From Cloud Shell, click Open Editor to launch the code editor.
Review the client application
-
Navigate to the
/firebase/startfolder using the file browser panel on the left side of the code editor. -
Continue navigating. Open
...quiz/webapp/static/client/. Click on theindex.htmlfile.This file is the single page in the AngularJS Single Page Application (SPA). It contains
<script></script>tags for the application libraries and code, and markup where the SPA will render dynamic output. -
Select the
qiq-login-template.htmlfile in the...quiz/webapp/static/client/app/auth/folder.This file contains the AngularJS template for the Login component. Notice how it contains a couple of textboxes and a button. The button has an event handler that runs code when it is clicked.
-
Still in this folder, select the
qiq-login.jsfile.This file contains an AngularJS component. It allows the user to log in to the application or to navigate to a registration page.
Task 3. Configure Identity Platform Authentication
In this task, you configure Identity Platform to sign in a user with an email and password. You then create a user which you can use to login to the Quiz Application.
Configure Identity Platform for email and password
-
In the Google Cloud Console, on the Navigation menu (
), click Identity Platform.
-
Click Enable Identity Platform.
Note: If you see the Leave site pop-up message, click Leave. The Identity Platform page appears in the Cloud Console.
-
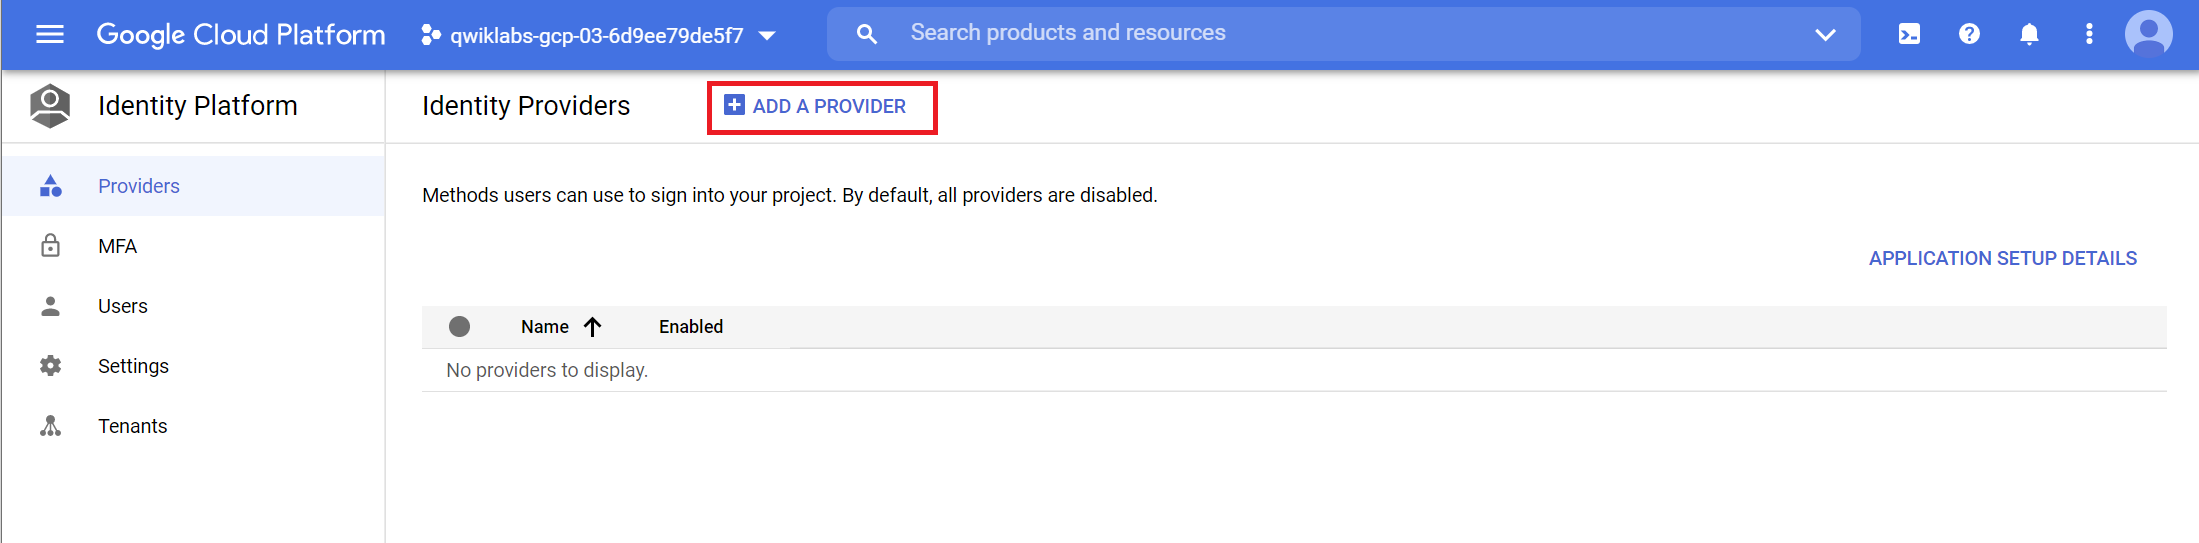
Click Add a Provider.
-
In the Sign-in method window, for Select a provider, select Email / Password.
-
Click Enabled.
-
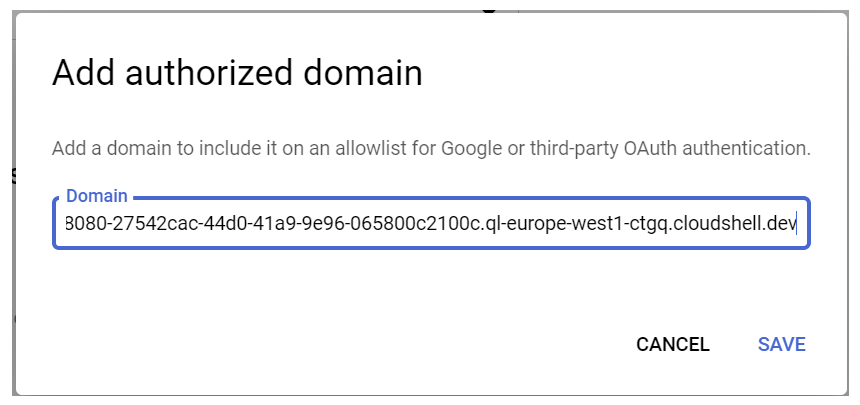
In the Authorized Domains pane, click Add Domain.
-
Return to the running Quiz Application and copy the domain which has the format below
-
Paste the domain into the Domain field.
-
Modify the pasted domain so that only the domain name is in the Domain field.
You should remove https:// and anything that follows the domain name, including slashes. The domain name should end with cloudshell.dev.
-
Click Save.
-
In the new identity provider window click Save.
You may need to scroll down to see the Save button.
Add a user
-
In the Identity Platform pane, click Users.
-
Click Add User.
-
In the Add user dialog box, specify the following:
Email
user1@example.com
Password
abc123!
-
Click Add.
Click Check my progress to verify the objective.
Task 4. Integrate a client-side web application with Identity Platform
In this task you apply your Identity Platform configuration to your client-side web application.
-
In the navigation pane, click Providers.
-
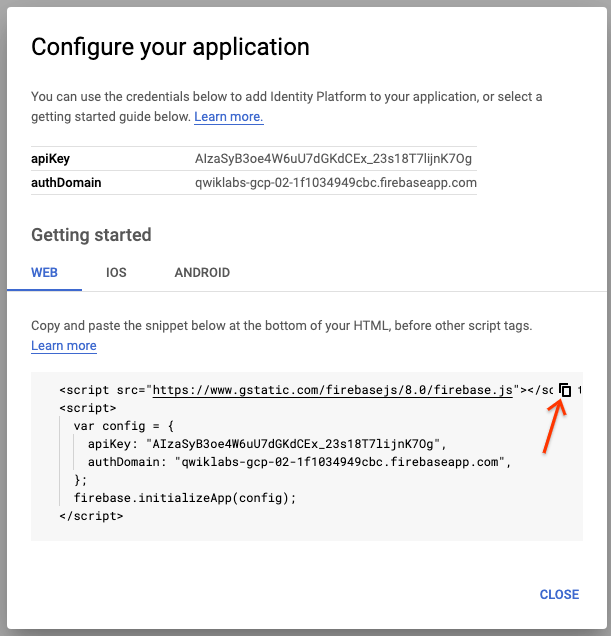
Click Application Setup Details.
-
In the Configure your application dialog box, copy the Identity Platform markup.
-
Click Close.
-
In the Cloud Shell code editor, open the
index.htmlfile in...webapp/static/client/. -
Paste the configuration markup just before the other
<script></script>tags at the bottom of the page. -
Save the
index.htmlfile.
Task 5. Run the application
In this task you verify that you can login to the Quiz Application using the credentials you created in Identity Platform in a previous step. You then register a new user in the Quiz Application and verify that these credentials are added to Identity Platform.
-
Return to the Quiz application and refresh your browser.
-
In the navigation bar, click Take Test.
-
In the navigation bar, click GCP, People, or Places.
Note: The quiz pages will be blank because you should not be able to take a test without being logged in. -
In the navigation bar, enter the following invalid credentials:
Email
user2@example.com
Password
abcd1234$
-
Click Login.
Note: Login will fail because the user is not registered. -
Enter the following credentials that you created in a previous task:
Email
user1@example.com
Password
abc123!
-
Click Login.
The user's email address should be shown in the navigation bar, and the first question will be presented.
Note: If the login does not work, the password may not have been configured correctly. Return to the Users page in Identity Platform and delete user1@example.com, and then add user1@example.com with the correct password. -
In the navigation bar, click Logout.
-
Click the Register link.
-
In the new form, enter the following credentials:
Email
user2@example.com
Password
abcd1234$
-
Click Register.
A complex password is required. If you have entered an acceptable password, you should be logged in and redirected to the GCP quiz.
You are able to answer questions and submit answers.
-
In the navigation bar, click Logout.
Note: You will be logged out and redirected to the Quiz homepage. -
In the Google Cloud Console, in the Identity Platform navigation pane, click Users.
Note: You should see user2@example.com has been added as a user.

Congratulations!
In this lab, you learned how to use Identity Platform to enable email and password registration for your application.
Finish your quest
This self-paced lab is part of the Application Development - Python quest. A quest is a series of related labs that form a learning path. Completing a quest earns you a badge to recognize your achievement. You can make your badge or badges public and link to them in your online resume or social media account. Enroll in any quest that contains this lab and get immediate completion credit. Refer to the Google Cloud Skills Boost catalog for all available quests.
Next steps / learn more
- To check out other Google Cloud features with which Firebase can be used, refer to Google Cloud operations suite documentation.
- To learn more about Deployment Manager, refer to Firebase & Google Cloud.
Manual last updated October 23, 2023
Lab last tested October 23, 2023
Copyright 2024 Google LLC All rights reserved. Google and the Google logo are trademarks of Google LLC. All other company and product names may be trademarks of the respective companies with which they are associated.