Checkpoints
Configure the Quiz application
/ 30
Create Kubernetes engine cluster
/ 20
Build Docker Images using Container Builder
/ 20
Create Kubernetes Deployment and Service Resources
/ 30
App Dev: Deploying the Application into Kubernetes Engine - Python
GSP188

Overview
Google Kubernetes Engine provides a managed environment for deploying, managing, and scaling your containerized applications using Google infrastructure. The environment Kubernetes Engine provides consists of multiple machines (specifically, Compute Engine instances) grouped together to form a cluster.
Kubernetes provides the mechanisms through which you interact with your cluster. You use Kubernetes commands and resources to deploy and manage your applications, perform administration tasks and set policies, and monitor the health of your deployed workloads.
In this lab, you deploy the Quiz application into Kubernetes Engine, leveraging Google Cloud resources, including Container Builder and Container Registry, and Kubernetes resources, such as Deployments, Pods, and Services.
What you'll learn
In this lab, you learn how to perform the following tasks:
- Create Dockerfiles to package up the Quiz application frontend and backend code for deployment.
- Harness Container Builder to produce Docker images.
- Provision a Kubernetes Engine cluster to host the Quiz application.
- Employ Kubernetes deployments to provision replicated Pods into Kubernetes Engine.
- Leverage a Kubernetes service to provision a load balancer for the quiz frontend.
Setup and requirements
Before you click the Start Lab button
Read these instructions. Labs are timed and you cannot pause them. The timer, which starts when you click Start Lab, shows how long Google Cloud resources will be made available to you.
This hands-on lab lets you do the lab activities yourself in a real cloud environment, not in a simulation or demo environment. It does so by giving you new, temporary credentials that you use to sign in and access Google Cloud for the duration of the lab.
To complete this lab, you need:
- Access to a standard internet browser (Chrome browser recommended).
- Time to complete the lab---remember, once you start, you cannot pause a lab.
How to start your lab and sign in to the Google Cloud console
-
Click the Start Lab button. If you need to pay for the lab, a pop-up opens for you to select your payment method. On the left is the Lab Details panel with the following:
- The Open Google Cloud console button
- Time remaining
- The temporary credentials that you must use for this lab
- Other information, if needed, to step through this lab
-
Click Open Google Cloud console (or right-click and select Open Link in Incognito Window if you are running the Chrome browser).
The lab spins up resources, and then opens another tab that shows the Sign in page.
Tip: Arrange the tabs in separate windows, side-by-side.
Note: If you see the Choose an account dialog, click Use Another Account. -
If necessary, copy the Username below and paste it into the Sign in dialog.
{{{user_0.username | "Username"}}} You can also find the Username in the Lab Details panel.
-
Click Next.
-
Copy the Password below and paste it into the Welcome dialog.
{{{user_0.password | "Password"}}} You can also find the Password in the Lab Details panel.
-
Click Next.
Important: You must use the credentials the lab provides you. Do not use your Google Cloud account credentials. Note: Using your own Google Cloud account for this lab may incur extra charges. -
Click through the subsequent pages:
- Accept the terms and conditions.
- Do not add recovery options or two-factor authentication (because this is a temporary account).
- Do not sign up for free trials.
After a few moments, the Google Cloud console opens in this tab.

Activate Cloud Shell
Cloud Shell is a virtual machine that is loaded with development tools. It offers a persistent 5GB home directory and runs on the Google Cloud. Cloud Shell provides command-line access to your Google Cloud resources.
- Click Activate Cloud Shell
at the top of the Google Cloud console.
When you are connected, you are already authenticated, and the project is set to your Project_ID,
gcloud is the command-line tool for Google Cloud. It comes pre-installed on Cloud Shell and supports tab-completion.
- (Optional) You can list the active account name with this command:
- Click Authorize.
Output:
- (Optional) You can list the project ID with this command:
Output:
gcloud, in Google Cloud, refer to the gcloud CLI overview guide.
Launch the Cloud Shell Code Editor
From Cloud Shell, click Open Editor to launch the code editor.

Prepare the Quiz application
In this section, you access Cloud Shell, clone the git repository containing the Quiz application, configure environment variables, and run the application.
Clone source code in Cloud Shell
Click Open Terminal and clone the repository for the lab.
Create a soft link as a shortcut to the working directory.
Configure the Quiz application
Change the directory that contains the sample files for this lab.
Configure the Quiz application.
This script file:
- Creates a Google App Engine application.
- Exports environment variables
GCLOUD_PROJECTandGCLOUD_BUCKET. - Updates pip then runs
pip install -r requirements.txt. - Creates entities in Google Cloud Datastore.
- Creates a Google Cloud Pub/Sub topic.
- Creates a Cloud Spanner Instance, Database, and Table.
- Prints out the Project ID.
The Quiz application is configured when you see the following message:
Example output message
Click Check my progress to verify the objective.
Review the code
In this section you examine the application files.
To view and edit files, you can use the shell editors that are installed in Cloud Shell, such as nano or vim or the Cloud Shell code editor. This lab uses the Cloud Shell code editor.
Examine the code
Navigate to training-data-analyst/courses/developingapps/v1.2/python/kubernetesengine/start.
The folder structure for the Quiz application reflects how it will be deployed in Kubernetes Engine.
The web application is in a folder called frontend.
The worker application code that subscribes to Cloud Pub/Sub and processes messages is in a folder called backend.
There are configuration files for Docker (a Dockerfile in the frontend and backend folder) and backend-deployment and frontend-deployment Kubernetes Engine .yaml files.
Create and connect to a Kubernetes Engine Cluster
Create a Kubernetes Engine cluster
-
In the Cloud Platform Console, click Navigation menu (
)> Kubernetes Engine > Clusters.
-
Click Create.
-
Click Switch to the Standard cluster on the top right corner. Set the following fields to the provided values, leave all others at the default value:
|
Property |
Value |
|
Name |
|
|
Zone |
|
|
default Pool > Security > Access scopes |
Select Allow full access to all Cloud APIs |
-
Click Create. The cluster takes a few minutes to provision.
Click Check my progress to verify the objective.
Create Kubernetes engine cluster
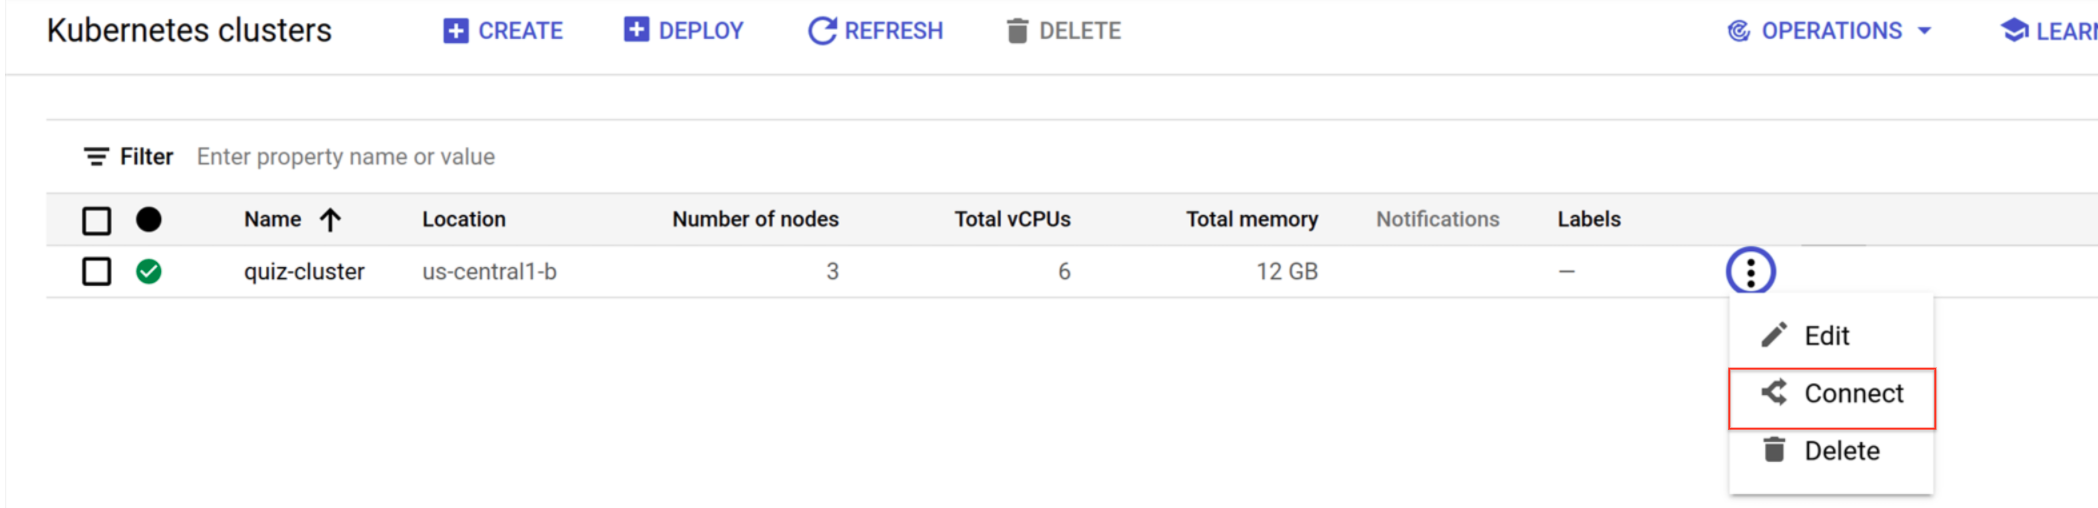
Connect to the cluster
In this section you connect the Quiz application to the kubernetes cluster.
- When the cluster is ready, click on the Actions icon and select Connect.
- In Connect to the cluster, click Run in Cloud Shell to populated Cloud shell with the command that resembles.
Press ENTER to run the command in Cloud Shell.
- Run the following command to list the pods in the cluster:
The response should be No resources found because there are no pods in the cluster. It confirms that you have configured security to allow the kubectl command-line tool to perform operations against the cluster.
Build Docker images using Container Builder
In this section, you create a Dockerfile for the application frontend and backend, and then employ Container Builder to build images and store them in the Container Registry.
Create the Dockerfile for the frontend and backend
- In the Cloud Shell code editor, open
frontend/Dockerfile. - Now add a block of code that does the following:
- Enter the Dockerfile command to initialize the creation of a custom Docker image using Google's Python App Engine image as the starting point.
- Writes the Dockerfile commands to activate a virtual environment.
- Writes the Dockerfile command to execute
pip installas part of the build process. - Writes the Dockerfile command to add the contents of the current folder to the
/apppath in the container. - Completes the
Dockerfileby entering the statement,gunicorn ..., that executes when the container runs. Gunicorn (Green Unicorn) is an HTTP server that supports the Python Web Server Gateway Interface (WSGI) specification.
Copy and paste the following to Dockerfile:
- Open the
backend/Dockerfilefile and copy and paste the following code:
Build Docker images with Container Builder
- In Cloud Shell, make sure you are in the
startfolder:
- Run the following command to build the frontend Docker image:
The files are staged into Cloud Storage, and a Docker image is built and stored in the Container Registry. It takes a few minutes.
Ignore any incompatibility messages you see in the output messages.
- Now run the following command to build the backend Docker image:
When the backend Docker image is ready you see these last messages:
-
In the Cloud Platform console, from the Navigation menu menu, click Container Registry. You should see two pods:
quiz-frontendandquiz-backend. -
Click quiz-frontend.
Click Check my progress to verify the objective.
Create Kubernetes deployment and service resources
In this section, you modify the template yaml files that contain the specification for Kubernetes Deployment and Service resources, and then create the resources in the Kubernetes Engine cluster.
Create a Kubernetes deployment file
- In the Cloud Shell Code Editor, open the
frontend-deployment.yamlfile.
- Replace the placeholders in the
frontend-deployment.yamlfile using the following values:
|
Placeholder Name |
Value |
|
|
Project ID |
|
|
Cloud Storage bucket name for the media bucket in your project |
|
|
The frontend image identified in the form |
- Save the file.
- Replace the placeholders in the
backend-deployment.yamlfile using the following values:
|
Placeholder Name |
Value |
|
|
Project ID |
|
|
Cloud Storage bucket ID for the media bucket in your project |
|
|
The backend image identified in the form |
- Save the file.
- Review the contents of the
frontend-service.yamlfile.
Execute the deployment and service Files
- In Cloud Shell, provision the quiz frontend deployment.
- Provision the quiz backend Deployment.
- Provision the quiz frontend Service.
Click Check my progress to verify the objective.
Test the Quiz Application
In this section you review the deployed Pods and Service and navigate to the Quiz application.
Review the deployed resources
- In the Cloud Console, select Navigation menu > Kubernetes Engine.
- Click Workloads in the left menu.
If the status of one or both containers is Does not have minimum availability, refresh the window.
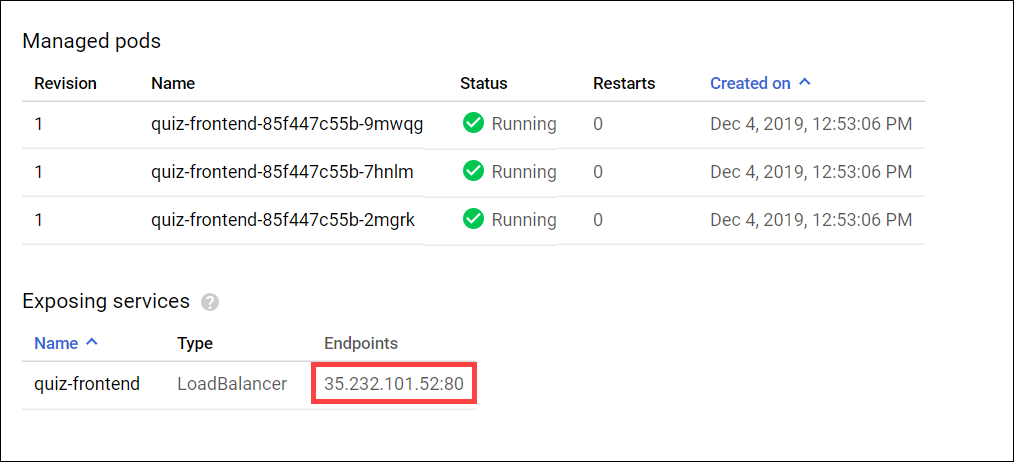
-
Click quiz-frontend. In the Managed pods section, there are three quiz-frontend pods.
-
In the Exposing services section near the bottom, find the Endpoints section and copy the IP address and paste it into the URL field of a new browser tab or window:
- This opens the Quiz application, which means you successfully deployed the application! You can end your lab here or use the remainder of the time to build some quizzes.
Congratulations!
This concludes the self-paced lab, App Dev: Deploying the Application into Kubernetes Engine - Python. You leveraged Google Cloud resources and Kubenetes resources to deploy a Quiz application.
Finish your quest
This self-paced lab is part of the Application Development - Python and Cloud Development quests. A quest is a series of related labs that form a learning path. Completing a quest earns you a badge to recognize your achievement. You can make your badge or badges public and link to them in your online resume or social media account. Enroll in any quest that contains this lab and get immediate completion credit. Refer to the Google Cloud Skills Boost catalog for all available quests.
Next steps / Learn more
Learn more about Kubernetes Engine.
Manual Last Updated November 03, 2023
Lab Last Tested November 03, 2023
Copyright 2024 Google LLC All rights reserved. Google and the Google logo are trademarks of Google LLC. All other company and product names may be trademarks of the respective companies with which they are associated.