Checkpoints
Create a custom network, subnetworks and firewall rules
/ 50
Create three instances in specified zones for Traceroute and performance testing.
/ 50
Networking 101
- GSP016
- Overview
- Setup and requirements
- Google Cloud Network Concepts
- Task 1. Review the default network
- Task 2. Creating a custom network
- Task 3. Create custom network with the console
- Task 4. Create custom network with Cloud Shell
- Task 5. Adding firewall rules
- Task 6. Connecting to your lab VMs and checking latency
- Task 7. (Optional) Traceroute and Performance testing
- Task 8. (Optional) Use iperf to test performance
- Task 9. Test your knowledge
- End your lab
- Congratulations
GSP016

Overview
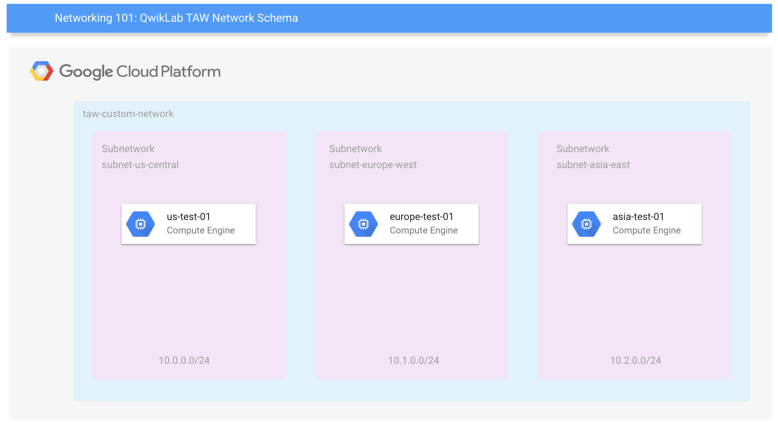
In this hands-on lab you will learn how to perform basic networking tasks on Google Cloud (including Compute Engine instances) and how Google Cloud might differ from an on-premises setup. You'll develop a network and 3 subnetworks, resulting in this end-state environment:
The lab exercises you'll do are ordered to reflect a common cloud developer experience:
- Set up your lab environment and learn how to work with your Google Cloud environment.
- Deploy a common network with subnets and multiple regions using common open source tools to explore your network around the world.
- Testing and monitoring your network and instances.
What you'll learn
- Basics concepts and constructs of Google Cloud networking.
- How default and user-created Networks are configured.
- How to measure performance & latency characteristics.
- Basic security configurations of Access, Firewall, and Routing.
Prerequisites
- Basic knowledge of Compute Engine
- Basic networking and TCP/IP knowledge
- Basic Unix/Linux command line knowledge
Setup and requirements
Before you click the Start Lab button
Read these instructions. Labs are timed and you cannot pause them. The timer, which starts when you click Start Lab, shows how long Google Cloud resources will be made available to you.
This hands-on lab lets you do the lab activities yourself in a real cloud environment, not in a simulation or demo environment. It does so by giving you new, temporary credentials that you use to sign in and access Google Cloud for the duration of the lab.
To complete this lab, you need:
- Access to a standard internet browser (Chrome browser recommended).
- Time to complete the lab---remember, once you start, you cannot pause a lab.
How to start your lab and sign in to the Google Cloud console
-
Click the Start Lab button. If you need to pay for the lab, a pop-up opens for you to select your payment method. On the left is the Lab Details panel with the following:
- The Open Google Cloud console button
- Time remaining
- The temporary credentials that you must use for this lab
- Other information, if needed, to step through this lab
-
Click Open Google Cloud console (or right-click and select Open Link in Incognito Window if you are running the Chrome browser).
The lab spins up resources, and then opens another tab that shows the Sign in page.
Tip: Arrange the tabs in separate windows, side-by-side.
Note: If you see the Choose an account dialog, click Use Another Account. -
If necessary, copy the Username below and paste it into the Sign in dialog.
{{{user_0.username | "Username"}}} You can also find the Username in the Lab Details panel.
-
Click Next.
-
Copy the Password below and paste it into the Welcome dialog.
{{{user_0.password | "Password"}}} You can also find the Password in the Lab Details panel.
-
Click Next.
Important: You must use the credentials the lab provides you. Do not use your Google Cloud account credentials. Note: Using your own Google Cloud account for this lab may incur extra charges. -
Click through the subsequent pages:
- Accept the terms and conditions.
- Do not add recovery options or two-factor authentication (because this is a temporary account).
- Do not sign up for free trials.
After a few moments, the Google Cloud console opens in this tab.

Activate Cloud Shell
Cloud Shell is a virtual machine that is loaded with development tools. It offers a persistent 5GB home directory and runs on the Google Cloud. Cloud Shell provides command-line access to your Google Cloud resources.
- Click Activate Cloud Shell
at the top of the Google Cloud console.
When you are connected, you are already authenticated, and the project is set to your Project_ID,
gcloud is the command-line tool for Google Cloud. It comes pre-installed on Cloud Shell and supports tab-completion.
- (Optional) You can list the active account name with this command:
- Click Authorize.
Output:
- (Optional) You can list the project ID with this command:
Output:
gcloud, in Google Cloud, refer to the gcloud CLI overview guide.
Understanding Regions and Zones
Certain Compute Engine resources live in regions or zones. A region is a specific geographical location where you can run your resources. Each region has one or more zones. For example, the us-central1 region denotes a region in the Central United States that has zones us-central1-a, us-central1-b, us-central1-c, and us-central1-f.
| Regions | Zones |
|---|---|
| Western US | us-west1-a, us-west1-b |
| Central US | us-central1-a, us-central1-b, us-central1-d, us-central1-f |
| Eastern US | us-east1-b, us-east1-c, us-east1-d |
| Western Europe | europe-west1-b, europe-west1-c, europe-west1-d |
| Eastern Asia | asia-east1-a, asia-east1-b, asia-east1-c |
Resources that live in a zone are referred to as zonal resources. Virtual machine Instances and persistent disks live in a zone. To attach a persistent disk to a virtual machine instance, both resources must be in the same zone. Similarly, if you want to assign a static IP address to an instance, the instance must be in the same region as the static IP.
Google Cloud Network Concepts
In Google Cloud Platform, networks provide data connections into and out of your cloud resources (mostly Compute Engine instances). Securing your Networks is critical to securing your data and controlling access to your resources.
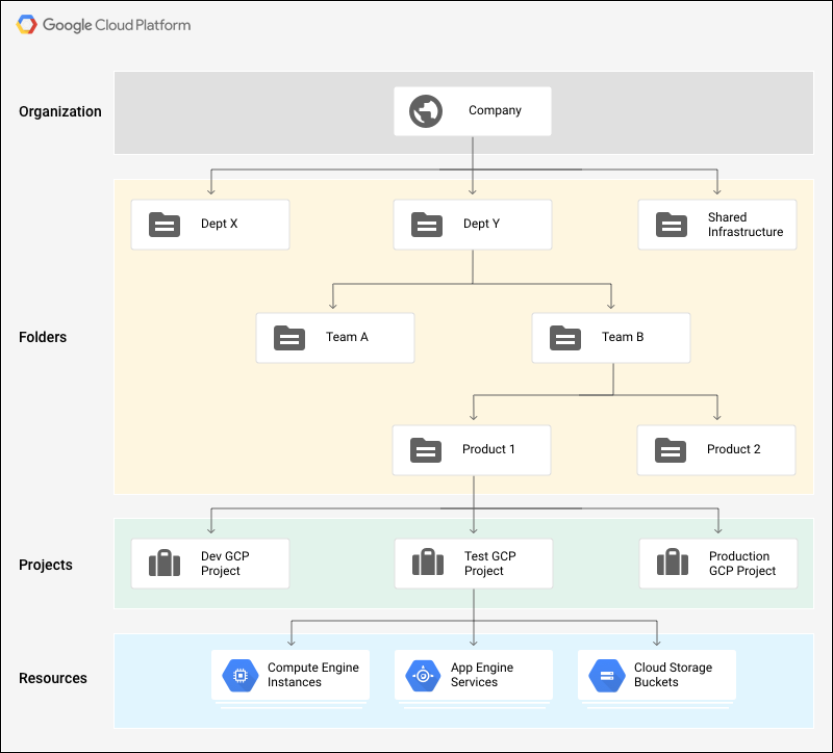
Google Cloud Platform supports Projects, Networks, and Subnetworks to provide flexible, logical isolation of unrelated resources.

Projects are the outermost container and are used to group resources that share the same trust boundary. Many developers map Projects to teams since each Project has its own access policy (IAM) and member list. Projects also serve as a collector of billing and quota details reflecting resource consumption. Projects contain Networks which contain Subnetworks, Firewall rules, and Routes (see below architecture diagrams for illustration).
Networks directly connect your resources to each other and to the outside world. Networks, using Firewalls, also house the access policies for incoming and outgoing connections. Networks can be Global (offering horizontal scalability across multiple Regions) or Regional (offering low-latency within a single Region).
Subnetworks allow you to group related resources (Compute Engine instances) into RFC1918 private address spaces. Subnetworks can only be Regional. A subnetwork can be in auto mode or custom mode.
- An auto mode network has one subnet per region, each with a predetermined IP range and gateway. These subnets are created automatically when you create the auto mode network, and each subnet has the same name as the overall network.
- A custom mode network has no subnets at creation. In order to create an instance in a custom mode network, you must first create a subnetwork in that region and specify its IP range. A custom mode network can have zero, one, or many subnets per region.
Set your region and zone
Certain Compute Engine resources live in regions and zones. A region is a specific geographical location where you can run your resources. Each region has one or more zones.
Run the following gcloud commands in Cloud Shell to set the default region and zone for your lab:
Task 1. Review the default network
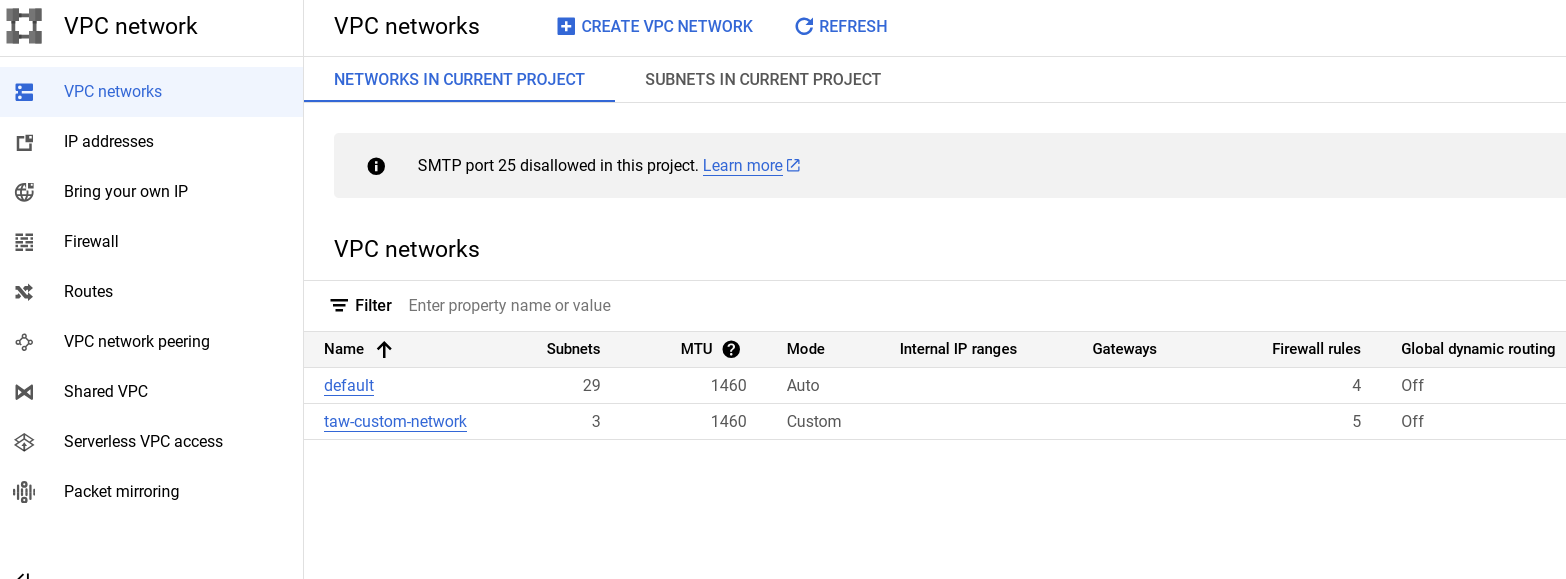
When a new project is created, a default network configuration provides each region with an auto subnet network. You can create up to four additional networks in a project. Additional networks can be auto subnet networks, custom subnet networks, or legacy networks.
Each instance created within a subnetwork is assigned an IPv4 address from that subnetwork range.
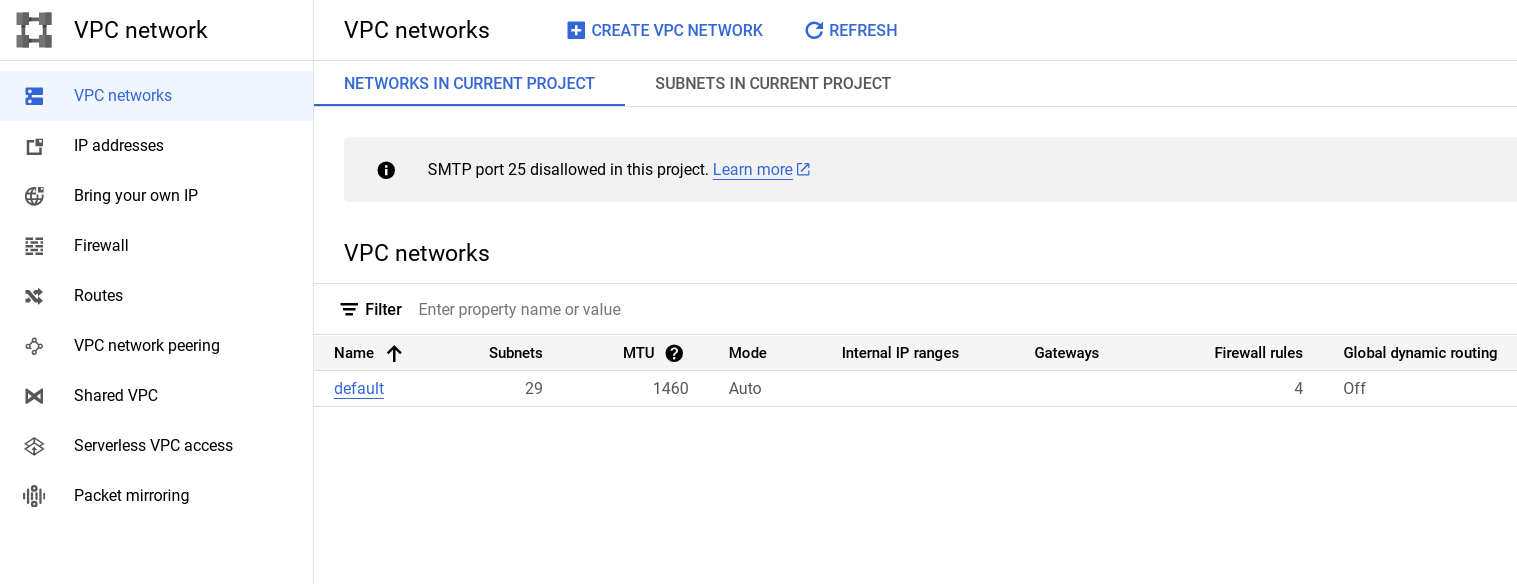
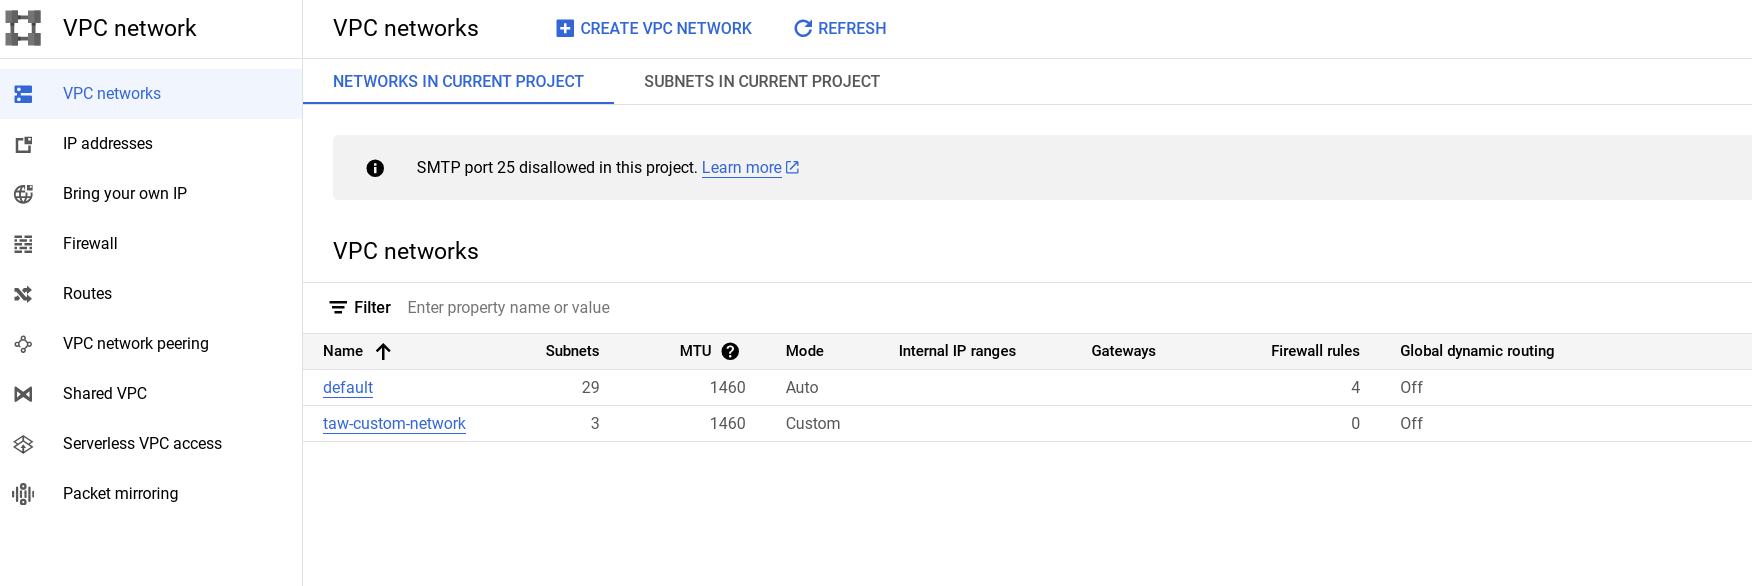
- Review your network. Click Navigation menu > VPC network.
Firewalls
for more information on how you can use firewall rules to isolate subnetworks, refer to subnetworks and firewall rules.
Each network has a default firewall that blocks all inbound traffic to instances. To allow traffic to come into an instance, you must create "allow" rules for the firewall. Additionally, the default firewall allows traffic from instances unless you configure it to block outbound connections using an "egress" firewall configuration. Therefore, by default you can create "allow" rules for traffic you wish to pass ingress, and "deny" rules for traffic you wish to restrict egress. You may also create a default-deny policy for egress and prohibit external connections entirely.
In general, it is recommended to configure the least permissive firewall rule that will support the kind of traffic you are trying to pass. For example, if you need to allow traffic to reach some instances, but restrict traffic from reaching others, create rules that allow traffic to the intended instances only. This more restrictive configuration is more predictable than a large firewall rule that allows traffic to all of the instances. If you want to have "deny" rules to override certain "allow" rules, you can set priority levels on each rule and the rule with the lowest numbered priority will be evaluated first. Creating large and complex sets of override rules can lead to allowing or blocking traffic that is not intended.
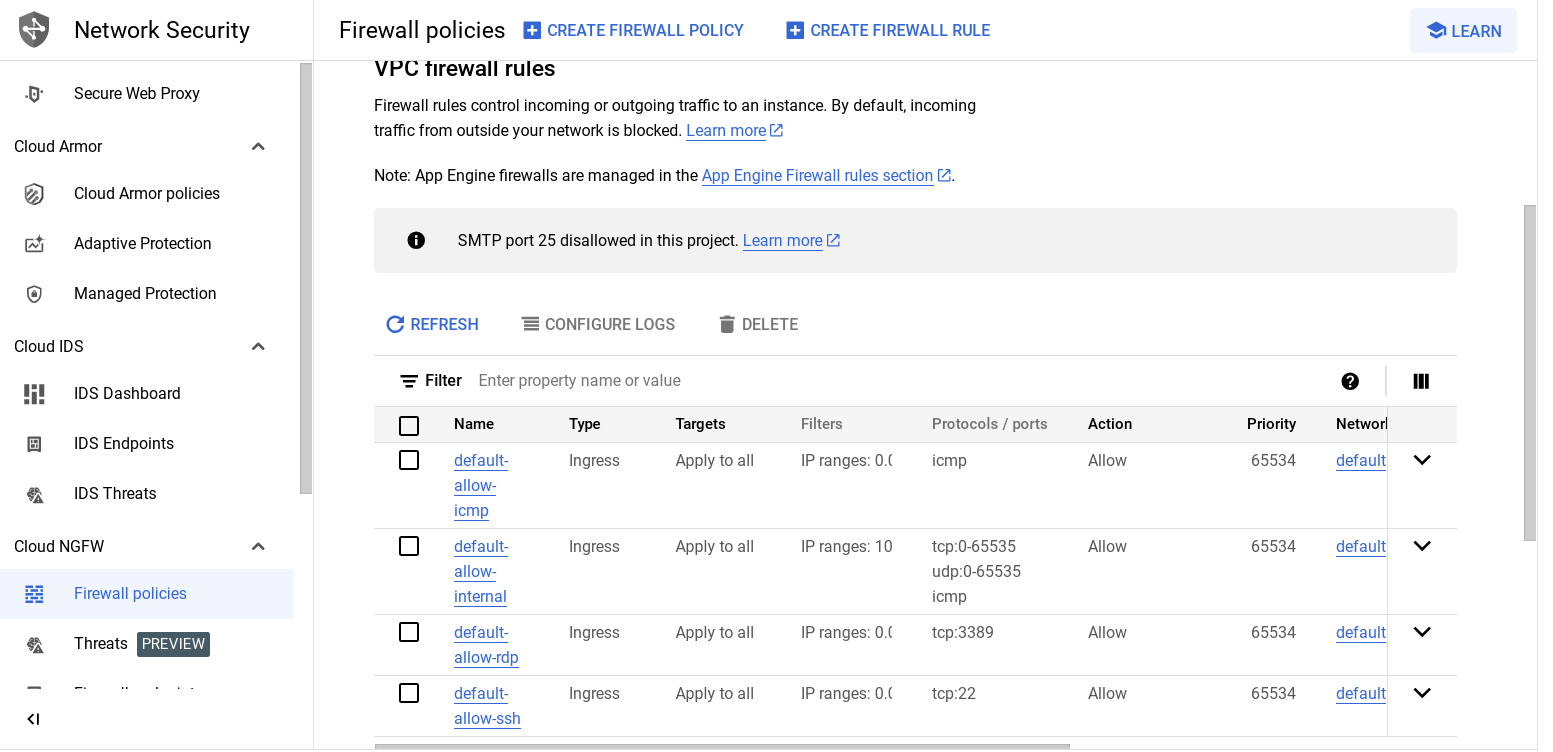
The default network has automatically created firewall rules, which are shown below. No manually created network of any type has automatically created firewall rules. For all networks except the default network, you must create any firewall rules you need.
The ingress firewall rules automatically created for the default network are as follows:
|
|
Allows network connections of any protocol and port between instances on the network. |
|
|
Allows SSH connections from any source to any instance on the network over TCP port 22. |
|
|
Allows RDP connections from any source to any instance on the network over TCP port 3389. |
|
|
Allows ICMP traffic from any source to any instance on the network. |
- To review the default Firewall rules, in the Cloud console click Navigation menu > VPC network > Firewall.
Network route
All networks have routes created automatically to the Internet (default route) and to the IP ranges in the network. The route names are automatically generated and will look different for each project.
- To review default routes, click Navigation menu > VPC network > Routes > Select Network and Region to view Routes.
Task 2. Creating a custom network
Creating a new network with custom subnet ranges
When manually assigning subnetwork ranges, you first create a custom subnet network, then create the subnetworks that you want within a region. You do not have to specify subnetworks for all regions right away, or even at all, but you cannot create instances in regions that have no subnetwork defined.
When you create a new subnetwork, its name must be unique in that project for that region, even across networks. The same name can appear twice in a project as long as each one is in a different region. Because this is a subnetwork, there is no network-level IPv4 range or gateway IP, so none will be displayed.
You can either create your custom network with the console or with Cloud Shell. You'll be shown you both, but you have to decide which method to use while taking the lab. For example, you cannot go through a section using the instructions for the console, then go through the same section using gcloud command line.
Task 3. Create custom network with the console
-
To create a custom network, click Navigation menu > VPC network.
-
Click Create VPC Network and name it
taw-custom-network. -
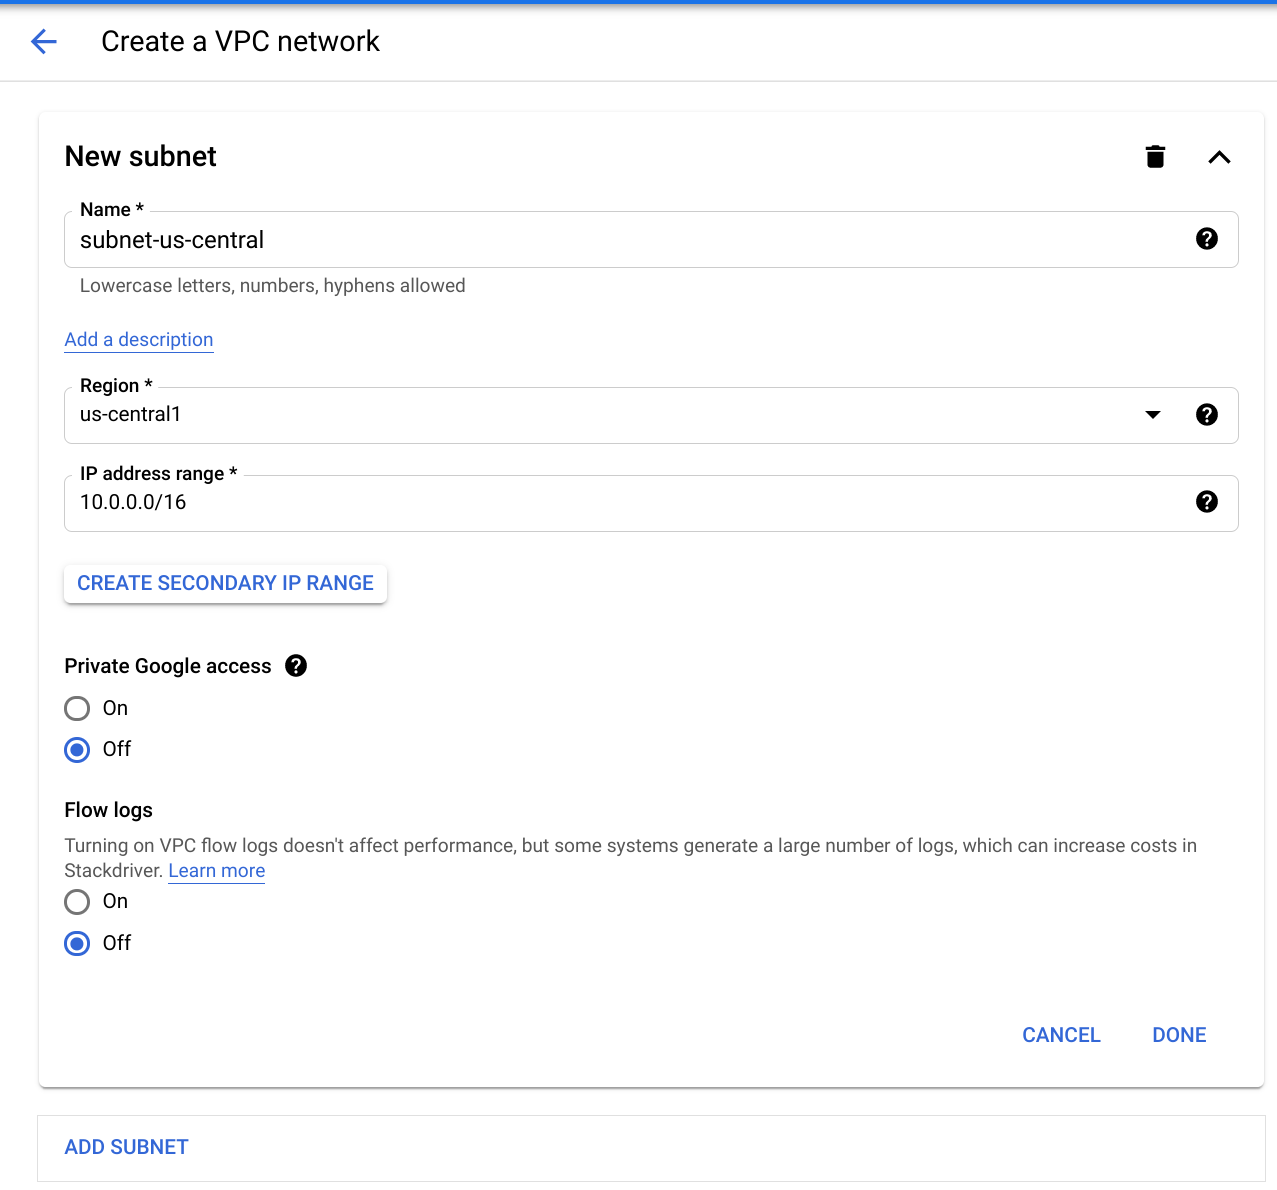
On the Custom tab create:
- Subnet name: subnet-
- Region:
- IP address range:
10.0.0.0/16
- Subnet name: subnet-
-
Click Done.
-
Now click Add Subnet and add 2 more subnets in their respective regions:
- subnet-
, , 10.1.0.0/16 - subnet-
, , 10.2.0.0/16
- subnet-
-
Click Create to finish.
At this point, the network has routes to the Internet and to any instances that you might create. But it has no firewall rules allowing access to instances, even from other instances. To allow access, you must create firewall rules.
Continue to the Adding firewall rules section.
Task 4. Create custom network with Cloud Shell
gcloud command line.
- Enter the following command in cloud shell to create the custom network:
Output:
Now create subnets for your new custom network. You'll create three of them.
- Create subnet-
with an IP prefix:
Output:
- Create subnet-
with an IP prefix:
Output:
- Create subnet-
with an IP prefix:
Output:
- List your networks:
If you created an auto subnet network in the prior section, those subnets will be listed as well.
Output:
At this point, the network has routes to the Internet and to any instances that you might create. But, it has no firewall rules allowing access to instances, even from other instances. To allow access, you must create firewall rules.
Task 5. Adding firewall rules
To allow access to VM instances, you must apply firewall rules. You will use an instance tag to apply the firewall rule to your VM instances. The firewall rule will apply to any VM using the same instance tag.
- Start by opening the firewall to allow HTTP Internet requests, then you'll add more firewall rules. Firewall rules can be added using the Console or Cloud Shell.
Add firewall rules through the Console
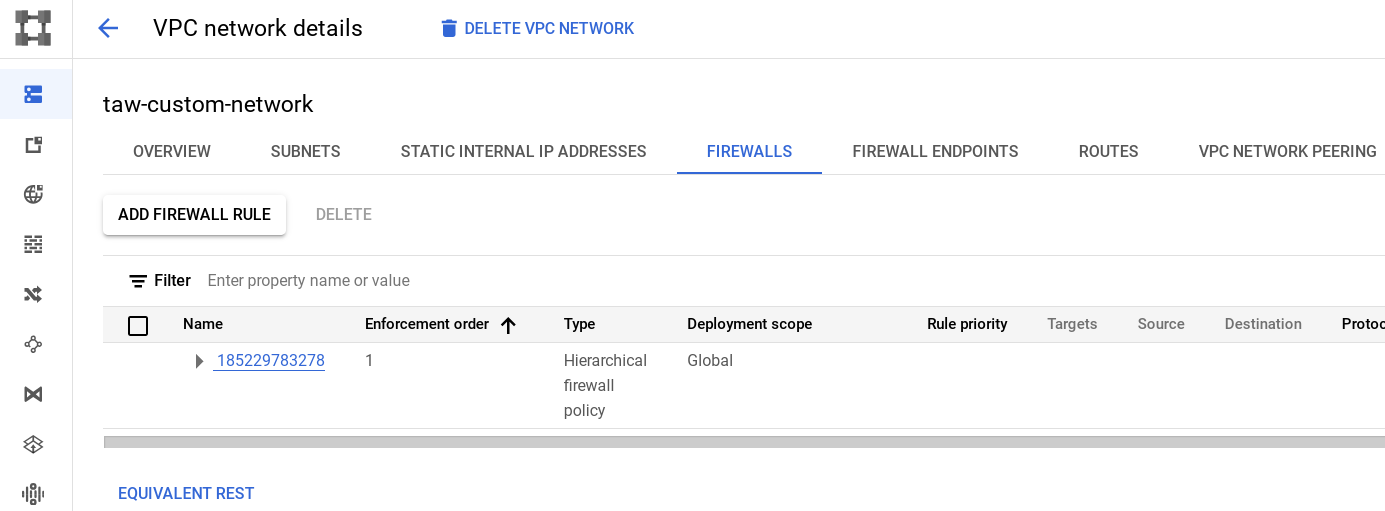
- In the Cloud console, navigate to VPC networks and click on the taw-custom-network:
- Click the Firewalls tab, then Add Firewall rule.
- Enter the following info:
|
Field |
Value |
Comments |
|
Name |
nw101-allow-http |
New rule name |
|
Targets |
Specified target tags |
Which instances to which the firewall rule applies. |
|
Target tags |
http |
The tag we created |
|
Source filter |
IPv4 ranges |
We will open the firewall for any IP address from the Internet. |
|
Source IPv4 ranges |
0.0.0.0/0 |
You will open the firewall for any IP address from the Internet. |
|
Protocols and ports |
Select Specified protocols and ports, then check the tcp box, and type 80 |
Only HTTP |
Your screen will look like this:
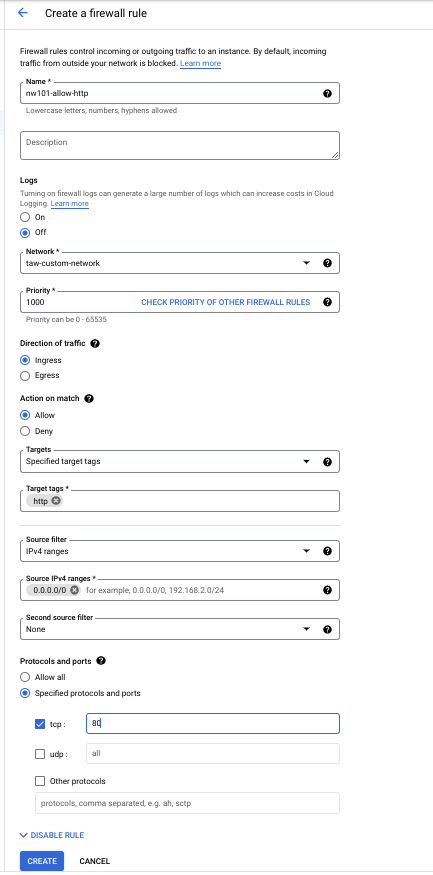
- Click Create and wait until the command succeeds. Next you'll create the additional firewall rules you'll need.
Add firewall rules using Cloud Shell
gcloud command line.
- To create firewall rules in Cloud Shell, run the following:
Output:

Create additional firewall rules
These additional firewall rules will allow ICMP, internal communication, SSH, and RDP. You can create them using the Console (or Cloud Shell). Remember to use one method or the other for each type of firewall rule, you can't do both.
- ICMP
|
Field |
Value |
Comments |
|
Name |
nw101-allow-icmp |
New rule name |
|
Targets |
Specified target tags |
Select from the Targets dropdown |
|
Target tags |
rules |
tag |
|
Source filter |
IPv4 ranges |
We will open the firewall for any IP address on this list. |
|
Source IPv4 ranges |
0.0.0.0/0 |
We will open the firewall for any IP address from the Internet. |
|
Protocols and ports |
Select Specified protocols and ports, other protocols, then type icmp |
The protocols and ports the firewall applies to |
(Cloud Shell commands)
- Internal Communication
|
Field |
Value |
Comments |
|
Name |
nw101-allow-internal |
New rule name |
|
Targets |
All instances in the network |
Select from the Targets dropdown |
|
Source filter |
IPv4 ranges |
The filter used to apply the rule to specific traffic sources |
|
Source IPv4 ranges |
10.0.0.0/16, 10.1.0.0/16, 10.2.0.0/16 |
We will open the firewall for any IP address from the Internet. |
|
Protocols and ports |
Select Specified protocols and ports, then tcp and type 0-65535; check udp type 0-65535; check Other protocols and type icmp |
Allows Tcp:0-65535, udp:0-65535,icmp |
(Cloud Shell commands)
- SSH
|
Field |
Value |
Comments |
|
Name |
nw101-allow-ssh |
New rule name |
|
Targets |
Specified target tags |
ssh |
|
Target tags |
ssh |
The instances to which you apply the firewall rule |
|
Source filter |
IPv4 ranges |
The filter used to apply the rule to specific traffic sources |
|
Source IPv4 ranges |
0.0.0.0/0 |
We will open the firewall for any IP address from the Internet. |
|
Protocols and ports |
Select Specified protocols and ports, check the tcp box, then type 22 |
Allows tcp:22 |
(Cloud Shell commands)
- RDP
|
Field |
Value |
Comments |
|
Name |
nw101-allow-rdp |
New rule name |
|
Targets |
All instances in the network |
Select from the Targets dropdown |
|
Source filter |
IPv4 ranges |
Filter IP addresses |
|
Source IPv4 ranges |
0.0.0.0/0 |
We will open the firewall for any IP address from the Internet. |
|
Protocols and ports |
Select Specified protocols and ports, check the tcp, then type 3389 |
Allows tcp:3389 |
(Cloud Shell commands)
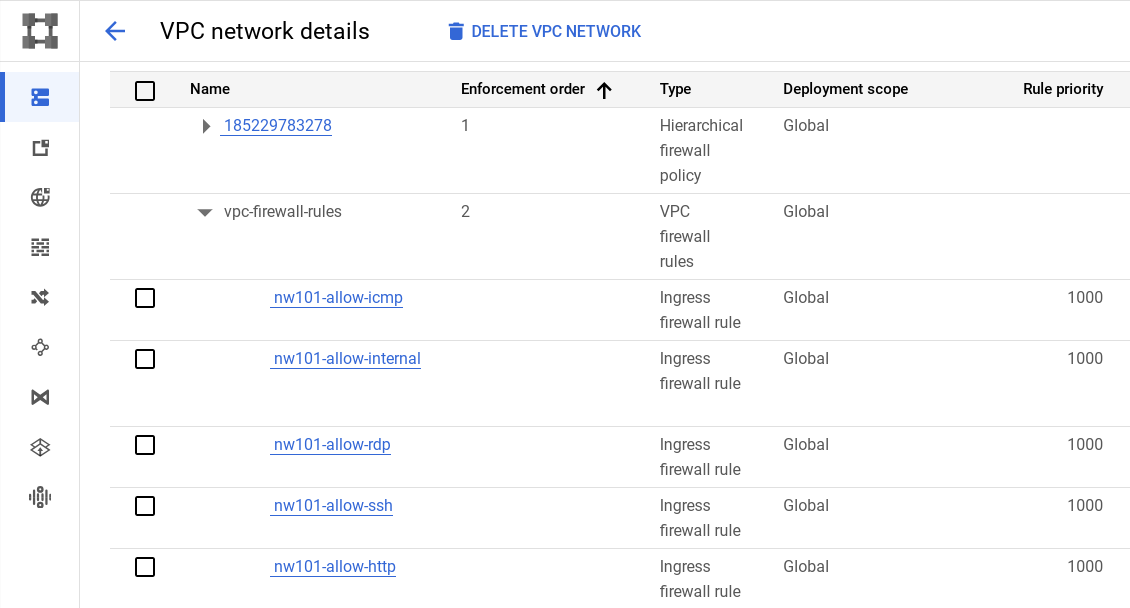
- Use the Console to review the firewall rules in your network. It should look like this:
Click Check my progress to verify the objective.
Task 6. Connecting to your lab VMs and checking latency
- Click on VPC networks in the left menu to see your entire network. The taw-custom-network has three subnetworks and the firewalls rules applied.
You should see this:
The next steps are to create a VM in each subnet and make sure you can connect to them.
Creating a VM in each zone
For this section of the lab you will work in Cloud Shell.
- Run this commands to create an instance named
us-test-01in the subnet-subnet:
Be sure to note the external IP for later use in this lab.
Output:
- Now make the us-test-02 and us-test-03 VMs in their correlated subnets:
Click Check my progress to verify the objective.
Verify you can connect your VM
Now do a few exercises to test the connection to your VMs.
-
Switch back to the Console and navigate to Compute Engine.
-
Click the SSH button corresponding to the
us-test-01instance. This opens an SSH connection to the instance in a new window. -
In the SSH window of
us-test-01, type the following command to use an ICMP echo againstus-test-02, adding the external IP address for the VM in-line:
 Your IP addresses will differ from the picture.
- Run this command to use an ICMP echo against
us-test-03, adding the external IP address for the VM in-line:
Example output:
- Now check that SSH also works for instances
us-test-02andus-test-03. Try an ICMP echo againstus-test-01.
Use ping to measure latency
Use ping to measure the latency between instances between all the regions.
- To observe the latency from the US Central region to the Europe West region, run the following command after opening an SSH window on the
us-test-01:
Command output:
The latency you get back is the "Round Trip Time" (RTT) - the time the packet takes to get from us-test-01 to us-test-02.
To test connectivity, Ping uses the ICMP Echo Request and Echo Reply Messages.
Task 7. (Optional) Traceroute and Performance testing
Optional exercise
Traceroute is a tool to trace the path between two hosts. A traceroute can be a helpful first step to uncovering many different types of network problems. Support or network engineers often ask for a traceroute when diagnosing network issues.
Now try it out by setting up a traceroute on one of your virtual machines.
-
For this step go back to using the
us-test-01VM andus-test-02VM and SSH into both of them. -
Install these performance tools in the SSH window for
us-test-01:
-
Now try a few other destinations and also from other sources:
- VMs in the same region or another region (eu1-vm, asia1-vm, w2-vm)
- www.wikipedia.org
- www.adcash.com
- bad.horse (works best if you increase max TTL, so traceroute -m 255 bad.horse)
- Anything else you can think of
-
To stop traceroute, Ctrl-c in the SSH window and return to the command line.
Task 8. (Optional) Use iperf to test performance
Between two hosts
Optional exercise
When you use iperf to test the performance between two hosts, one side needs to be set up as the iperf server to accept connections.
Try a very simple test:
- SSH into
us-test-02and install the performance tools:
- SSH into
us-test-01and run:
- On
us-test-02SSH run thisiperf:
You will see some output like this:
- On
us-test-01use Ctrl + c to exit the server side when you're done.
Between VMs within a region
Optional exercise
Now you'll deploy another instance (us-test-04)in a different zone than us-test-01. You will see that within a region, the bandwidth is limited by the 2 Gbit/s per core egress cap.
- In Cloud Shell, create
us-test-04:
- SSH to
us-test-04and install performance tools:
Between regions you reach much lower limits, mostly due to limits on TCP window size and single stream performance. You can increase bandwidth between hosts by using other parameters, like UDP.
- On
us-test-02SSH run:
- On
us-test-01SSH run:
This should be able to achieve a higher speed between EU and US. Even higher speeds can be achieved by running a bunch of TCP iperfs in parallel. Let's test this.
- In the SSH window for
us-test-01run:
- In the SSH window for
us-test-02run:
The combined bandwidth should be really close to the maximum achievable bandwidth.
- Test a few more combinations. If you use Linux on your laptop you can test against your laptop as well. (You can also try iperf3 which is available for many OSes, but this is not part of the lab.)
As you can see, to reach the maximum bandwidth, just running a single TCP stream (for example, file copy) is not sufficient; you need to have several TCP sessions in parallel. Reasons are: TCP parameters such as Window Size; and functions such as Slow Start.
For more information on this and all other TCP/IP topics, refer to TCP/IP Illustrated.
Tools like bbcp can help to copy files as fast as possible by parallelizing transfers and using configurable window size.
Task 9. Test your knowledge
End your lab
When you have completed your lab, click End Lab. Your account and the resources you've used are removed from the lab platform.
You will be given an opportunity to rate the lab experience. Select the applicable number of stars, type a comment, and then click Submit.
The number of stars indicates the following:
- 1 star = Very dissatisfied
- 2 stars = Dissatisfied
- 3 stars = Neutral
- 4 stars = Satisfied
- 5 stars = Very satisfied
You can close the dialog box if you don't want to provide feedback.
For feedback, suggestions, or corrections, please use the Support tab.
Congratulations
You have learned how default and user-created Networks are configured, how to grant and deny access, and measured performance and latency.
Next steps / Learn more
When you're ready, try out the Networking fundamentals in the Google Cloud course!
Google Cloud training and certification
...helps you make the most of Google Cloud technologies. Our classes include technical skills and best practices to help you get up to speed quickly and continue your learning journey. We offer fundamental to advanced level training, with on-demand, live, and virtual options to suit your busy schedule. Certifications help you validate and prove your skill and expertise in Google Cloud technologies.
Manual last updated February 14, 2024
Lab last tested February 14, 2024
Copyright 2024 Google LLC All rights reserved. Google and the Google logo are trademarks of Google LLC. All other company and product names may be trademarks of the respective companies with which they are associated.