체크포인트
Create the connection resource
/ 20
Set up access to a Cloud Storage data lake
/ 30
Create the BigLake table
/ 20
Create the external table
/ 10
Update external table to Biglake table
/ 20
BigLake: Qwik Start
- GSP1040
- Overview
- Objectives
- Setup and requirements
- Task 1. Create a connection resource
- Task 2. Set up access to a Cloud Storage data lake
- Task 3. Create a BigLake table
- Task 4. Query a BigLake table through BigQuery
- Task 5. Set up access control policies
- Task 6. Upgrade external tables to BigLake tables
- Congratulations!
GSP1040

Overview
BigLake is a unified storage engine that simplifies data access for data warehouses and lakes by providing uniform fine-grained access control across multi-cloud storage and open formats.
BigLake extends BigQuery's fine-grained row- and column-level security to tables on data resident object stores such as Amazon S3, Azure Data Lake Storage Gen2, and Google Cloud Storage. BigLake decouples access to the table from the underlying cloud storage data through access delegation. This feature helps you to securely grant row- and column-level access to users and pipelines in your organization without providing them full access to the table.
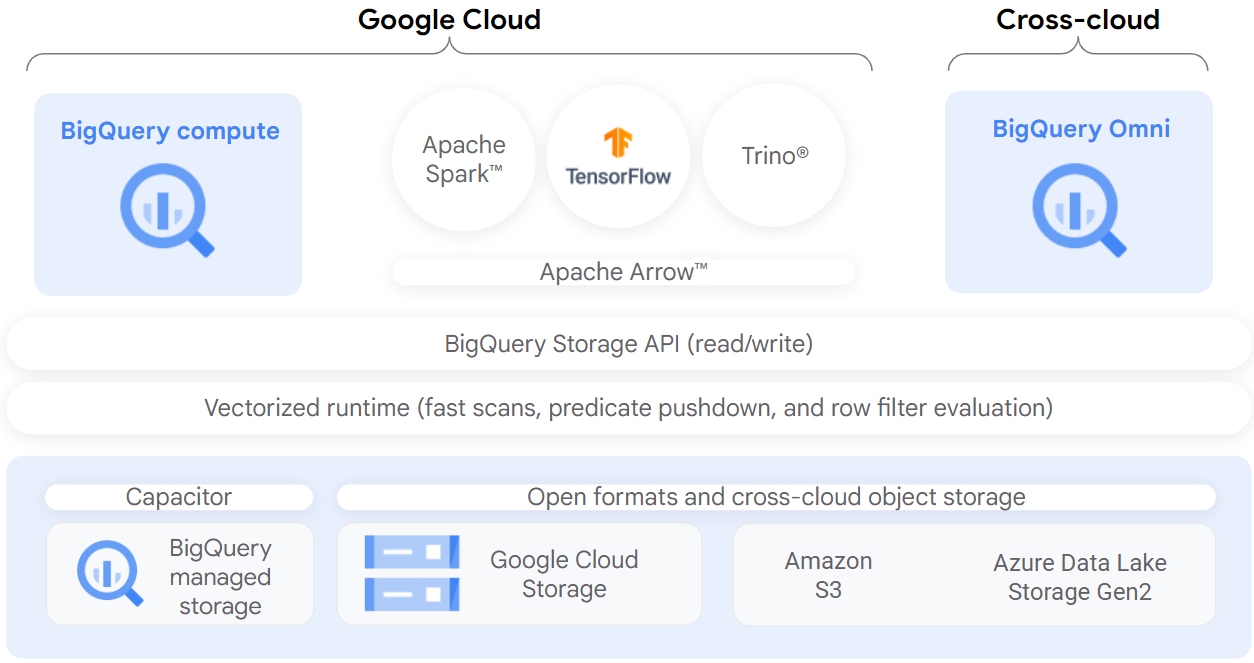
After you create a BigLake table, you can query it like other BigQuery tables. BigQuery enforces row- and column-level access controls, and every user sees only the slice of data that they are authorized to see. Governance policies are enforced on all access to the data through BigQuery APIs. For example, the BigQuery Storage API lets users access authorized data using open source query engines such as Apache Spark, as the following diagram shows:
Objectives
In this lab, you will:
- Create and view a connection resource.
- Set up access to a Cloud Storage data lake.
- Create a BigLake table.
- Query a BigLake table through BigQuery.
- Set up access control policies.
- Upgrade external tables to BigLake tables.
Setup and requirements
Before you click the Start Lab button
Read these instructions. Labs are timed and you cannot pause them. The timer, which starts when you click Start Lab, shows how long Google Cloud resources will be made available to you.
This hands-on lab lets you do the lab activities yourself in a real cloud environment, not in a simulation or demo environment. It does so by giving you new, temporary credentials that you use to sign in and access Google Cloud for the duration of the lab.
To complete this lab, you need:
- Access to a standard internet browser (Chrome browser recommended).
- Time to complete the lab---remember, once you start, you cannot pause a lab.
How to start your lab and sign in to the Google Cloud console
-
Click the Start Lab button. If you need to pay for the lab, a pop-up opens for you to select your payment method. On the left is the Lab Details panel with the following:
- The Open Google Cloud console button
- Time remaining
- The temporary credentials that you must use for this lab
- Other information, if needed, to step through this lab
-
Click Open Google Cloud console (or right-click and select Open Link in Incognito Window if you are running the Chrome browser).
The lab spins up resources, and then opens another tab that shows the Sign in page.
Tip: Arrange the tabs in separate windows, side-by-side.
Note: If you see the Choose an account dialog, click Use Another Account. -
If necessary, copy the Username below and paste it into the Sign in dialog.
{{{user_0.username | "Username"}}} You can also find the Username in the Lab Details panel.
-
Click Next.
-
Copy the Password below and paste it into the Welcome dialog.
{{{user_0.password | "Password"}}} You can also find the Password in the Lab Details panel.
-
Click Next.
Important: You must use the credentials the lab provides you. Do not use your Google Cloud account credentials. Note: Using your own Google Cloud account for this lab may incur extra charges. -
Click through the subsequent pages:
- Accept the terms and conditions.
- Do not add recovery options or two-factor authentication (because this is a temporary account).
- Do not sign up for free trials.
After a few moments, the Google Cloud console opens in this tab.

Activate Cloud Shell
Cloud Shell is a virtual machine that is loaded with development tools. It offers a persistent 5GB home directory and runs on the Google Cloud. Cloud Shell provides command-line access to your Google Cloud resources.
- Click Activate Cloud Shell
at the top of the Google Cloud console.
When you are connected, you are already authenticated, and the project is set to your Project_ID,
gcloud is the command-line tool for Google Cloud. It comes pre-installed on Cloud Shell and supports tab-completion.
- (Optional) You can list the active account name with this command:
- Click Authorize.
Output:
- (Optional) You can list the project ID with this command:
Output:
gcloud, in Google Cloud, refer to the gcloud CLI overview guide.
Task 1. Create a connection resource
BigLake tables access Google Cloud Storage data using a connection resource. A connection resource can be associated with a single table or an arbitrary group of tables in the project.
-
From the Navigation Menu, go to BigQuery > BigQuery Studio. Click Done.
-
To create a connection, click +ADD, and then click Connections to external data sources.
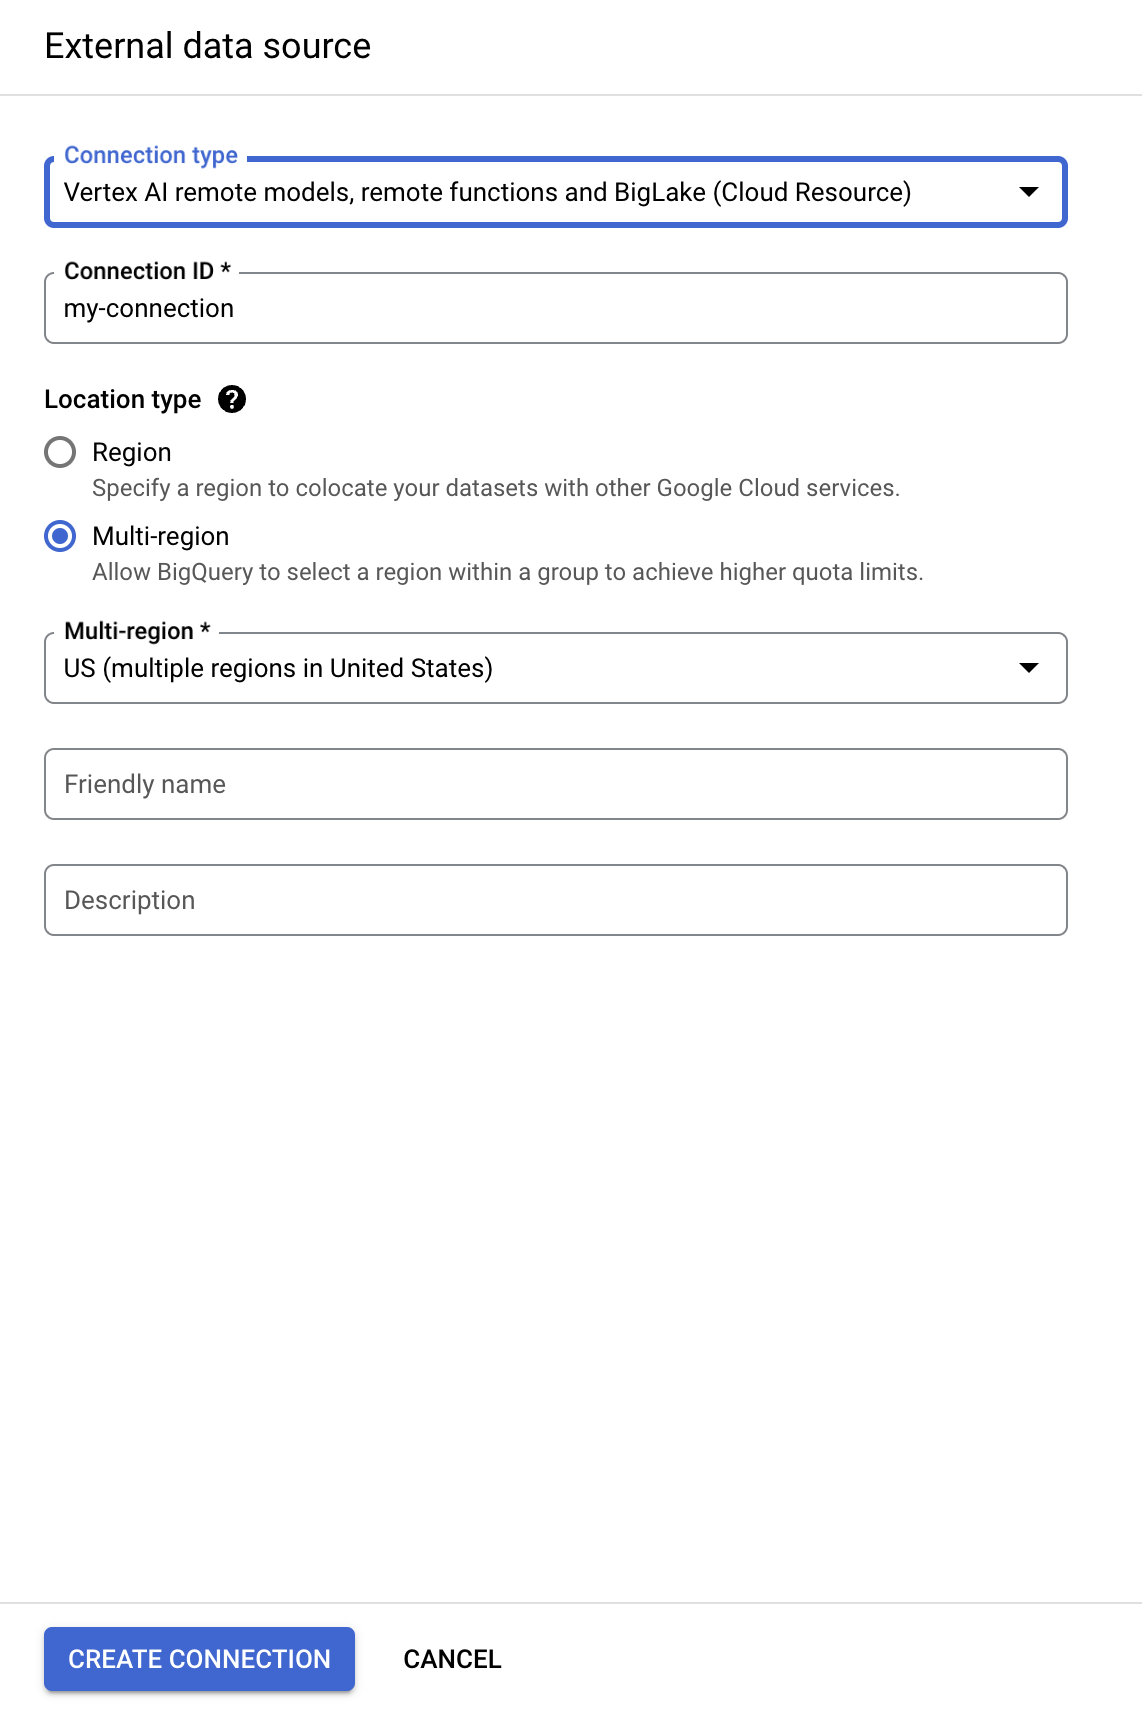
- In the Connection type list, select Vertex AI remote models, remote functions and BigLake (Cloud Resource).
-
In the Connection ID field, enter
my-connection. -
For Location type, choose Multi-region and select US (multiple regions in United States) from dropdown.
-
Click Create connection.
-
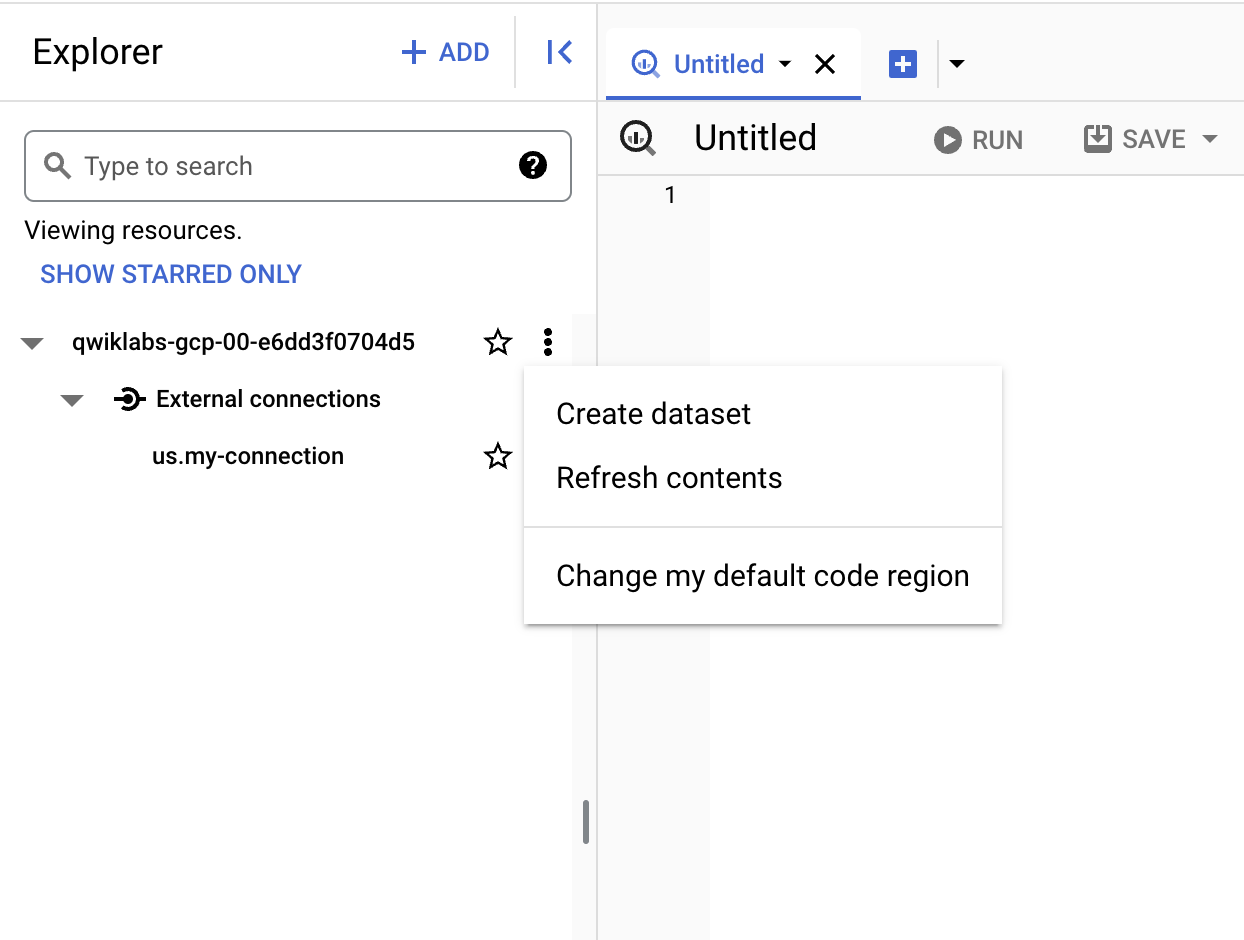
To view your connection information, select the connection in the navigation menu.

- In the Connection info section, copy the Service Account ID. You will need this in the following section.
Click Check my progress to verify the objective.
Task 2. Set up access to a Cloud Storage data lake
In this section, you will give the new connection resource read-only access to the Cloud Storage data lake so that BigQuery can access Cloud Storage files on behalf of users. We recommend that you grant the connection resource service account the Storage Object Viewer IAM role, which lets the service account access Cloud Storage buckets.
-
From the Navigation Menu, go to IAM & Admin > IAM.
-
Click +GRANT ACCESS.
-
In the New principals field, enter the service account ID that you copied earlier.
-
In the Select a role field, select Cloud Storage, and then select Storage Object Viewer.
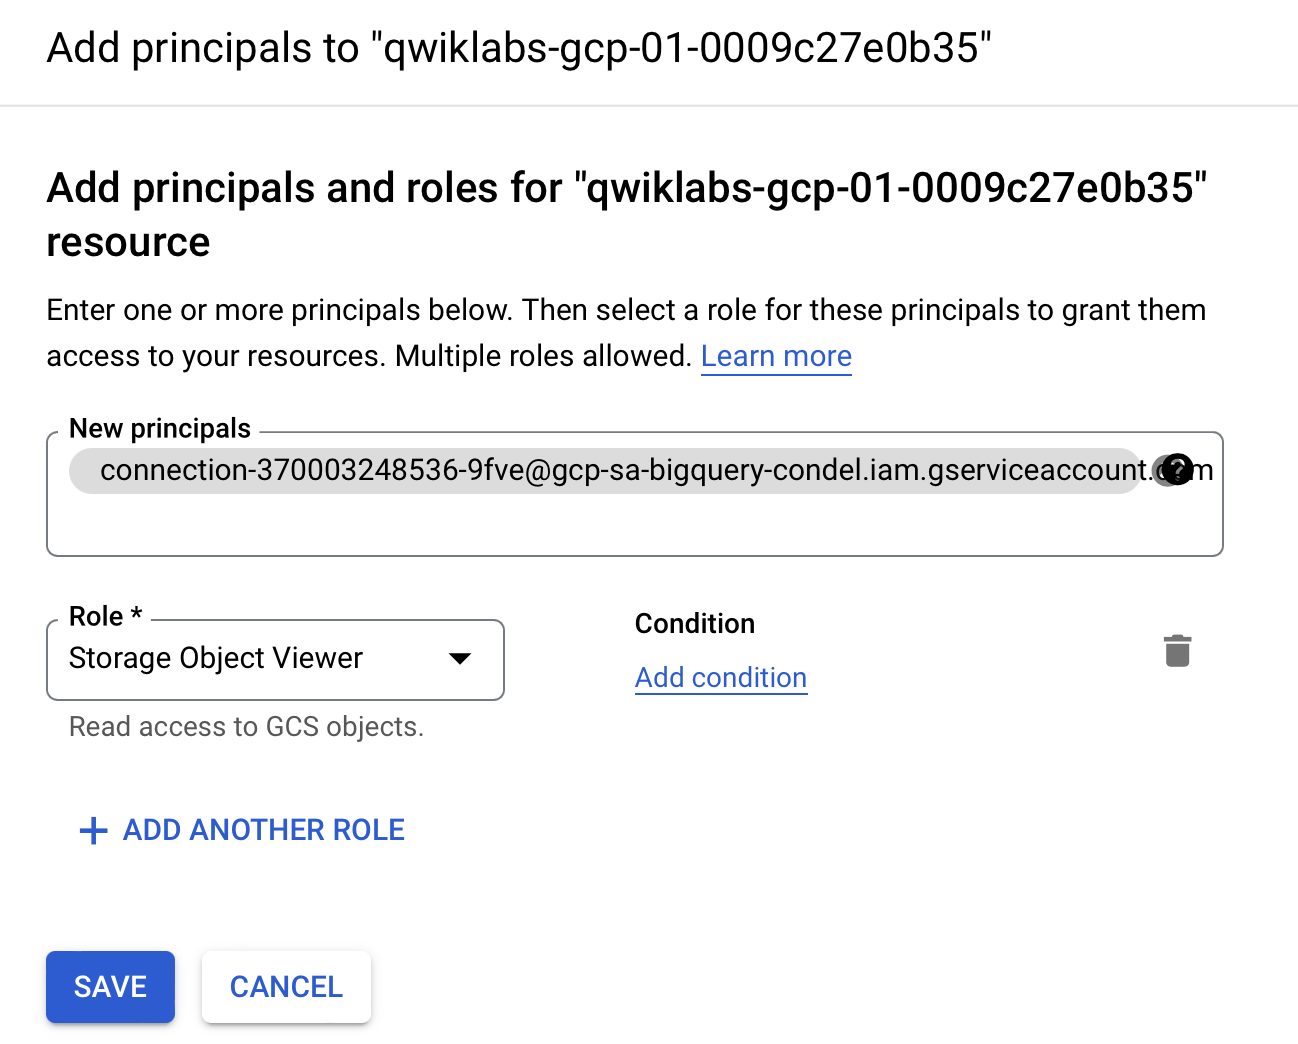
- Click Save.
Click Check my progress to verify the objective.
Task 3. Create a BigLake table
The following example uses the CSV file format, but you can use any format supported by BigLake, as shown in Limitations. If you're familiar with creating tables in BigQuery, then this process should be similar. The only difference is that you specify the associated cloud resource connection.
If no schema was provided and the service account was not granted access to the bucket in the previous step, this step will fail with an access denied message.
Create a dataset
-
Navigate back to BigQuery > BigQuery Studio.
-
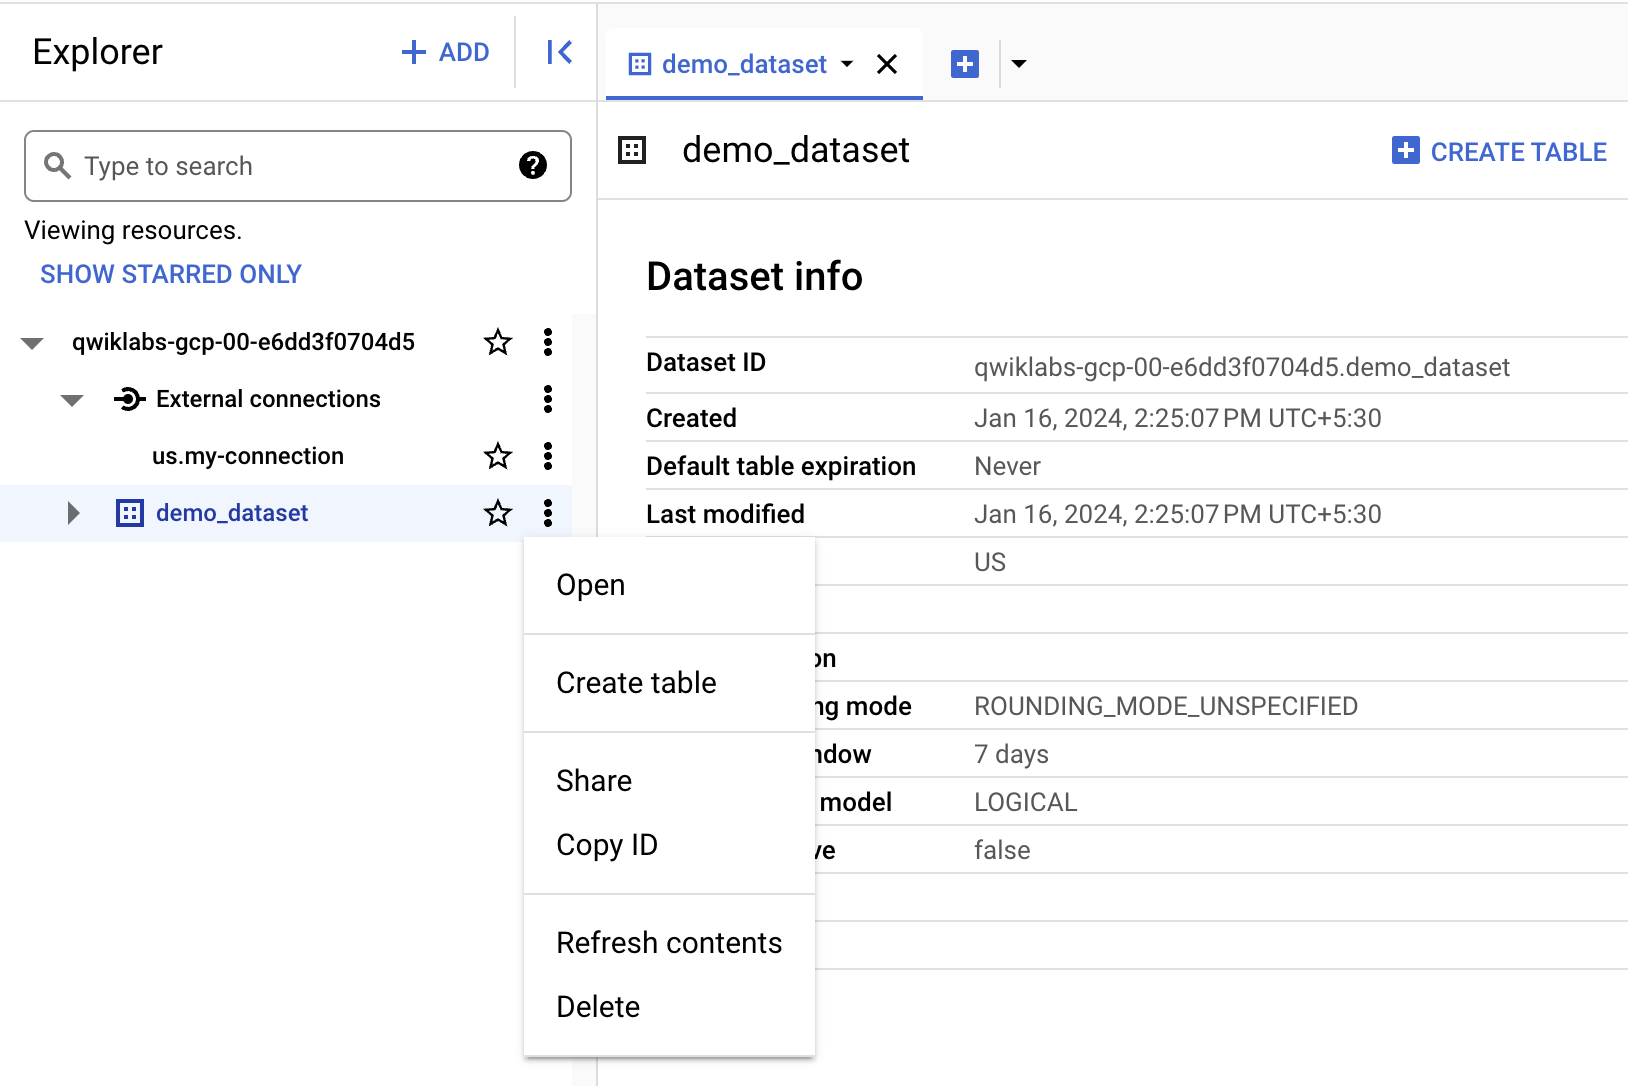
Click the three dots next to your project name and select Create dataset.
-
For the Dataset ID, use
demo_dataset. -
For Location type, choose Multi-region and select US (multiple regions in United States) from dropdown.
-
Leave the rest of the fields as default and click Create Dataset.
Now that you have a dataset created, you can copy an existing dataset from Cloud Storage into BigQuery.
Create the table
- Click three dots next to demo_dataset, then choose Create table.
- Under Source for Create table from, choose Google Cloud Storage.
-
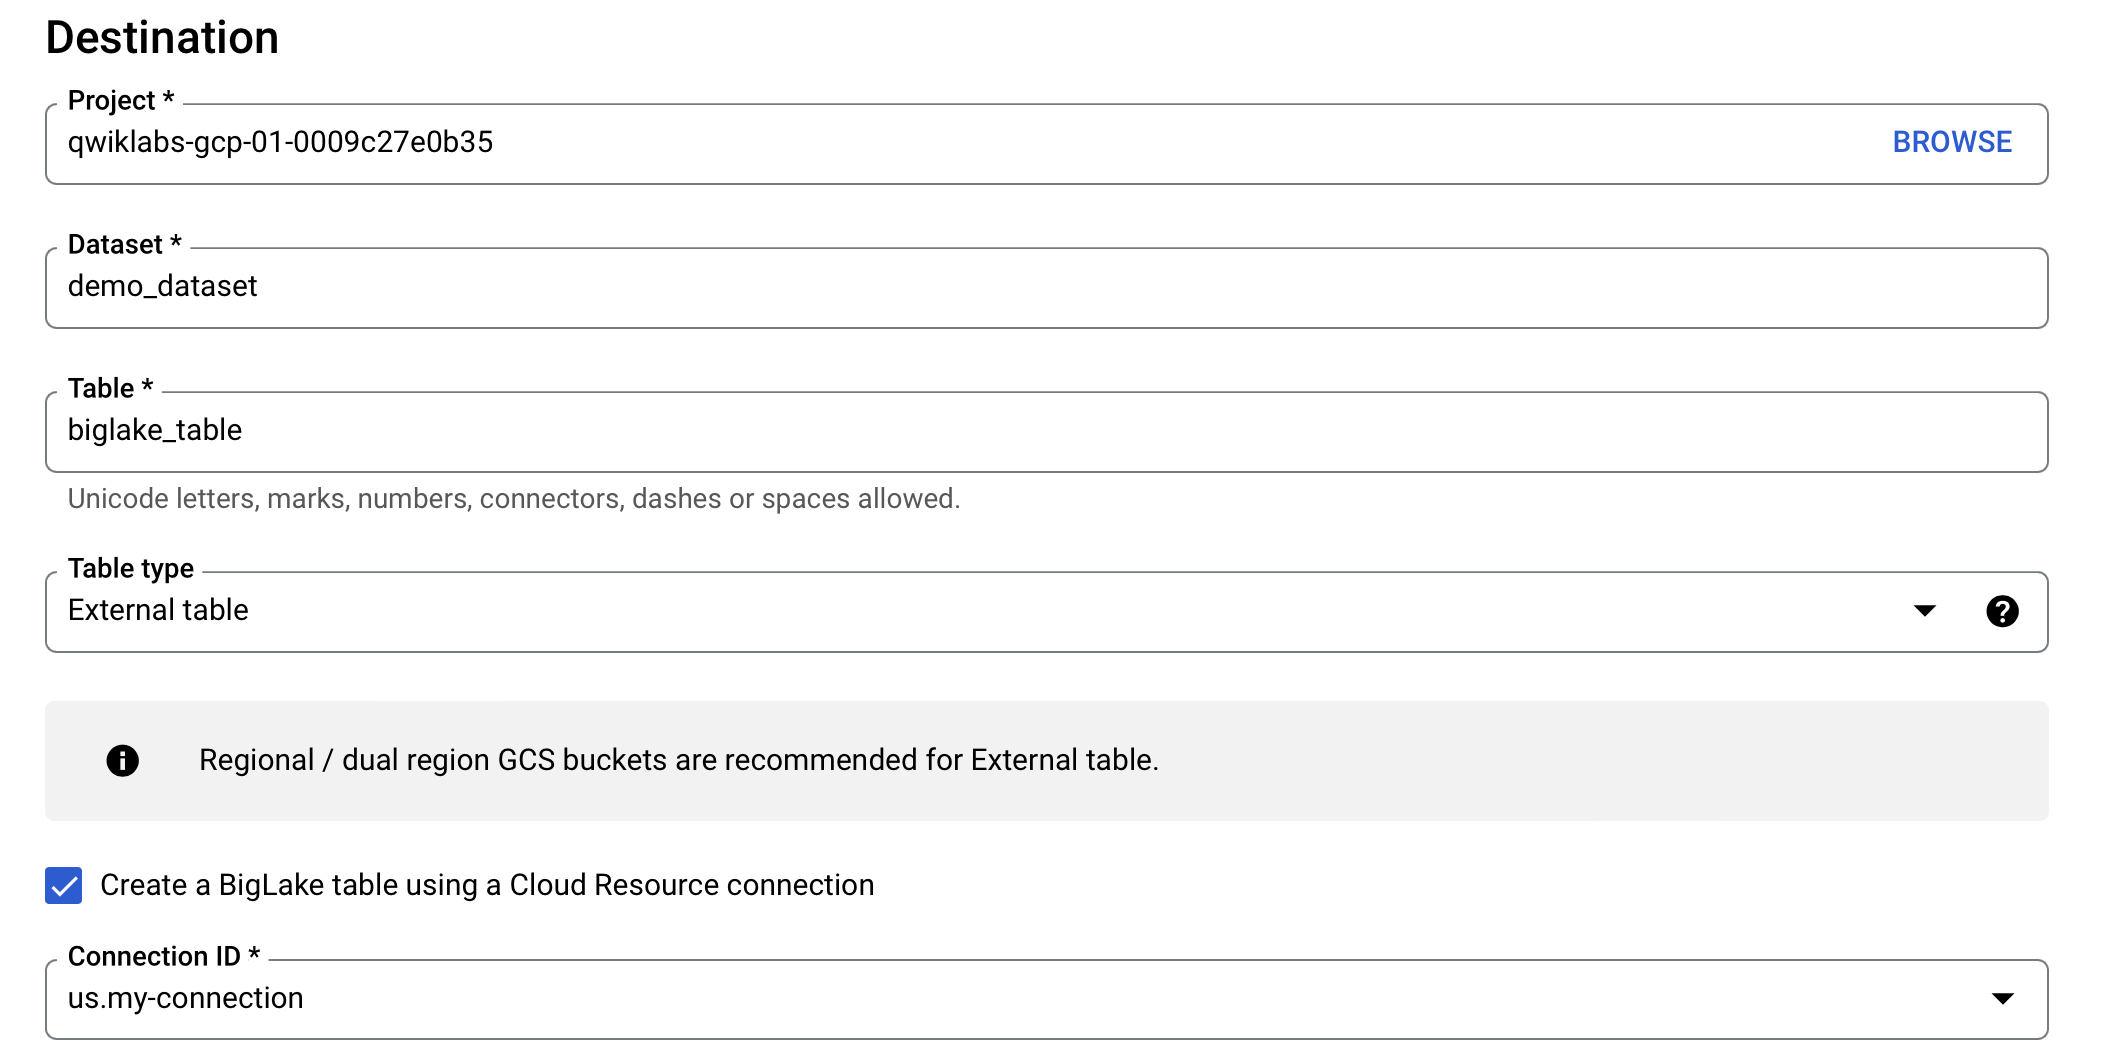
Click Browse to select the dataset. Navigate to the bucket named as
and then customer.csvfile to import it into BigQuery, and click Select. -
Under Destination, verify your lab project has been selected and you're using the demo_dataset.
-
For the table name, use
biglake_table. -
Set the table type to External Table.
-
Select the box to Create a BigLake table using a Cloud Resource connection.
Verify that your connection ID us.my-connection is selected. Your configuration should resemble the following:
- Under Schema, enable Edit as text and copy and paste the following schema into the text box:
- Click Create Table.
Click Check my progress to verify the objective.
Task 4. Query a BigLake table through BigQuery
Now that you've created the BigLake table, you can use any BigQuery client to submit a query.
-
From the biglake_table preview toolbar, click Query > In new tab.
-
Run the following to query the BigLake table through the BigQuery Editor:
-
Click Run.
-
Verify you can see all of the columns and data in the resulting table.
Task 5. Set up access control policies
Once a BigLake table has been created, it can be managed in a similar fashion to BigQuery tables. To create access control policies for BigLake tables, you'll first create a taxonomy of policy tags in BigQuery. Then, apply the policy tags to the sensitive rows or columns. In this section, you will create a column level policy. For directions on setting up row-level security, see the row-level security guide.
For these purposes, a BigQuery taxonomy named
Add policy tags to columns
You will now use the policy tag you created to restrict access to certain columns within the BigQuery table. For this example, you will restrict access to sensitive information such as address, postal code, and phone number.
-
From the Navigation Menu, go to BigQuery > BigQuery Studio.
-
Navigate to demo-dataset > biglake_table and click the table to open the table schema page.
-
Click Edit Schema.
-
Check the boxes next to the address, postal_code, and phone fields.
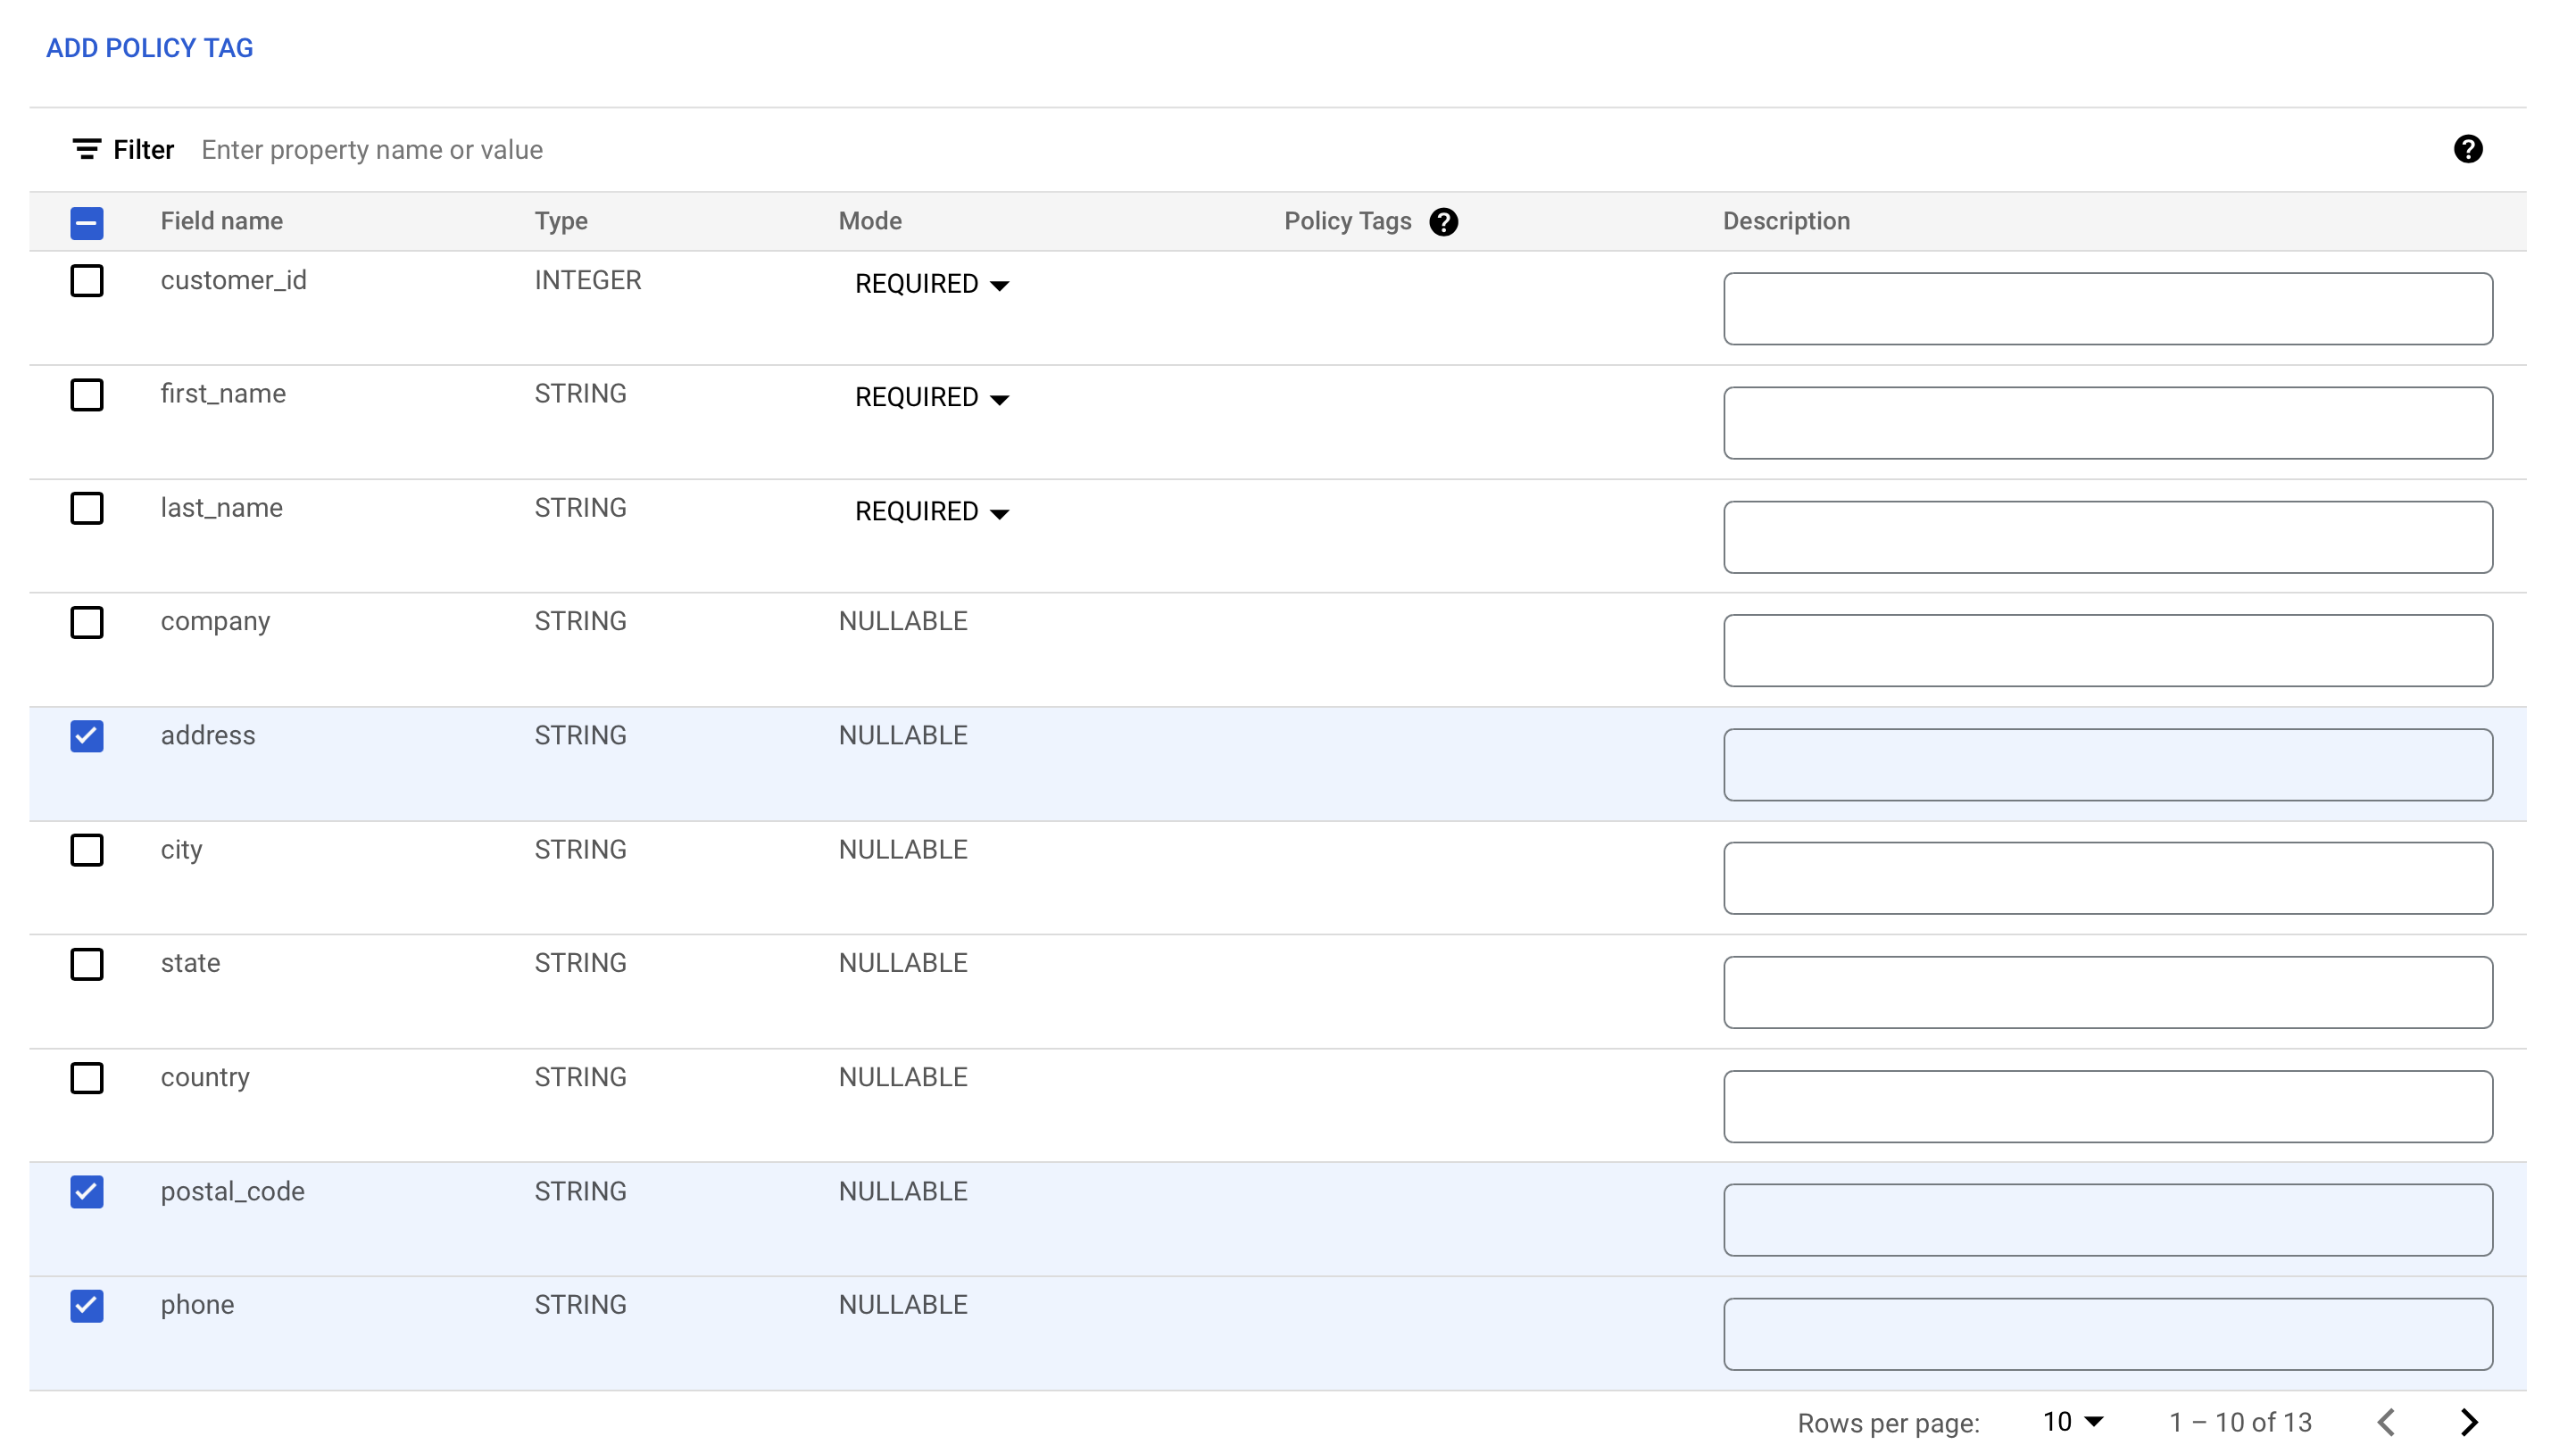
-
Click Add policy tag.
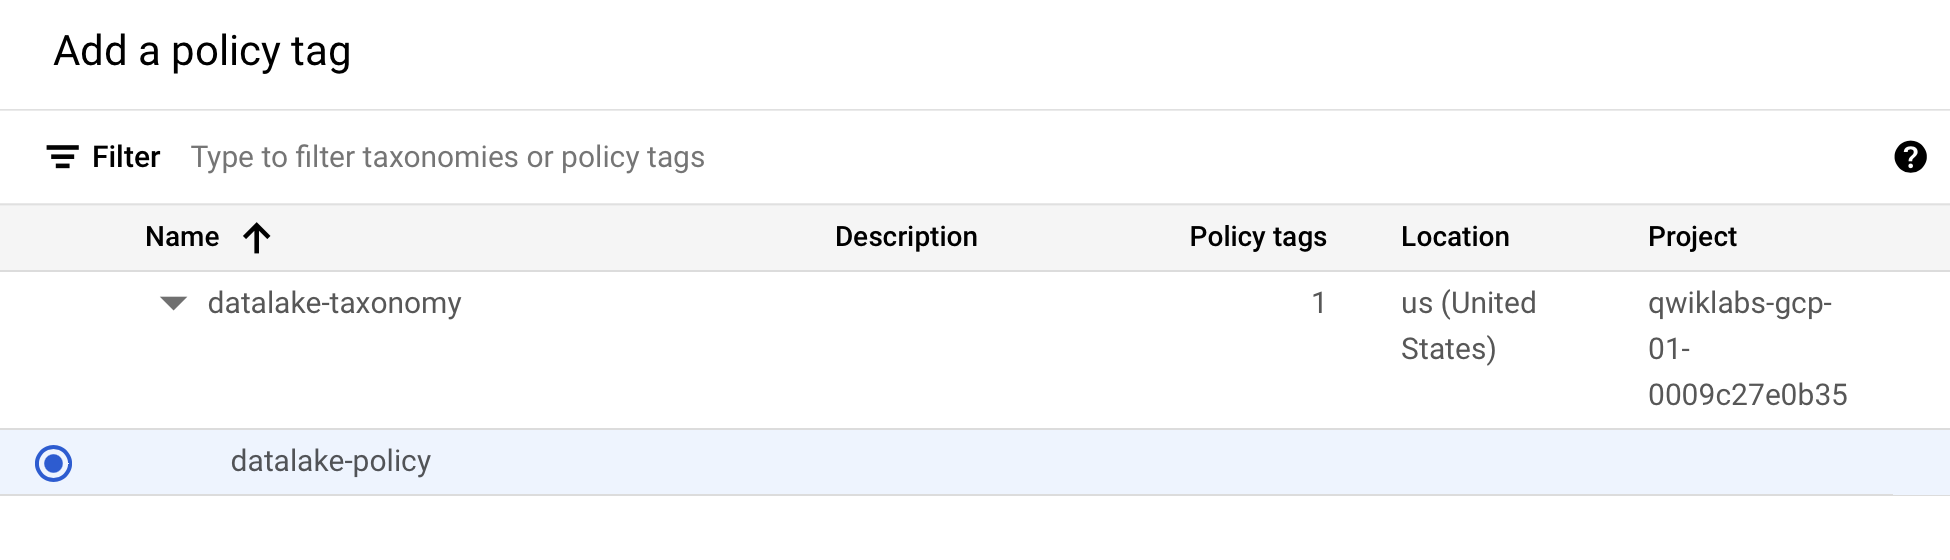
-
Click
to expand it to select biglake-policy.
-
Click Select.
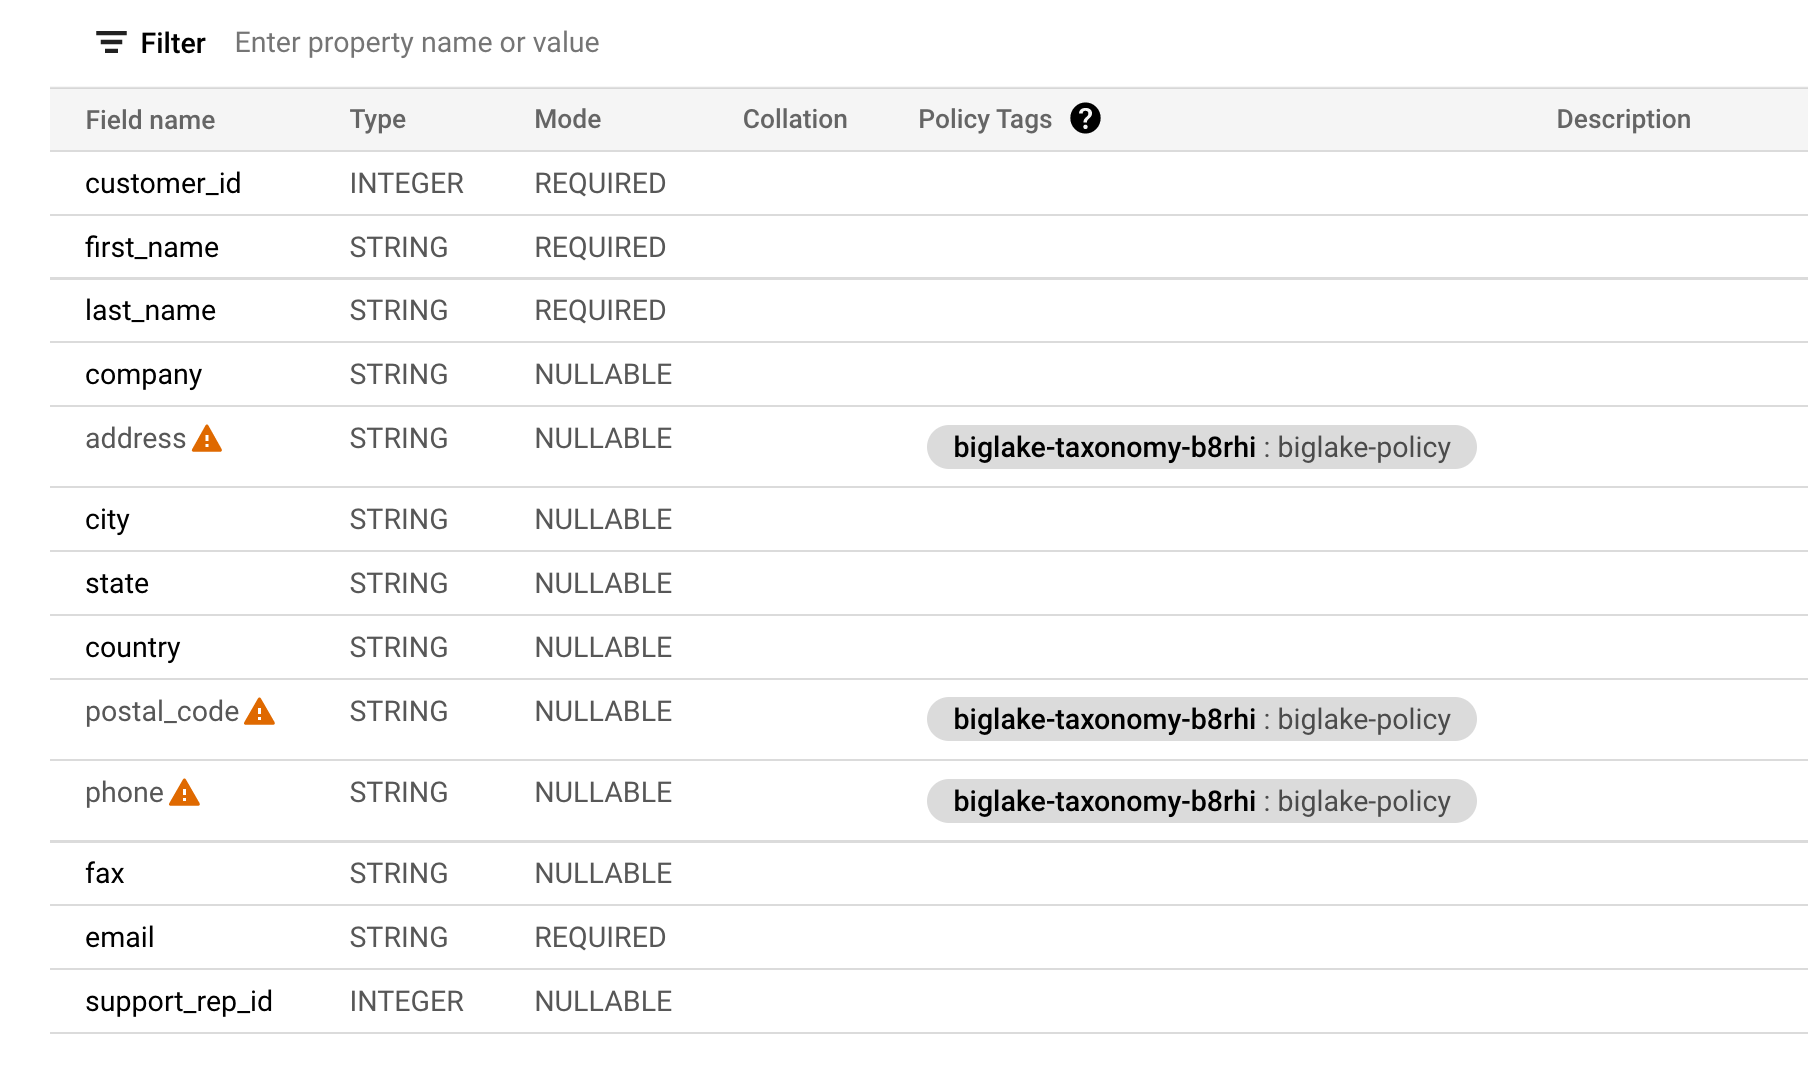
Your columns should now have the policy tags attached to them.

-
Click Save.
-
Verify your table schema now resembles the following.
Verify the column level security
-
Open the query editor for the biglake_table.
-
Run the following to query the BigLake table through the BigQuery Editor:
-
Click Run.
You should receive an error access denied error:
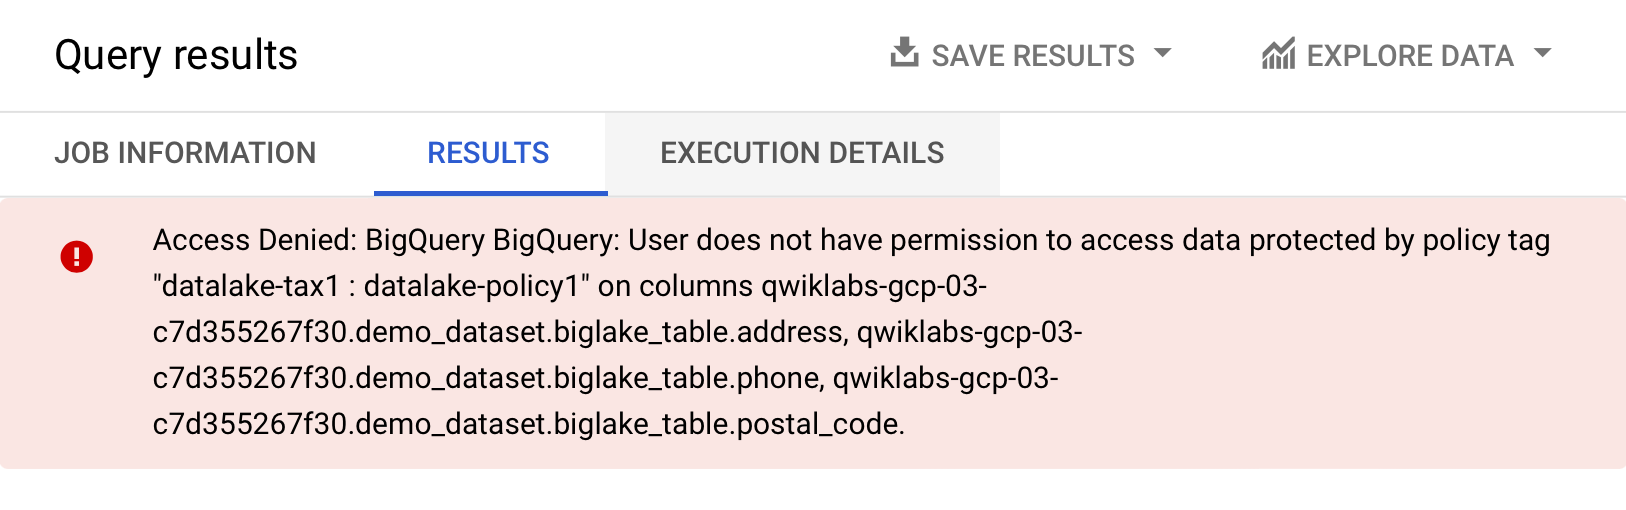
- Now, run the following query, omitting the columns you don't have access to:
The query should run without any issues and return the columns you have access to. This example shows that column level security enforced through BigQuery can also be applied to BigLake tables.
Task 6. Upgrade external tables to BigLake tables
You can upgrade existing tables to BigLake tables by associating the existing table to a cloud resource connection. For a complete list of flags and arguments, see bq update and bq mkdef.
Create the external table
-
Click three dots next to demo_dataset, then choose Create table.
-
Under Source for Create table from, choose Google Cloud Storage.
-
Click Browse to select the dataset. Navigate to the bucket named
and then invoice.csvfile to import it into BigQuery, and click Select. -
Under Destination, verify your lab project has been selected and you're using the demo_dataset.
-
For the table name, use
external_table. -
Set the table type to External Table.
- Under Schema, enable Edit as text and copy and paste the following schema into the text box:
- Click Create Table.
Click Check my progress to verify the objective.
Update external table to Biglake table
- Open a new Cloud Shell window and run the following command to generate a new external table definition that specifies the connection to use:
- Verify your table definition has been created:
- Get the schema from your table:
- Update the table using the new external table definition:
Click Check my progress to verify the objective.
Verify the updated table
-
From the Navigation Menu, go to BigQuery > BigQuery Studio.
-
Navigate to demo-dataset > and double click external_table.
-
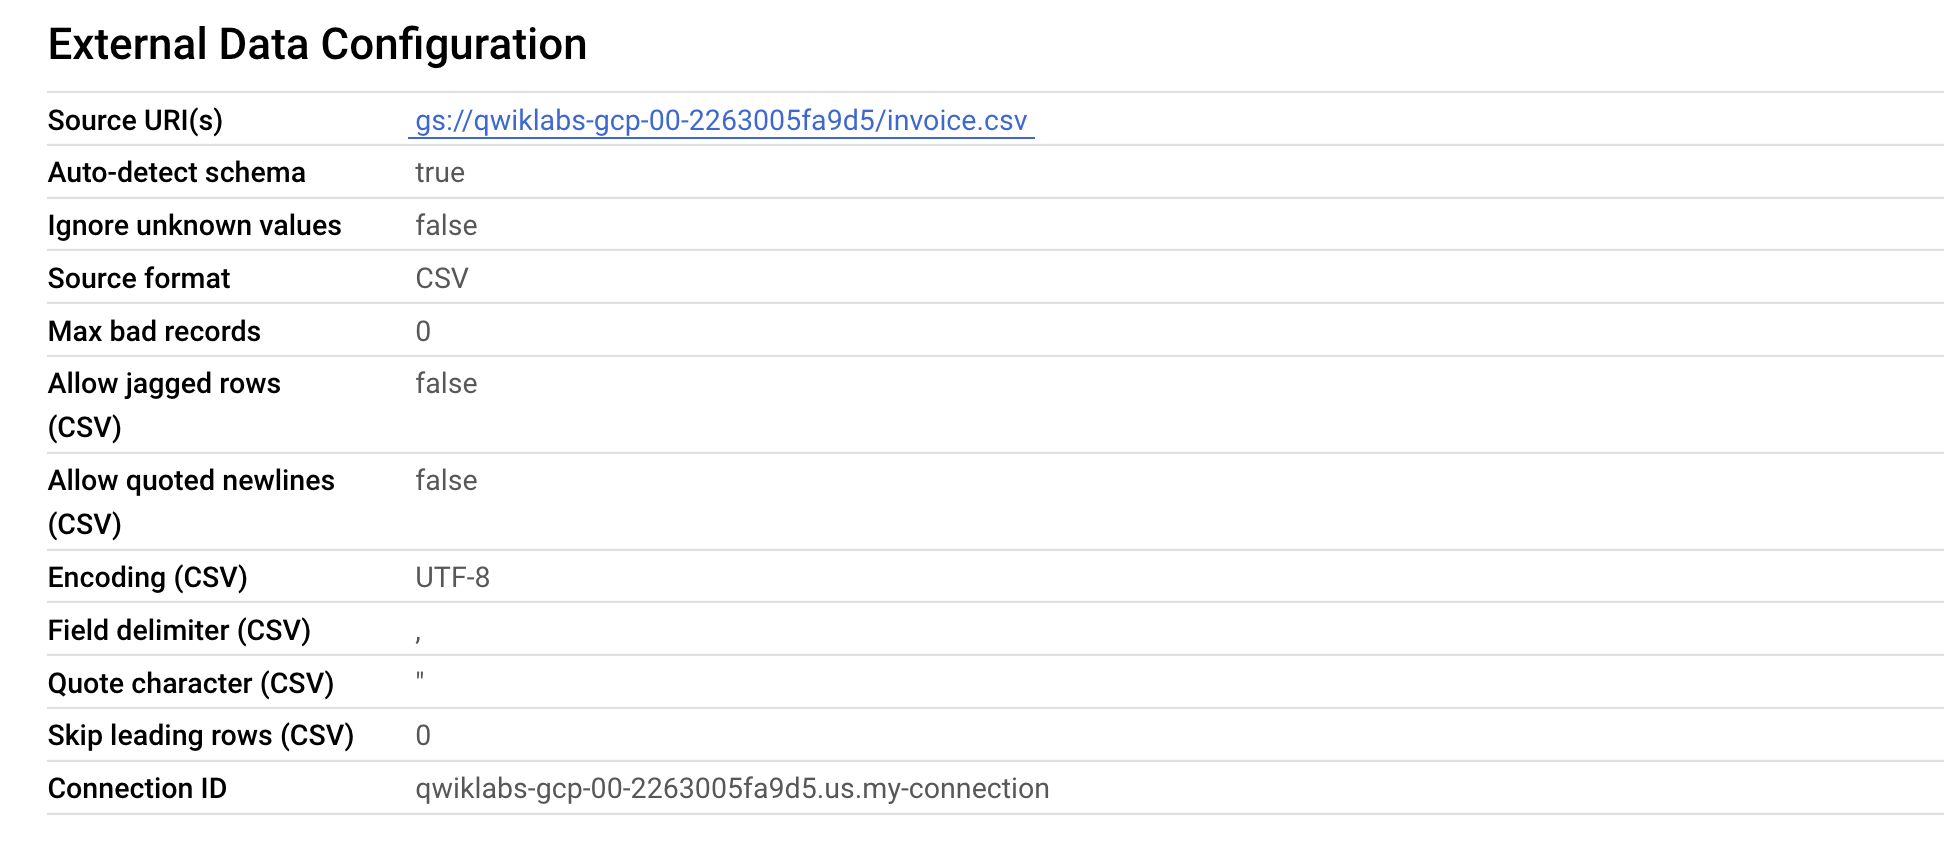
Open the Details tab.
-
Verify under External Data Configuration that the table is now using the proper Connection ID.
Great! You successfully upgraded the existing external table to a BigLake table by associating it to a cloud resource connection.
Congratulations!
In this lab you created a connection resource, set up access to a Cloud Storage data lake, and created a BigLake table from it. You then queried the BigLake table through BigQuery, and set up column level access control policies. Lastly, you updated an existing external table to a BigLake table using the connection resource.
Next Steps / Learn More
Be sure to check out the following documentation for more practice with BigLake:
- Introduction to BigLake Tables
- Create and Manage BigLake tables documentation
- Query a BigLake table using connectors
Google Cloud training and certification
...helps you make the most of Google Cloud technologies. Our classes include technical skills and best practices to help you get up to speed quickly and continue your learning journey. We offer fundamental to advanced level training, with on-demand, live, and virtual options to suit your busy schedule. Certifications help you validate and prove your skill and expertise in Google Cloud technologies.
Manual Last Updated January 16, 2024
Lab Last Tested January 16, 2024
Copyright 2024 Google LLC All rights reserved. Google and the Google logo are trademarks of Google LLC. All other company and product names may be trademarks of the respective companies with which they are associated.