Checkpoints
Launch Apps Script
/ 50
Use the add-on
/ 50
Creating a Gmail Add-on
GSP249

Overview
Gmail add-ons automate tasks within Gmail, saving time and effort for users. Gmail add-ons can examine incoming messages, then act on these messages in various ways, such as:
- Displaying additional information for the user in the Gmail UI.
- Connecting to non-Google services, to retrieve information or take other actions.
- Providing an interactive interface to allow the user to control the add-on or send information to another service.
What you'll do
In this hands-on lab you create a Gmail Add-on that allows you to quickly change the labels of an email thread.
Setup and requirements
Before you click the Start Lab button
Read these instructions. Labs are timed and you cannot pause them. The timer, which starts when you click Start Lab, shows how long lab resources will be made available to you.
This hands-on lab lets you do the lab activities yourself in a real cloud environment, not in a simulation or demo environment. It does so by giving you new, temporary credentials that you use to sign in and access Gmail for the duration of the lab.
What you need
To complete this lab, you need:
- Access to a standard internet browser (Chrome browser recommended).
- Time to complete the lab.
-
Make sure you are signed into the lab using an incognito window.
-
When ready, click
.
A new panel appears with the temporary credentials that you must use for this lab.
If you need to pay for the lab, a pop-up will open for you to select your payment method.
-
Note your lab credentials. You use them to sign in to Gmail for this lab.
If you use other credentials, you will get errors or incur charges. -
Click Open Gmail.
-
Click Next in the Sign in dialog.
-
Enter the provided Password and click Next.
-
If needed, click Accept to accept the terms.
Gmail opens. Click Get started, and then close any further information windows.
You are now in Gmail, looking at your Inbox.
Task 1. Create the script project
Launch Apps Script
- Click this Apps Script link to open in a new tab or browser window. A new project opens.
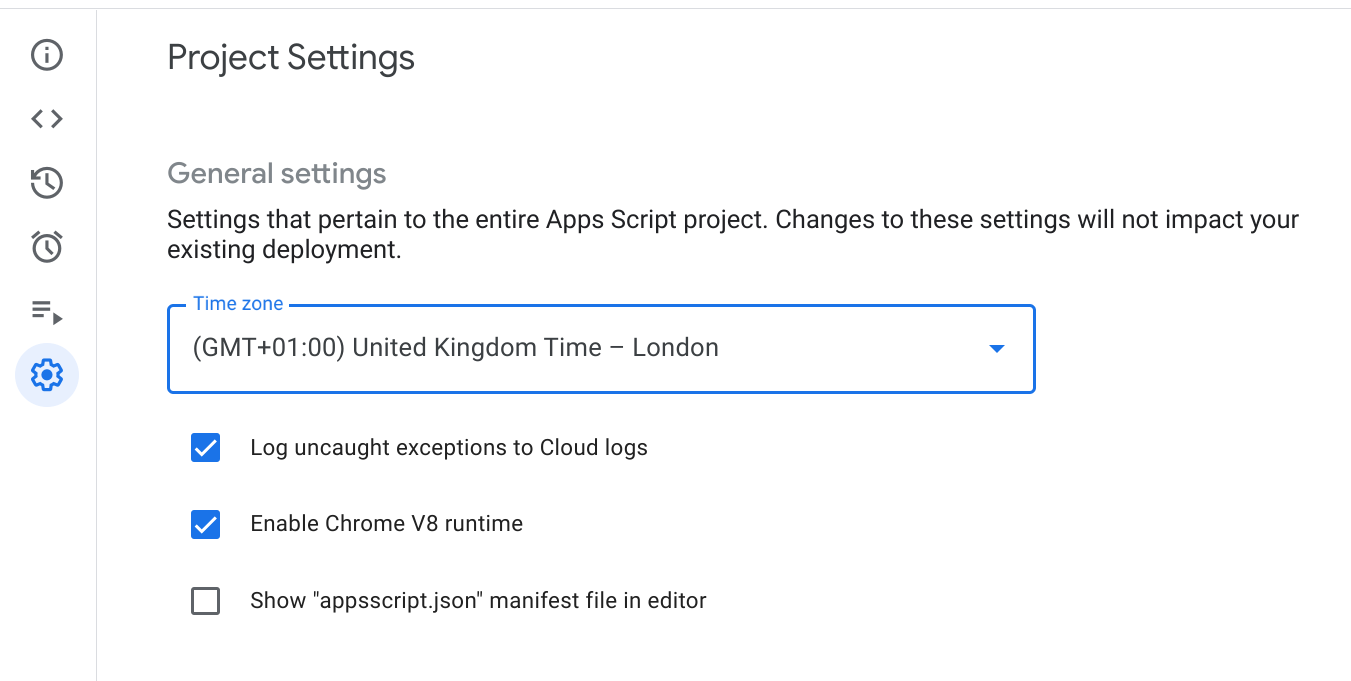
- Click the Settings icon then select the Show "appsscript.json" manifest file in editor option.
- Click the Editor icon.
Name the project
- Click Untitled project in the upper left.
- Name the project Gmail Add-on Quickstart, and then click Rename.
Create the script file, Code.gs
- Replace the
Code.gsfile contents with the following:
Code.gs
Task 2. Update the script manifest
Update the manifest (appsscript.json) to provide the add-on with required deployment information.
- In the script editor, select the appsscript.json file from the left menu.
- Replace the content of the manifest (
appsscript.json)with the following:
appsscript.json
- Click the Save project icon to save the changes to the manifest and Code.gs. This step provides the add-on with required deployment information. If you get an error, save
Code.gsagain.
Task 3. Deploy the add-on
-
Click the Deploy > Test deployments button at the top of the screen.
-
For Application(s): Gmail click Install.
-
Click Done.
-
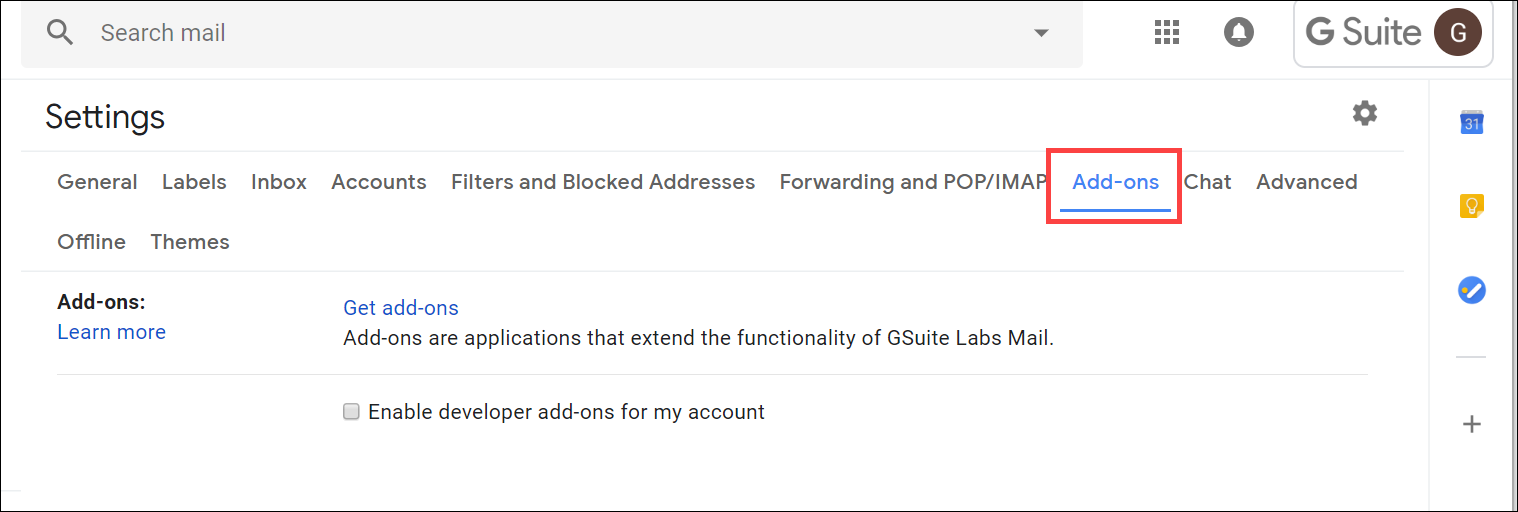
Open the Gmail add-on settings tab.
-
This brings you to the Setting dialog at the Add-ons tab.
When you have completed these steps, the add-on appears in the Installed developer add-ons list and becomes available for use in Gmail.
Task 4. Run the add-on
- Return to your Gmail tab and refresh the tab.
- Choose a message in Gmail and open it.
- Make sure the right side menu is open - click the arrow to expand if it has been collapsed.
Create some labels
- Click the Labels button (
) from the Gmail menu bar above the email.
- Click Create new.
- Enter "Test 1" as your label name and click the Create button.
- Repeat these steps to create another label named "Test 2".
Authorize add-on
The add-ons you installed appear in the right menu of the open email thread.
- On the right side of the screen, click on
.
The add-on will place a contextual card on the right-side of the window, with a message asking for authorization.
- Click the Authorize access link to open a dialog where you can authorize the add-on.
- Select the student account that should authorize the add-on.
- Click Allow.
- If next dialog may informs you that the app is not verified:
- Click Advanced.
- At the bottom of the dialog, click Go to Gmail Add-on Quickstart (unsafe).
- In the new dialog, type "Continue" into the text field, then click Next.
- Once authorized, the add-on should automatically refresh and start operating.
Task 5. Use the add-on
The Test 1 and the Test 2 labels are checked under the Available User Labels section of the add-on (right side menu).
- Click the Test 2 checkbox to deselect the label. This will remove the label from the email thread you're currently in.
- Verify that the appropriate labels have been applied by navigating back to the Inbox and refreshing the browser. Only the Test 1 label is still applied and Test 2 has been removed.
- Open a different email.
- In the add-on menu, select the Test 1 and Test 2 checkboxes, enabling them both.
- Return to the Inbox and refresh the browser. Both labels have been applied to the email thread.
Congratulations!
You now have an idea of what Gmail add-ons are capable of. You could do many other things like displaying other recent threads that the sender has started, or translating the text of an email from one language to another without leaving Gmail.
Finish your quest
This self-paced lab is part of Workspace Integrations quest. A quest is a series of related labs that form a learning path. Completing a quest earns you a badge to recognize your achievement. You can make your badge or badges public and link to them in your online resume or social media account. Enroll in any quest that contains this lab and get immediate completion credit. Refer to the Google Cloud Skills Boost catalog for all available quests.
Take your next lab
Learn more about Workspace:
Next steps
- Learn more about Gmail Add-ons
- Google Workspace Learning Center
Google Cloud training and certification
...helps you make the most of Google Cloud technologies. Our classes include technical skills and best practices to help you get up to speed quickly and continue your learning journey. We offer fundamental to advanced level training, with on-demand, live, and virtual options to suit your busy schedule. Certifications help you validate and prove your skill and expertise in Google Cloud technologies.
Manual Last Updated February 16, 2023
Lab Last Tested February 16, 2023
Copyright 2024 Google LLC All rights reserved. Google and the Google logo are trademarks of Google LLC. All other company and product names may be trademarks of the respective companies with which they are associated.