检查点
Sort data
/ 20
Create a filter
/ 10
Create a filter view
/ 15
Format numbers and text
/ 20
Validate data using the function and correct rule
/ 20
Clean data
/ 15
Validate Data in Google Sheets
GSP1062

Overview
For this lab you read through a fictitious business scenario. By completing the various lab activities, you assist the characters with their Google Sheets usage.

Thomas Omar and Seroja Malone started On the Rise Bakery as a small family business to share their love of international flavors and nostalgic baked goods. They expanded from New York City to across North America and now have bakeries around the world. As the company has grown, they have hired staff to help oversee daily operations for multiple locations.
Google Sheets has several built-in tools that help you validate the data in your spreadsheet.
In this lab, you use a spreadsheet to format the text and numbers printed on price labels used for bakery items. You also learn to remove duplicate data and create data validation rules to help On the Rise Bakery send customer marketing emails.
Objectives
You learn how to perform the following tasks:
- Sort and filter data.
- Format numbers and text.
- Clean data using functions.
- Create data validation rules.
Prerequisites
If you're new to Google Sheets, the following courses are recommended: Google Sheets, Google Sheets - Advanced Topics.
You may also find it helpful to complete the following lab: Google Sheets: Getting Started.
Setup and requirements
Before you click Start Lab
Read these instructions. Labs are timed and you cannot pause them. The timer starts when you click Start Lab and shows how long Google Workspace resources are available to you.
This Google Workspace hands-on lab lets you do the lab activities yourself in a real cloud environment, not in a simulation or demo environment. It does so by giving you new, temporary credentials that you use to sign in and access Google Workspace for the duration of the lab.
What you need
To complete this lab, you need:
- Access to a standard internet browser (Chrome browser recommended).
- Time. Note the time at the top of the left panel, which is an estimate of how long it should take to complete all steps. Plan your schedule so you have time to complete the lab. Once you start the lab, you will not be able to pause and return later (you begin at step 1 every time you start a lab).
- You do NOT need a Google Workspace account. An account is provided to you as part of this lab.
Start your lab
When you are ready, click Start Lab in the upper left panel.
Find your lab's User Email and Password
To access the resources and console for this lab, locate the User Email and Password in the left panel. These are the credentials you use to log in to Google Drive.
If your lab requires other resource identifiers or connection-related information, these will also appear on this panel.
Sign in to Google Sheets
- Click Open Google Sheets
Tip: Open the tabs in separate windows, side-by-side.
-
Notice the User Email field has been pre-filled. Click Next.
-
Enter the Password and click Next.
-
Accept all terms and conditions as prompted.
Google Sheets opens and you are signed in to your Student Google Account.
Task 1. Sort data
In this task, you open a Google Sheets file and organize the data using sorting.
Copy a spreadsheet
-
In the left panel of the lab instructions, right-click Open Google Sheets, and then click Open link in incognito window to sign into your student account.
-
Right-click On The Rise Bakery Customers and Items, and then click Open link in incognito window to open the spreadsheet.
-
Click File > Make a copy.
-
Click Make a copy in the modal window to save the copy of the sheet in My Drive.
Sort a range
When working with large datasets, it can be helpful to sort data to gain fast access to the necessary cells. Google Sheets lets users sort data in alphabetical or numerical order. You can sort an entire sheet by a column or you can sort a range of cells.
- In the lower-left of your spreadsheet, click the sheet labeled Items to view the data specific to items from On the Rise Bakery.

-
To freeze the first row, at the top, click View > Freeze > 1 row.
Freezing the top row ensures that the header does not change when you sort the records.
-
To sort by Number of Items in ascending order, right-click the heading for column C, and then click Sort sheet A to Z.
Use the SORT function
The SORT function can arrange rows in a spreadsheet based on the values in one or more of its columns. When using the SORT formula, you must provide the following parameters:
- range: The data to be sorted.
- sort_column: The range of the values to sort by.
- is_ascending: The direction to sort the sort_column in; TRUE sorts in ascending order, and FALSE sorts in descending order.
-
In the lower-left of your spreadsheet, click Add Sheet (+) to add another sheet.
-
Right-click the new sheet name, click Rename, and type Items Sorted By Unit Price
-
In cell A1 of the new sheet, type or paste =SORT(Items!A1:Items!C15, Items!B1:Items!B15, FALSE)
In this formula, the range is A1:C15 from the Items sheet and the sort column is column B, which contains the unit price of each column. The word FALSE indicates that the data should be sorted in descending order.
The SORT function also lets you sort data by multiple columns. To use this function, append the values for sort_column and is_ascending to the end of the formula for each additional column to sort by. See the Help Center for more information.
Click Check my progress to verify the objective.
Task 2. Filter data
The bakery is out of stock of cinnamon, so it wants to exclude cinnamon buns from the spreadsheet without deleting the affected rows. Filtering data can help with analyzing a subset of the data in your spreadsheet. In this task, you create a filter and a filter view to help On The Rise Bakery update its spreadsheet.
Create a filter
-
Return to the Items sheet.
-
Select column A, and then at the top, click Data > Create a filter.
-
Click the filter icon (
) that appears in cell A1 to display filter options.
-
Point to or click the following items in the menu to explore your options:
- Filter by color
- Filter by condition
- Filter by values
-
To filter out cinnamon buns, under Filter by values, clear the checkmark next to Cinnamon bun, and then click OK.
Click Check my progress to verify the objective.
- To remove the filter, at the top, click Data > Remove filter.
Create a filter view
-
Select cell A1.
-
At the top, click Data > Filter views > Create new filter view.
-
To filter out cinnamon buns, select the filter icon in cell A1, and then follow the previous process.
Click Check my progress to verify the objective.
- To delete the filter view, at the top, click Data > Filter views > Delete all filter views.
Task 3. Format data
Functions in Google Sheets are used to manipulate text and perform calculations. On The Rise Bakery must create price labels for its shelves, and it uses data in a Google Sheets spreadsheet. In this task, you use functions to format data and get labels ready for printing.
Truncate numbers
-
In cell E1, type Truncated Unit Prices
The unit price displayed for 10 donut holes shows five values after the decimal point, while other items only show four. You can use the truncate function to limit the decimal places shown.
-
In cell E2, type or paste =TRUNC(B2, 4)
-
Click the small blue box in the lower-right corner of the cell, and then drag your cursor down to apply the formula to the remaining cells in the column.
Format currency
-
To calculate the total cost of each menu item, in cell D2, type or paste =B2*C2
This formula multiplies the unit price by the number of items.
-
To round the total cost to two decimal points, change the formula in cell D2 to =ROUND(B2*C2, 2)
-
Apply the formula to the remaining cells in column D.
-
To format numbers as currency, click the gray column label for column D to select the column, and then at the top, click Format > Number > Currency.
Currency formatting options in Google Sheets can also be used to adjust the number of values shown after the decimal point and add a currency symbol. Similarly, the decrease decimal places option (
) in the toolbar lets you reduce the number of decimal places shown without changing the underlying data in the cell.
Format text
On the Rise Bakery must also properly capitalize product descriptions for the catering menu.
-
To insert a new column, right-click the column B label, and then click Insert 1 column left.
-
In cell B1, type Formatted Name
-
To capitalize the first letter of each word in the name of each food item, in cell B2, type or paste =PROPER(A2)
-
Apply this function to the remaining cells in column B.
Click Check my progress to verify the objective.
Task 4. Validate data
On The Rise Bakery must ensure the customer mailing list only contains valid email addresses. In this task, you create a data validation rule to verify that all entries have the proper formatting for email addresses.
Use a function to validate data
-
On the sheet labeled Customers, click cell D2 and, at the top, click Insert > Function > Info > ISEMAIL.
-
In the parentheses in the formula, type C2, so the formula reads =ISEMAIL(C2)
-
Apply the formula to the remaining rows in the column.
Use a rule to validate data
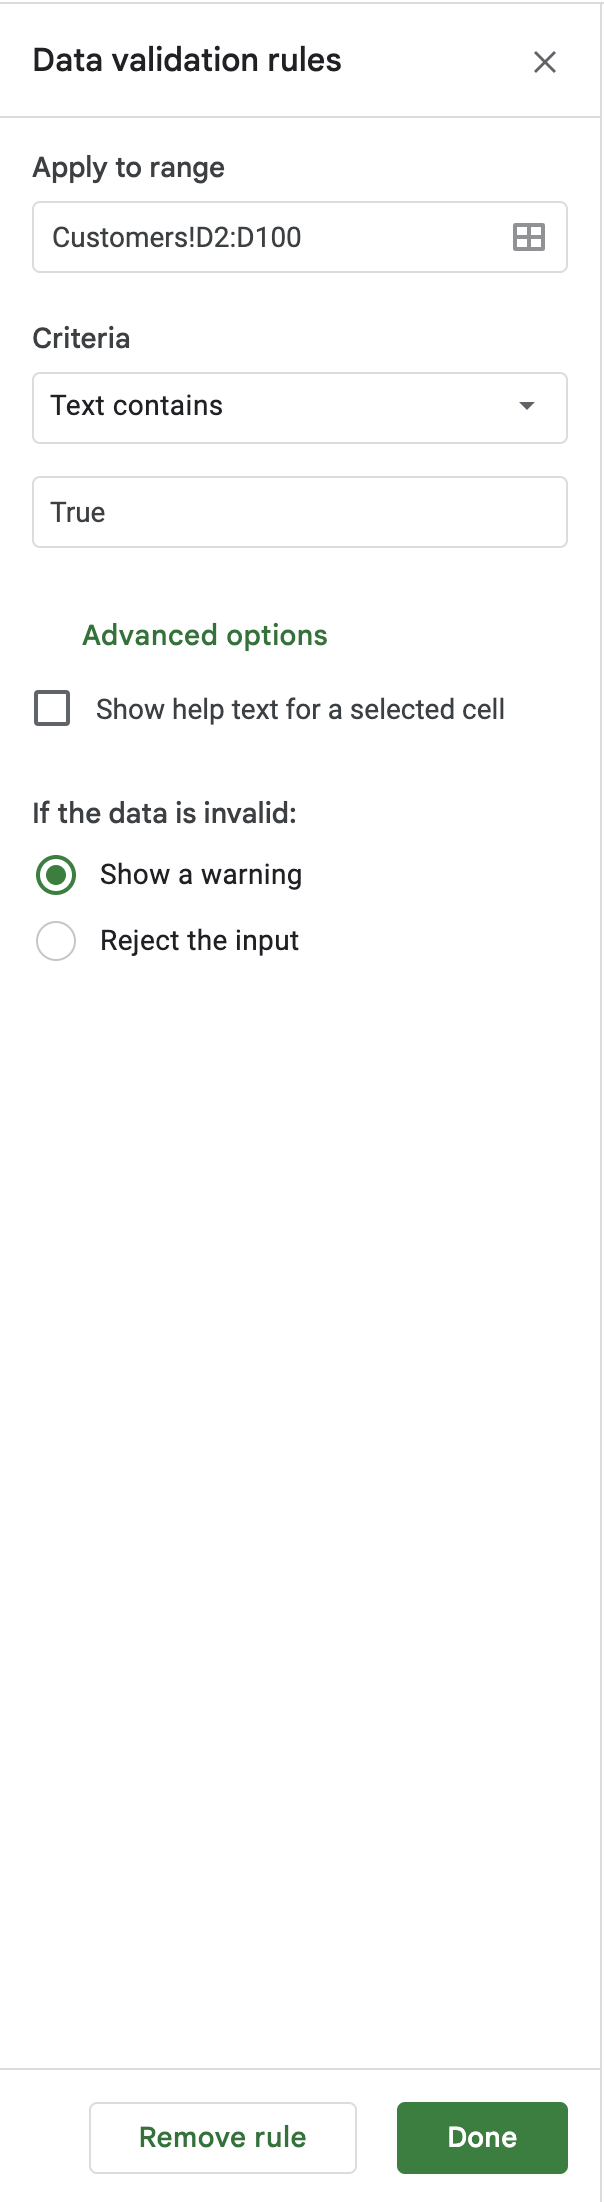
-
Select cells D2:D100 and, at the top, click Data > Data validation > + Add rule.
This opens a sidebar with options for data validation rules. The Cell range field should be prepopulated with Customers!D2:D100.
-
Select Text contains from the dropdown next to Criteria.
- Type True in input box and then click Done.
Your completed validation rule should look like this:
Data validation rules in Google Sheets allow you to constrain the values that can be entered into a worksheet cell. You can define one or more data validation rules for your worksheet. Typically, you define a separate data validation rule for each column in your worksheet where you need to constrain user entered values.
Test your understanding
Click Check my progress to verify the objective.
- (Optional) Experiment with ISDATE or ISNUMBER using a data validation rule. Use column E for sample data, and validate the data in column F.
Task 5. Clean Data
In this task, you help On the Rise Bakery clean data by removing duplicate rows and eliminating duplicates.
Highlight duplicates
On The Rise Bakery also wants to know whether a single email address is associated with more than one customer.
-
At the top, click Format > Conditional formatting. This opens a sidebar with options for conditional format rules.
-
For Apply to range, type C1:C100
-
Under Format rules, for Format cells if, select Custom formula is.
-
For Value or formula, type or paste =COUNTIF(C:C,C1)>1
Cells, rows, or columns can be formatted to change text or background color if they meet certain conditions. This formula checks if an email address is found more than once within the column.
-
For Fill color (
), select red.
-
Click Done.
Trim whitespaces
On The Rise Bakery wants to address each of its customers by their first names in emails.
-
In cell G1, type Personalized Greeting
-
In cell G2, type or paste =CONCATENATE("Hello ", A2, ","), and then apply this formula to the remaining cells in the column.
The CONCATENATE function lets you combine strings of text. In this case, the formula combines the word "Hello" with the customer's name and a comma. However, cell G2 appears different from the other cells in the column.
-
To trim whitespaces, update the formula in cell G2 to =CONCATENATE("Hello ", TRIM(A2),",")
The trim function removes leading, trailing, and repeated spaces in text. Using TRIM and CONCATENATE together ensures the Personalized Greeting will be properly formatted.
Remove duplicates
-
Select columns A-D, and at the top, click Data > Data cleanup > Remove duplicates.
-
In the Remove duplicates dialog, select Data has header row, and under Column to analyze, select Select all.
-
Click Remove duplicates.
-
Notice the number of duplicate rows removed, and then click OK or X to close the dialog.
Click Check my progress to verify the objective.
Congratulations!
You’ve successfully formatted the text and numbers on price labels. You also learned how to remove duplicate data and created data validation rules.
Next steps / Learn more
Check out the following for more information on Google Sheets:
- Read the Top 10 tips to clean up data.
- See the handy Sheets Cheat Sheet.
- See the Sheets Productivity Guide to learn what else you can do with Sheets.
- Visit the Google Workspace Learning Center to view Sheets tips, templates and more.
Google Cloud training and certification
...helps you make the most of Google Cloud technologies. Our classes include technical skills and best practices to help you get up to speed quickly and continue your learning journey. We offer fundamental to advanced level training, with on-demand, live, and virtual options to suit your busy schedule. Certifications help you validate and prove your skill and expertise in Google Cloud technologies.
Manual Last Updated February 20, 2024
Lab Last Tested August 22, 2023
Copyright 2024 Google LLC All rights reserved. Google and the Google logo are trademarks of Google LLC. All other company and product names may be trademarks of the respective companies with which they are associated.