Checkpoints
Create a Kubernetes cluster and launch Nginx container
/ 25
Create Monolith pods and service
/ 25
Allow traffic to the monolith service on the exposed nodeport
/ 5
Adding Labels to Pods
/ 20
Creating Deployments (Auth, Hello and Frontend)
/ 25
Orchestrating the Cloud with Kubernetes
- GSP021
- Overview
- Objectives
- Setup and requirements
- Task 1. Get the sample code
- Task 2. Quick Kubernetes Demo
- Task 3. Pods
- Task 4. Creating pods
- Task 5. Interacting with pods
- Task 6. Services
- Task 7. Creating a service
- Task 8. Adding labels to pods
- Task 9. Deploying applications with Kubernetes
- Task 10. Creating deployments
- Congratulations!
GSP021

Overview
Kubernetes is an open source project (available on kubernetes.io) which can run on many different environments, from laptops to high-availability multi-node clusters, from public clouds to on-premise deployments, from virtual machines to bare metal.
For this lab, using a managed environment such as Kubernetes Engine allows you to focus on experiencing Kubernetes rather than setting up the underlying infrastructure. Kubernetes Engine is a managed environment for deploying containerized applications. It brings the latest innovations in developer productivity, resource efficiency, automated operations, and open source flexibility to accelerate your time to market.
Objectives
In this lab you will learn how to:
- Provision a complete Kubernetes cluster using Kubernetes Engine.
- Deploy and manage Docker containers using
kubectl. - Break an application into microservices using Kubernetes' Deployments and Services.
Setup and requirements
Before you click the Start Lab button
Read these instructions. Labs are timed and you cannot pause them. The timer, which starts when you click Start Lab, shows how long Google Cloud resources will be made available to you.
This hands-on lab lets you do the lab activities yourself in a real cloud environment, not in a simulation or demo environment. It does so by giving you new, temporary credentials that you use to sign in and access Google Cloud for the duration of the lab.
To complete this lab, you need:
- Access to a standard internet browser (Chrome browser recommended).
- Time to complete the lab---remember, once you start, you cannot pause a lab.
How to start your lab and sign in to the Google Cloud console
-
Click the Start Lab button. If you need to pay for the lab, a pop-up opens for you to select your payment method. On the left is the Lab Details panel with the following:
- The Open Google Cloud console button
- Time remaining
- The temporary credentials that you must use for this lab
- Other information, if needed, to step through this lab
-
Click Open Google Cloud console (or right-click and select Open Link in Incognito Window if you are running the Chrome browser).
The lab spins up resources, and then opens another tab that shows the Sign in page.
Tip: Arrange the tabs in separate windows, side-by-side.
Note: If you see the Choose an account dialog, click Use Another Account. -
If necessary, copy the Username below and paste it into the Sign in dialog.
{{{user_0.username | "Username"}}} You can also find the Username in the Lab Details panel.
-
Click Next.
-
Copy the Password below and paste it into the Welcome dialog.
{{{user_0.password | "Password"}}} You can also find the Password in the Lab Details panel.
-
Click Next.
Important: You must use the credentials the lab provides you. Do not use your Google Cloud account credentials. Note: Using your own Google Cloud account for this lab may incur extra charges. -
Click through the subsequent pages:
- Accept the terms and conditions.
- Do not add recovery options or two-factor authentication (because this is a temporary account).
- Do not sign up for free trials.
After a few moments, the Google Cloud console opens in this tab.

Activate Cloud Shell
Cloud Shell is a virtual machine that is loaded with development tools. It offers a persistent 5GB home directory and runs on the Google Cloud. Cloud Shell provides command-line access to your Google Cloud resources.
- Click Activate Cloud Shell
at the top of the Google Cloud console.
When you are connected, you are already authenticated, and the project is set to your Project_ID,
gcloud is the command-line tool for Google Cloud. It comes pre-installed on Cloud Shell and supports tab-completion.
- (Optional) You can list the active account name with this command:
- Click Authorize.
Output:
- (Optional) You can list the project ID with this command:
Output:
gcloud, in Google Cloud, refer to the gcloud CLI overview guide.
Google Kubernetes Engine
- In the cloud shell environment type the following command to set the zone:
- Start up a cluster for use in this lab:
gcloud container clusters get-credentials io command to re-authenticate.
Task 1. Get the sample code
- Copy the source code from the Cloud Shell command line:
- Change into the directory needed for this lab:
- List the files to see what you're working with:
The sample has the following layout:
Now that you have the code -- it's time to give Kubernetes a try!
Task 2. Quick Kubernetes Demo
The easiest way to get started with Kubernetes is to use the kubectl create command.
- Use it to launch a single instance of the nginx container:
Kubernetes has created a deployment -- more about deployments later, but for now all you need to know is that deployments keep the pods up and running even when the nodes they run on fail.
In Kubernetes, all containers run in a pod.
- Use the
kubectl get podscommand to view the running nginx container:
- Once the nginx container has a Running status you can expose it outside of Kubernetes using the
kubectl exposecommand:
So what just happened? Behind the scenes Kubernetes created an external Load Balancer with a public IP address attached to it. Any client who hits that public IP address will be routed to the pods behind the service. In this case that would be the nginx pod.
- List our services now using the
kubectl get servicescommand:
ExternalIP field is populated for your service. This is normal -- just re-run the kubectl get services command every few seconds until the field populates.
- Add the External IP to this command to hit the Nginx container remotely:
And there you go! Kubernetes supports an easy to use workflow out of the box using the kubectl run and expose commands.
Test completed task
Click Check my progress below to check your lab progress. If you successfully created a Kubernetes cluster and deploy a Nginx container, you'll see an assessment score.
Now that you've seen a quick tour of kubernetes, it's time to dive into each of the components and abstractions.
Task 3. Pods
At the core of Kubernetes is the Pod.
Pods represent and hold a collection of one or more containers. Generally, if you have multiple containers with a hard dependency on each other, you package the containers inside a single pod.
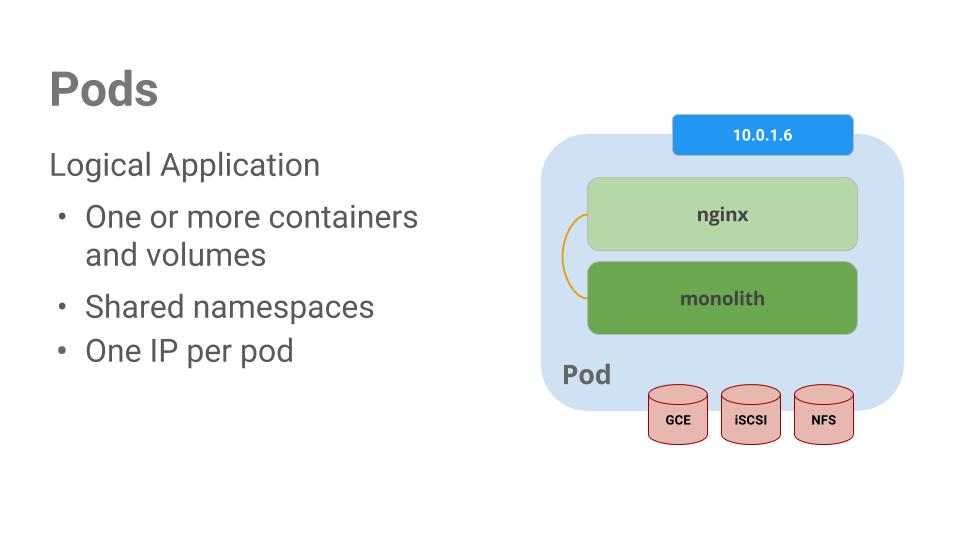
In this example there is a pod that contains the monolith and nginx containers.
Pods also have Volumes. Volumes are data disks that live as long as the pods live, and can be used by the containers in that pod. Pods provide a shared namespace for their contents which means that the two containers inside of our example pod can communicate with each other, and they also share the attached volumes.
Pods also share a network namespace. This means that there is one IP Address per pod.
Next, a deeper dive into pods.
Task 4. Creating pods
Pods can be created using pod configuration files. Take a moment to explore the monolith pod configuration file.
- Go to directory:
- Run the following:
The output shows the open configuration file:
There's a few things to notice here. You'll see that:
- Your pod is made up of one container (the monolith).
- You're passing a few arguments to our container when it starts up.
- You're opening up port 80 for http traffic.
- Create the monolith pod using
kubectl:
- Examine your pods. Use the
kubectl get podscommand to list all pods running in the default namespace:
- Once the pod is running, use
kubectl describecommand to get more information about the monolith pod:
You'll see a lot of the information about the monolith pod including the Pod IP address and the event log. This information will come in handy when troubleshooting.
Kubernetes makes it easy to create pods by describing them in configuration files and easy to view information about them when they are running. At this point you have the ability to create all the pods your deployment requires!
Task 5. Interacting with pods
By default, pods are allocated a private IP address and cannot be reached outside of the cluster. Use the kubectl port-forward command to map a local port to a port inside the monolith pod.
-
Open a second Cloud Shell terminal. Now you have two terminals, one to run the
kubectl port-forwardcommand, and the other to issuecurlcommands. -
In the 2nd terminal, run this command to set up port-forwarding:
- Now in the 1st terminal start talking to your pod using
curl:
Yes! You got a very friendly "hello" back from your container.
- Now use the
curlcommand to see what happens when you hit a secure endpoint:
Uh oh.
- Try logging in to get an auth token back from the monolith:
- At the login prompt, use the super-secret password
passwordto login.
Logging in caused a JWT token to print out.
- Since Cloud Shell does not handle copying long strings well, create an environment variable for the token.
-
Enter the super-secret password
passwordagain when prompted for the host password. -
Use this command to copy and then use the token to hit the secure endpoint with
curl:
At this point you should get a response back from our application, letting us know everything is right in the world again.
- Use the
kubectl logscommand to view the logs for themonolithPod.
-
Open a 3rd terminal and use the
-fflag to get a stream of the logs happening in real-time:
- Now if you use
curlin the 1st terminal to interact with the monolith, you can see the logs updating (in the 3rd terminal):
- Use the
kubectl execcommand to run an interactive shell inside the Monolith Pod. This can come in handy when you want to troubleshoot from within a container:
- For example, once you have a shell into the monolith container you can test external connectivity using the
pingcommand:
- Be sure to log out when you're done with this interactive shell.
As you can see, interacting with pods is as easy as using the kubectl command. If you need to hit a container remotely, or get a login shell, Kubernetes provides everything you need to get up and going.
Task 6. Services
Pods aren't meant to be persistent. They can be stopped or started for many reasons - like failed liveness or readiness checks - and this leads to a problem:
What happens if you want to communicate with a set of Pods? When they get restarted they might have a different IP address.
That's where Services come in. Services provide stable endpoints for Pods.
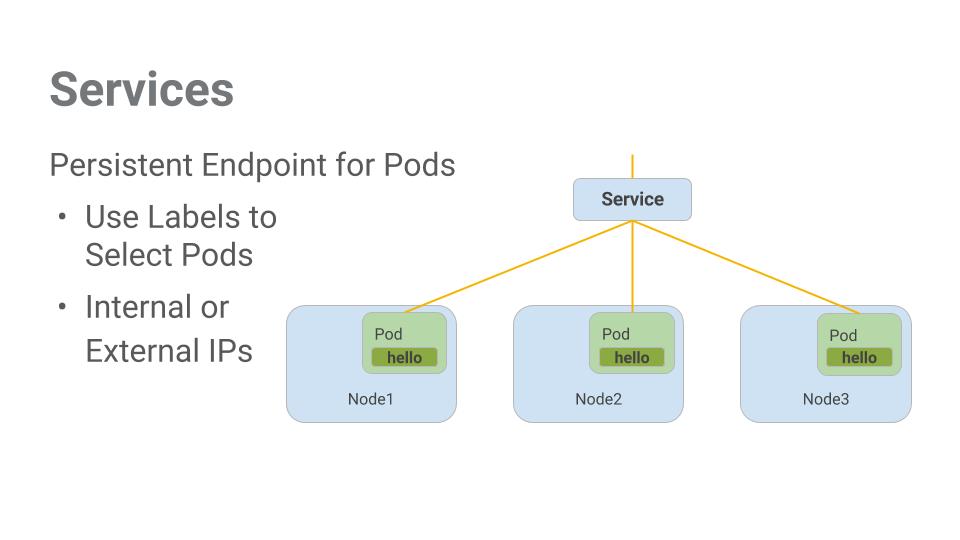
Services use labels to determine what Pods they operate on. If Pods have the correct labels, they are automatically picked up and exposed by our services.
The level of access a service provides to a set of pods depends on the Service's type. Currently there are three types:
-
ClusterIP(internal) -- the default type means that this Service is only visible inside of the cluster, -
NodePortgives each node in the cluster an externally accessible IP and -
LoadBalanceradds a load balancer from the cloud provider which forwards traffic from the service to Nodes within it.
Now you'll learn how to:
- Create a service
- Use label selectors to expose a limited set of Pods externally
Task 7. Creating a service
Before you can create services, first create a secure pod that can handle https traffic.
- If you've changed directories, make sure you return to the
~/orchestrate-with-kubernetes/kubernetesdirectory:
- Explore the monolith service configuration file:
- Create the secure-monolith pods and their configuration data:
Now that you have a secure pod, it's time to expose the secure-monolith Pod externally.To do that, create a Kubernetes service.
- Explore the monolith service configuration file:
(Output):
* There's a selector which is used to automatically find and expose any pods with the labels `app: monolith` and `secure: enabled`.
* Now you have to expose the nodeport here because this is how you'll forward external traffic from port 31000 to nginx (on port 443).
- Use the
kubectl createcommand to create the monolith service from the monolith service configuration file:
(Output):
Test completed task
Click Check my progress below to check your lab progress. If you successfully created Monolith pods and service, you'll see an assessment score.
You're using a port to expose the service. This means that it's possible to have port collisions if another app tries to bind to port 31000 on one of your servers.
Normally, Kubernetes would handle this port assignment. In this lab you chose a port so that it's easier to configure health checks later on.
- Use the
gcloud compute firewall-rulescommand to allow traffic to the monolith service on the exposed nodeport:
Test completed task
Click Check my progress below to check your lab progress. If you successfully created a firewall rule to allow TCP traffic on the 31000 port, you'll see an assessment score.
Now that everything is set up you should be able to hit the secure-monolith service from outside the cluster without using port forwarding.
- First, get an external IP address for one of the nodes.
- Now try hitting the secure-monolith service using
curl:
Uh oh! That timed out. What's going wrong?
Note: It's time for a quick knowledge check.
Use the following commands to answer the questions below:kubectl get services monolith
kubectl describe services monolith
Questions:
Hint: it has to do with labels. You'll fix the issue in the next section.
Task 8. Adding labels to pods
Currently the monolith service does not have endpoints. One way to troubleshoot an issue like this is to use the kubectl get pods command with a label query.
- You can see that you have quite a few pods running with the monolith label.
- But what about "app=monolith" and "secure=enabled"?
Notice this label query does not print any results. It seems like you need to add the "secure=enabled" label to them.
- Use the
kubectl labelcommand to add the missingsecure=enabledlabel to the secure-monolith Pod. Afterwards, you can check and see that your labels have been updated.
- Now that your pods are correctly labeled, view the list of endpoints on the monolith service:
And you have one!
- Test this out by hitting one of our nodes again.
Bam! Houston, we have contact.
Test completed task
Click Check my progress below to check your lab progress. If you successfully added labels to monolith pods, you'll see an assessment score.
Task 9. Deploying applications with Kubernetes
The goal of this lab is to get you ready for scaling and managing containers in production. That's where Deployments come in. Deployments are a declarative way to ensure that the number of Pods running is equal to the desired number of Pods, specified by the user.
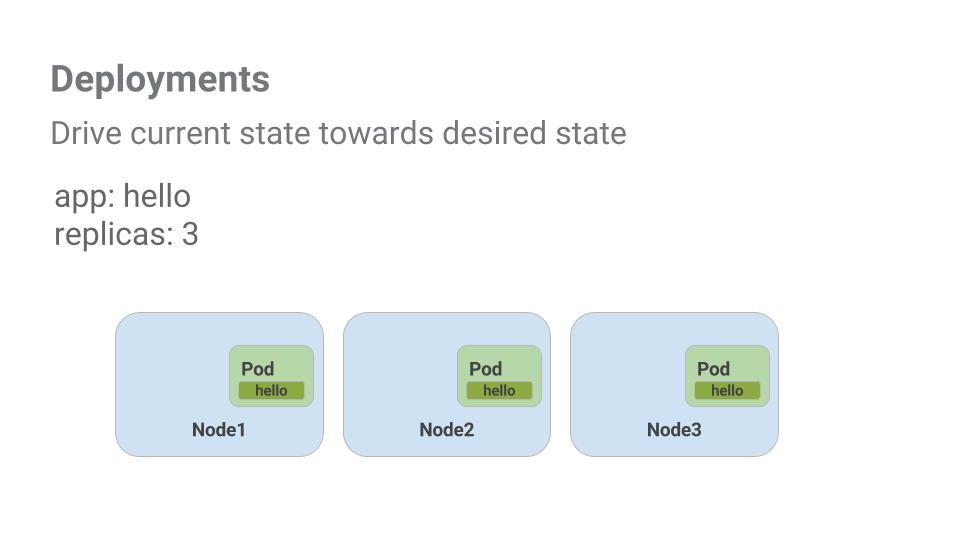
Look at a quick example:
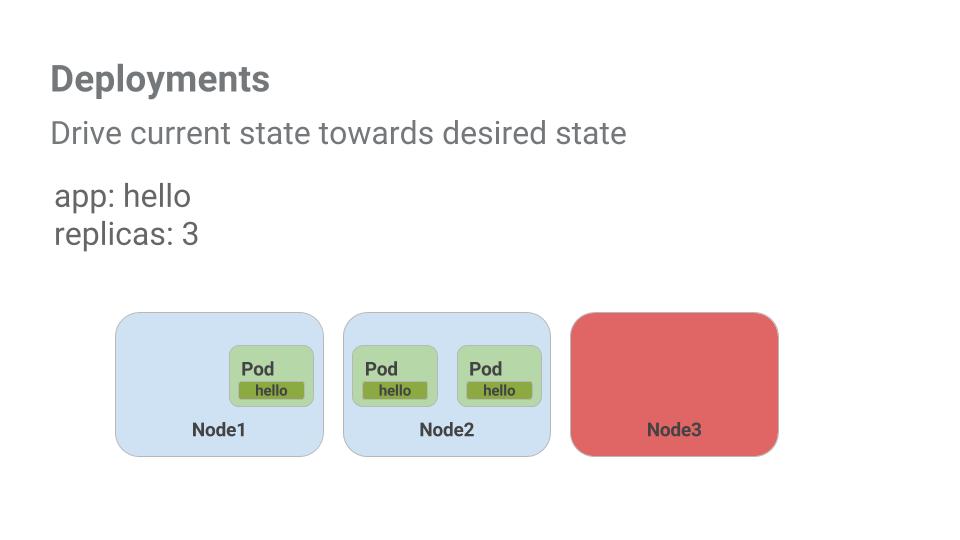
Pods are tied to the lifetime of the Node they are created on. In the example above, Node3 went down (taking a Pod with it). Instead of manually creating a new Pod and finding a Node for it, your Deployment created a new Pod and started it on Node2.
That's pretty cool!
It's time to combine everything you learned about Pods and Services to break up the monolith application into smaller Services using Deployments.
Task 10. Creating deployments
You're going to break the monolith app into three separate pieces:
- auth - Generates JWT tokens for authenticated users.
- hello - Greet authenticated users.
- frontend - Routes traffic to the auth and hello services.
You are ready to create deployments, one for each service. Afterwards, you'll define internal services for the auth and hello deployments and an external service for the frontend deployment. Once finished you'll be able to interact with the microservices just like with Monolith only now each piece will be able to be scaled and deployed, independently!
- Get started by examining the auth deployment configuration file.
(Output)
The deployment is creating 1 replica, and you're using version 2.0.0 of the auth container.
When you run the kubectl create command to create the auth deployment it will make one pod that conforms to the data in the Deployment manifest. This means you can scale the number of Pods by changing the number specified in the Replicas field.
- Anyway, go ahead and create your deployment object:
- It's time to create a service for your auth deployment. Use the
kubectl createcommand to create the auth service:
- Now do the same thing to create and expose the hello deployment:
- And one more time to create and expose the frontend Deployment.
- Interact with the frontend by grabbing its External IP and then curling to it:
EXTERNAL-IP column status is pending.And you get a hello response back!
Test completed task
Click Check my progress below to check your lab progress. If you successfully created Auth, Hello and Frontend deployments, you'll see an assessment score.
Congratulations!
Congratulations! You've developed a multi-service application using Kubernetes. The skills you've learned here will allow you to deploy complex applications on Kubernetes using a collection of deployments and services.
Next steps / Learn more
- You can follow the Kubernetes news on X and on the community's blog.
- Remember, Kubernetes is an open source project ( http://kubernetes.io/) hosted on GitHub. Your feedback and contributions are always welcome.
Google Cloud training and certification
...helps you make the most of Google Cloud technologies. Our classes include technical skills and best practices to help you get up to speed quickly and continue your learning journey. We offer fundamental to advanced level training, with on-demand, live, and virtual options to suit your busy schedule. Certifications help you validate and prove your skill and expertise in Google Cloud technologies.
Manual Last Updated January 26, 2023
Lab Last Tested January 26, 2023
Copyright 2024 Google LLC All rights reserved. Google and the Google logo are trademarks of Google LLC. All other company and product names may be trademarks of the respective companies with which they are associated.