Checkpoints
Create your cluster
/ 20
Create your pod
/ 30
Create a Kubernetes Service
/ 30
Scale up your service
/ 20
Hello Node Kubernetes
- GSP005
- Overview
- Setup and requirements
- Task 1. Create your Node.js application
- Task 2. Create a Docker container image
- Task 3. Create your cluster
- Task 4. Create your pod
- Task 5. Allow external traffic
- Task 6. Scale up your service
- Task 7. Roll out an upgrade to your service
- Task 8. Test your knowledge
- Congratulations!
GSP005

Overview
The goal of this hands-on lab is for you to turn code that you have developed into a replicated application running on Kubernetes, which is running on Kubernetes Engine. For this lab the code will be a simple Hello World node.js app.
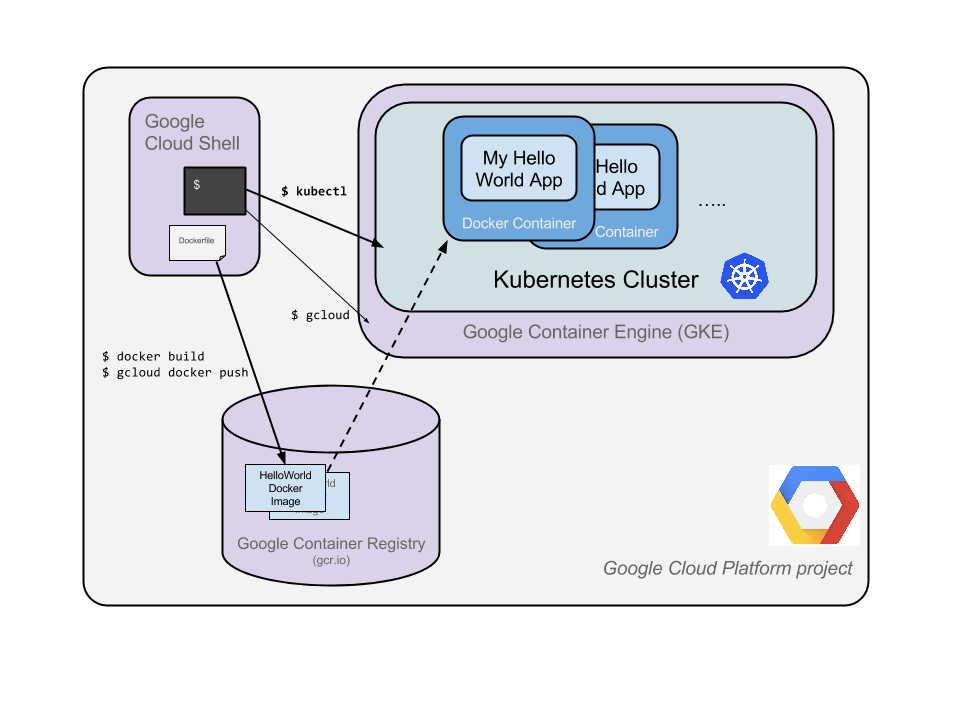
Here's a diagram of the various parts in play in this lab, to help you understand how the pieces fit together with one another. Use this as a reference as you progress through the lab; it should all make sense by the time you get to the end (but feel free to ignore this for now).
Kubernetes is an open source project (available on kubernetes.io) which can run on many different environments, from laptops to high-availability multi-node clusters; from public clouds to on-premise deployments; from virtual machines to bare metal.
For the purpose of this lab, using a managed environment such as Kubernetes Engine (a Google-hosted version of Kubernetes running on Compute Engine) will allow you to focus more on experiencing Kubernetes rather than setting up the underlying infrastructure.
What you'll learn
- Create a Node.js server.
- Create a Docker container image.
- Create a container cluster.
- Create a Kubernetes pod.
- Scale up your services.
Prerequisites
- Familiarity with standard Linux text editors such as
vim,emacs, ornanowill be helpful.
Students are to type the commands themselves, to help encourage learning of the core concepts. Many labs will include a code block that contains the required commands. You can easily copy and paste the commands from the code block into the appropriate places during the lab.
Setup and requirements
Before you click the Start Lab button
Read these instructions. Labs are timed and you cannot pause them. The timer, which starts when you click Start Lab, shows how long Google Cloud resources will be made available to you.
This hands-on lab lets you do the lab activities yourself in a real cloud environment, not in a simulation or demo environment. It does so by giving you new, temporary credentials that you use to sign in and access Google Cloud for the duration of the lab.
To complete this lab, you need:
- Access to a standard internet browser (Chrome browser recommended).
- Time to complete the lab---remember, once you start, you cannot pause a lab.
How to start your lab and sign in to the Google Cloud console
-
Click the Start Lab button. If you need to pay for the lab, a pop-up opens for you to select your payment method. On the left is the Lab Details panel with the following:
- The Open Google Cloud console button
- Time remaining
- The temporary credentials that you must use for this lab
- Other information, if needed, to step through this lab
-
Click Open Google Cloud console (or right-click and select Open Link in Incognito Window if you are running the Chrome browser).
The lab spins up resources, and then opens another tab that shows the Sign in page.
Tip: Arrange the tabs in separate windows, side-by-side.
Note: If you see the Choose an account dialog, click Use Another Account. -
If necessary, copy the Username below and paste it into the Sign in dialog.
{{{user_0.username | "Username"}}} You can also find the Username in the Lab Details panel.
-
Click Next.
-
Copy the Password below and paste it into the Welcome dialog.
{{{user_0.password | "Password"}}} You can also find the Password in the Lab Details panel.
-
Click Next.
Important: You must use the credentials the lab provides you. Do not use your Google Cloud account credentials. Note: Using your own Google Cloud account for this lab may incur extra charges. -
Click through the subsequent pages:
- Accept the terms and conditions.
- Do not add recovery options or two-factor authentication (because this is a temporary account).
- Do not sign up for free trials.
After a few moments, the Google Cloud console opens in this tab.

Activate Cloud Shell
Cloud Shell is a virtual machine that is loaded with development tools. It offers a persistent 5GB home directory and runs on the Google Cloud. Cloud Shell provides command-line access to your Google Cloud resources.
- Click Activate Cloud Shell
at the top of the Google Cloud console.
When you are connected, you are already authenticated, and the project is set to your Project_ID,
gcloud is the command-line tool for Google Cloud. It comes pre-installed on Cloud Shell and supports tab-completion.
- (Optional) You can list the active account name with this command:
- Click Authorize.
Output:
- (Optional) You can list the project ID with this command:
Output:
gcloud, in Google Cloud, refer to the gcloud CLI overview guide.
Task 1. Create your Node.js application
1.Using Cloud Shell, write a simple Node.js server that you'll deploy to Kubernetes Engine:
- Start the editor:
- Add this content to the file:
vi is used here, but nano and emacs are also available in Cloud Shell. You can also use the Web-editor feature of CloudShell as described in the How Cloud Shell works guide.
- Save the
server.jsfile by pressing Esc then:
- Since Cloud Shell has the
nodeexecutable installed, run this command to start the node server (the command produces no output):
- Use the built-in Web preview feature of Cloud Shell to open a new browser tab and proxy a request to the instance you just started on port
8080.
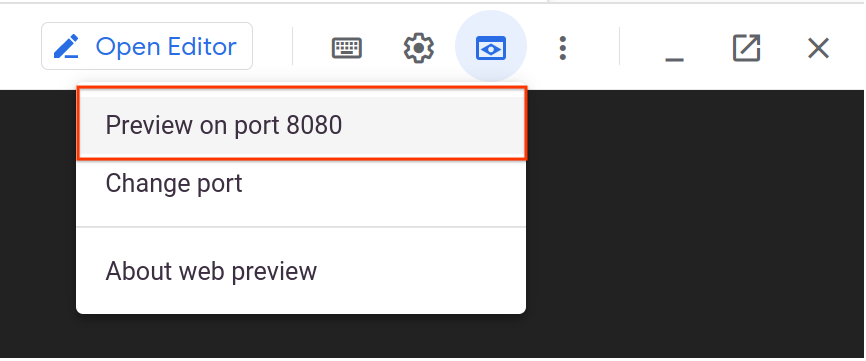
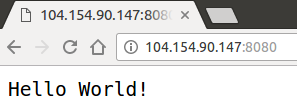
A new browser tab will open to display your results:

- Before continuing, return to Cloud Shell and type CTRL+C to stop the running node server.
Next you will package this application in a Docker container.
Task 2. Create a Docker container image
- Next, create a
Dockerfilethat describes the image you want to build. Docker container images can extend from other existing images, so for this image, we'll extend from an existing Node image:
- Start the editor:
- Add this content:
This "recipe" for the Docker image will:
- Start from the
nodeimage found on the Docker hub. - Expose port
8080. - Copy your
server.jsfile to the image. - Start the node server as we previously did manually.
- Save this
Dockerfileby pressing ESC, then type:
- Build the image with the following, replacing
PROJECT_IDwith your Project ID, found in the Console and the Lab Details section of the lab:
It'll take some time to download and extract everything, but you can see the progress bars as the image builds.
Once complete, test the image locally by running a Docker container as a daemon on port 8080 from your newly-created container image.
- Run the following command replacing
PROJECT_IDwith your Project ID, found in the Console and the Lab Details section of the lab:
Your output should look something like this:
- To see your results, use the web preview feature of Cloud Shell. Alternatively use
curlfrom your Cloud Shell prompt:
This is the output you should see:
docker run command can be found in the Docker run reference.
Next, stop the running container.
- Find your Docker container ID by running:
Your output you should look like this:
- Stop the container by running the following, replacing the
[CONTAINER ID]with the value provided from the previous step:
Your console output should resemble the following (your container ID):
Now that the image is working as intended, push it to the Google Container Registry, a private repository for your Docker images, accessible from your Google Cloud projects.
- Run the following command to configure docker authentication.
If Prompted, Do you want to continue (Y/n)?. Enter Y.
- Run this command, replacing
PROJECT_IDwith your Project ID, found in the Console or the Lab Details section of the lab:
The initial push may take a few minutes to complete. You'll see the progress bars as it builds.
- The container image will be listed in your Console. Click Navigation menu > Container Registry.
Now you have a project-wide Docker image available which Kubernetes can access and orchestrate.
gcr.io). In your own environment you can be more specific about which zone and bucket to use. To learn more, refer to .
Task 3. Create your cluster
Now you're ready to create your Kubernetes Engine cluster. A cluster consists of a Kubernetes master API server hosted by Google and a set of worker nodes. The worker nodes are Compute Engine virtual machines.
- Make sure you have set your project using
gcloud(replacePROJECT_IDwith your Project ID, found in the console and in the Lab Details section of the lab):
- Create a cluster with two n1-standard-1 nodes (this will take a few minutes to complete):
You can safely ignore warnings that come up when the cluster builds.
The console output should look like this:
Alternatively, you can create this cluster through the Console by opening the Navigation menu and selecting Kubernetes Engine > Kubernetes clusters > Create.
If you select Navigation menu > Kubernetes Engine, you'll see that you have a fully-functioning Kubernetes cluster powered by Kubernetes Engine.
It's time to deploy your own containerized application to the Kubernetes cluster! From now on you'll use the kubectl command line (already set up in your Cloud Shell environment).
Click Check my progress below to check your lab progress.
Task 4. Create your pod
A Kubernetes pod is a group of containers tied together for administration and networking purposes. It can contain single or multiple containers. Here you'll use one container built with your Node.js image stored in your private container registry. It will serve content on port 8080.
- Create a pod with the
kubectl runcommand (replacePROJECT_IDwith your Project ID, found in the console and in the Connection Details section of the lab):
Output:
As you can see, you've created a deployment object. Deployments are the recommended way to create and scale pods. Here, a new deployment manages a single pod replica running the hello-node:v1 image.
- To view the deployment, run:
Output:
- To view the pod created by the deployment, run:
Output:
Now is a good time to go through some interesting kubectl commands. None of these will change the state of the cluster. To view the full reference documentation, refer to Command line tool (kubectl):
And for troubleshooting :
You now need to make your pod accessible to the outside world.
Click Check my progress below to check your lab progress.
Task 5. Allow external traffic
By default, the pod is only accessible by its internal IP within the cluster. In order to make the hello-node container accessible from outside the Kubernetes virtual network, you have to expose the pod as a Kubernetes service.
- From Cloud Shell you can expose the pod to the public internet with the
kubectl exposecommand combined with the--type="LoadBalancer"flag. This flag is required for the creation of an externally accessible IP:
Output:
The flag used in this command specifies that it is using the load-balancer provided by the underlying infrastructure (in this case the Compute Engine load balancer). Note that you expose the deployment, and not the pod, directly. This will cause the resulting service to load balance traffic across all pods managed by the deployment (in this case only 1 pod, but you will add more replicas later).
The Kubernetes master creates the load balancer and related Compute Engine forwarding rules, target pools, and firewall rules to make the service fully accessible from outside of Google Cloud.
- To find the publicly-accessible IP address of the service, request
kubectlto list all the cluster services:
This is the output you should see:
There are 2 IP addresses listed for your hello-node service, both serving port 8080. The CLUSTER-IP is the internal IP that is only visible inside your cloud virtual network; the EXTERNAL-IP is the external load-balanced IP.
EXTERNAL-IP may take several minutes to become available and visible. If the EXTERNAL-IP is missing, wait a few minutes and run the command again.
- You should now be able to reach the service by pointing your browser to this address:
http://<EXTERNAL_IP>:8080
At this point you've gained several features from moving to containers and Kubernetes - you do not need to specify on which host to run your workload and you also benefit from service monitoring and restart. Now see what else can be gained from your new Kubernetes infrastructure.
Click Check my progress below to check your lab progress.
Task 6. Scale up your service
One of the powerful features offered by Kubernetes is how easy it is to scale your application. Suppose you suddenly need more capacity. You can tell the replication controller to manage a new number of replicas for your pod.
- Set the number of replicas for your pod:
Output:
- Request a description of the updated deployment:
Output:
Re-run the above command until you see all 4 replicas created.
- List all the pods:
This is the output you should see:
A declarative approach is being used here. Rather than starting or stopping new instances, you declare how many instances should be running at all times. Kubernetes reconciliation loops make sure that reality matches what you requested and takes action if needed.
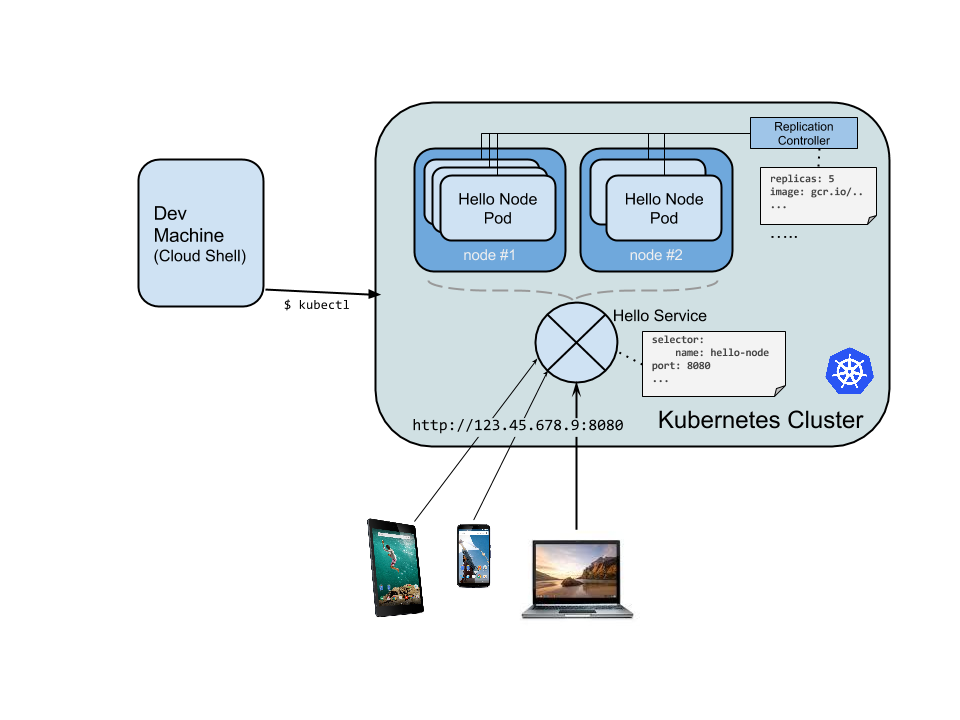
Here's a diagram summarizing the state of your Kubernetes cluster:
Click Check my progress below to check your lab progress.
Task 7. Roll out an upgrade to your service
At some point the application that you've deployed to production will require bug fixes or additional features. Kubernetes helps you deploy a new version to production without impacting your users.
- First, modify the application by opening
server.js:
- Then update the response message:
- Save the
server.jsfile by pressing Esc then:
Now you can build and publish a new container image to the registry with an incremented tag (v2 in this case).
- Run the following commands, replacing
PROJECT_IDwith your lab project ID:
Kubernetes will smoothly update your replication controller to the new version of the application. In order to change the image label for your running container, you will edit the existing hello-node deployment and change the image from gcr.io/PROJECT_ID/hello-node:v1 to gcr.io/PROJECT_ID/hello-node:v2.
- To do this, use the
kubectl editcommand:
It opens a text editor displaying the full deployment yaml configuration. It isn't necessary to understand the full yaml config right now, just understand that by updating the spec.template.spec.containers.image field in the config you are telling the deployment to update the pods with the new image.
- Look for
Spec>containers>imageand change the version number from v1 to v2:
- After making the change, save and close this file: Press ESC, then:
This is the output you should see:
- Run the following to update the deployment with the new image:
New pods will be created with the new image and the old pods will be deleted.
This is the output you should see (you may need to rerun the above command to see the following):
While this is happening, the users of your services shouldn't see any interruption. After a little while they'll start accessing the new version of your application. You can find more details on rolling updates in the Performing a Rolling Update documentation.
Hopefully with these deployment, scaling, and updated features, once you've set up your Kubernetes Engine cluster, you'll agree that Kubernetes will help you focus on the application rather than the infrastructure.
Task 8. Test your knowledge
Test your knowledge about Google cloud Platform by taking our quiz. (Please select multiple correct options.)
Congratulations!
This concludes this hands-on lab with Kubernetes. You've only scratched the surface of this technology. Explore with your own pods, replication controllers, and services - and also check out liveness probes (health checks) and consider using the Kubernetes API directly.
Take your next lab
Try Managing Deployments using Kubernetes Engine, or check out these suggestions:
Next steps / Learn more
- Check out Minikube, which offers a simple setup of a single node kubernetes cluster for development and testing purposes after you take this lab: http://kubernetes.io/docs/getting-started-guides/minikube/.
- Kubernetes is an open source project ( http://kubernetes.io/) hosted on GitHub. Your feedback and contributions are always welcome.
- You can follow the Kubernetes news on Twitter and on the community blog.
Google Cloud training and certification
...helps you make the most of Google Cloud technologies. Our classes include technical skills and best practices to help you get up to speed quickly and continue your learning journey. We offer fundamental to advanced level training, with on-demand, live, and virtual options to suit your busy schedule. Certifications help you validate and prove your skill and expertise in Google Cloud technologies.
Manual Last Updated March 14, 2024
Lab Last Tested March 14, 2024
Copyright 2024 Google LLC All rights reserved. Google and the Google logo are trademarks of Google LLC. All other company and product names may be trademarks of the respective companies with which they are associated.