Prüfpunkte
Retrieve dataset files
/ 50
Publish the results to BigQuery
/ 50
Working with Cloud Dataprep on Google Cloud
- GSP050
- Overview
- Setup and requirements
- Task 1. Open Google Cloud Dataprep
- Task 2. Retrieve dataset files
- Task 3. Create a Flow
- Task 4. Clean customer data
- Task 5. Union multiple transactions datasets
- Task 6. Modifying recipe steps
- Task 7. Join transactions data to customers data
- Task 8. Create new columns and rename
- Task 9. Publish the results to BigQuery
- Congratulations!
This lab was developed with our partner, Alteryx. Your personal information may be shared with Alteryx, the lab sponsor, if you have opted-in to receive product updates, announcements, and offers in your Account Profile.
GSP050

Overview
Cloud Dataprep is Google's self-service data preparation tool built in collaboration with Alteryx. In this lab you will learn how to clean and enrich multiple datasets using Cloud Dataprep. The lab exercises are based on a mock use case scenario.
Use case scenario:
You work for a technical services company that sells three monthly subscription products:
- Silver (price: $9.99/month)
- Gold (price: $14.99/month)
- Platinum (price: $29.99/month)
The company occasionally offers promotional discounts, so some product prices may be slightly lower than those listed above. Your overall goal is to provide an analysis of sales activity by zip code over the course of three years.
To do this you'll need to join your customer contact datasource (where the zip code information resides) with sales data from your purchases datasource. Once you've joined the data, you'll aggregate the results.
What you'll learn
In this lab, you will learn how to perform the following tasks:
- Cleaning and profiling data with Cloud Dataprep
- Combining multiple datasets using Cloud Dataprep
- Computing the results of formulas in Cloud Dataprep
Setup and requirements
Before you click the Start Lab button
Read these instructions. Labs are timed and you cannot pause them. The timer, which starts when you click Start Lab, shows how long Google Cloud resources will be made available to you.
This hands-on lab lets you do the lab activities yourself in a real cloud environment, not in a simulation or demo environment. It does so by giving you new, temporary credentials that you use to sign in and access Google Cloud for the duration of the lab.
To complete this lab, you need:
- Access to a standard internet browser (Chrome browser recommended).
- Time to complete the lab---remember, once you start, you cannot pause a lab.
How to start your lab and sign in to the Google Cloud console
-
Click the Start Lab button. If you need to pay for the lab, a pop-up opens for you to select your payment method. On the left is the Lab Details panel with the following:
- The Open Google Cloud console button
- Time remaining
- The temporary credentials that you must use for this lab
- Other information, if needed, to step through this lab
-
Click Open Google Cloud console (or right-click and select Open Link in Incognito Window if you are running the Chrome browser).
The lab spins up resources, and then opens another tab that shows the Sign in page.
Tip: Arrange the tabs in separate windows, side-by-side.
Note: If you see the Choose an account dialog, click Use Another Account. -
If necessary, copy the Username below and paste it into the Sign in dialog.
{{{user_0.username | "Username"}}} You can also find the Username in the Lab Details panel.
-
Click Next.
-
Copy the Password below and paste it into the Welcome dialog.
{{{user_0.password | "Password"}}} You can also find the Password in the Lab Details panel.
-
Click Next.
Important: You must use the credentials the lab provides you. Do not use your Google Cloud account credentials. Note: Using your own Google Cloud account for this lab may incur extra charges. -
Click through the subsequent pages:
- Accept the terms and conditions.
- Do not add recovery options or two-factor authentication (because this is a temporary account).
- Do not sign up for free trials.
After a few moments, the Google Cloud console opens in this tab.

Activate Cloud Shell
Cloud Shell is a virtual machine that is loaded with development tools. It offers a persistent 5GB home directory and runs on the Google Cloud. Cloud Shell provides command-line access to your Google Cloud resources.
- Click Activate Cloud Shell
at the top of the Google Cloud console.
When you are connected, you are already authenticated, and the project is set to your Project_ID,
gcloud is the command-line tool for Google Cloud. It comes pre-installed on Cloud Shell and supports tab-completion.
- (Optional) You can list the active account name with this command:
- Click Authorize.
Output:
- (Optional) You can list the project ID with this command:
Output:
gcloud, in Google Cloud, refer to the gcloud CLI overview guide.
Task 1. Open Google Cloud Dataprep
- In Cloud Shell run the following command:
You should see a message saying the service identity was created.
-
In the Cloud Console go to the Navigation menu, and under ANALYTICS select Dataprep.
-
Check that you agree to Google Dataprep Terms of Service, and then click Accept.
-
Click the checkbox and then click Agree and Continue when prompted to share account information with Alteryx.
-
Click Allow to give Alteryx access to your project.
-
Select your lab credentials to sign in and click Allow.
-
Check the box and click Accept to agree to Alteryx Terms of Service.
-
If prompted to use the default location for the storage bucket, click Continue.
-
For new users, a tutorial will launch, asking you to select datasets. Quit out of this screen by clicking Cancel or exiting out.
-
Click on the Dataprep icon on the top left corner to go to the home screen.
Task 2. Retrieve dataset files
In this section you will add the sales activity files to a storage bucket that Dataprep created for you.
- Go back to the Cloud Console.
-
Get your bucket name. From the Navigation menu, select Cloud Storage > Bucket.
-
Note the Dataprep bucket name to use in the next step.
-
In the Cloud Shell command line, execute the following command, substituting
[YOUR-BUCKET-NAME]with the Dataprep bucket name:
You should receive a similar output:
Click Check my progress to verify the objective.
Task 3. Create a Flow
Go back to the Cloud Dataprep tab. To wrangle your data, you need to create a Flow. A Flow is a set of related datasets and the connections between them.
- Click Create Flow in the upper right-hand corner:
- Name your Flow
Qwiklab1, leave the flow description blank, then click Ok.
At this point your Flow is created. To guide you, Dataprep creates some placeholders in the flow to help you get started. The first step is to import and add data to Dataprep and the Flow.
-
Click on the + under Dataset to add a new data source and click the Import Datasets link.
-
In the left navigation menu, click
Cloud Storage>dataprep-staging-xxx...>gsp050to access the sample data you stored in the previous section. -
Click the + next to each file listed. When you click on a file, it will move to the right side of the screen. Click Import & Add to Flow to add the datasets to your Flow:
Cloud Dataprep brings you back to the Flow View page, which now contains the datasets you added. Additional placeholders for the recipe and output are created.
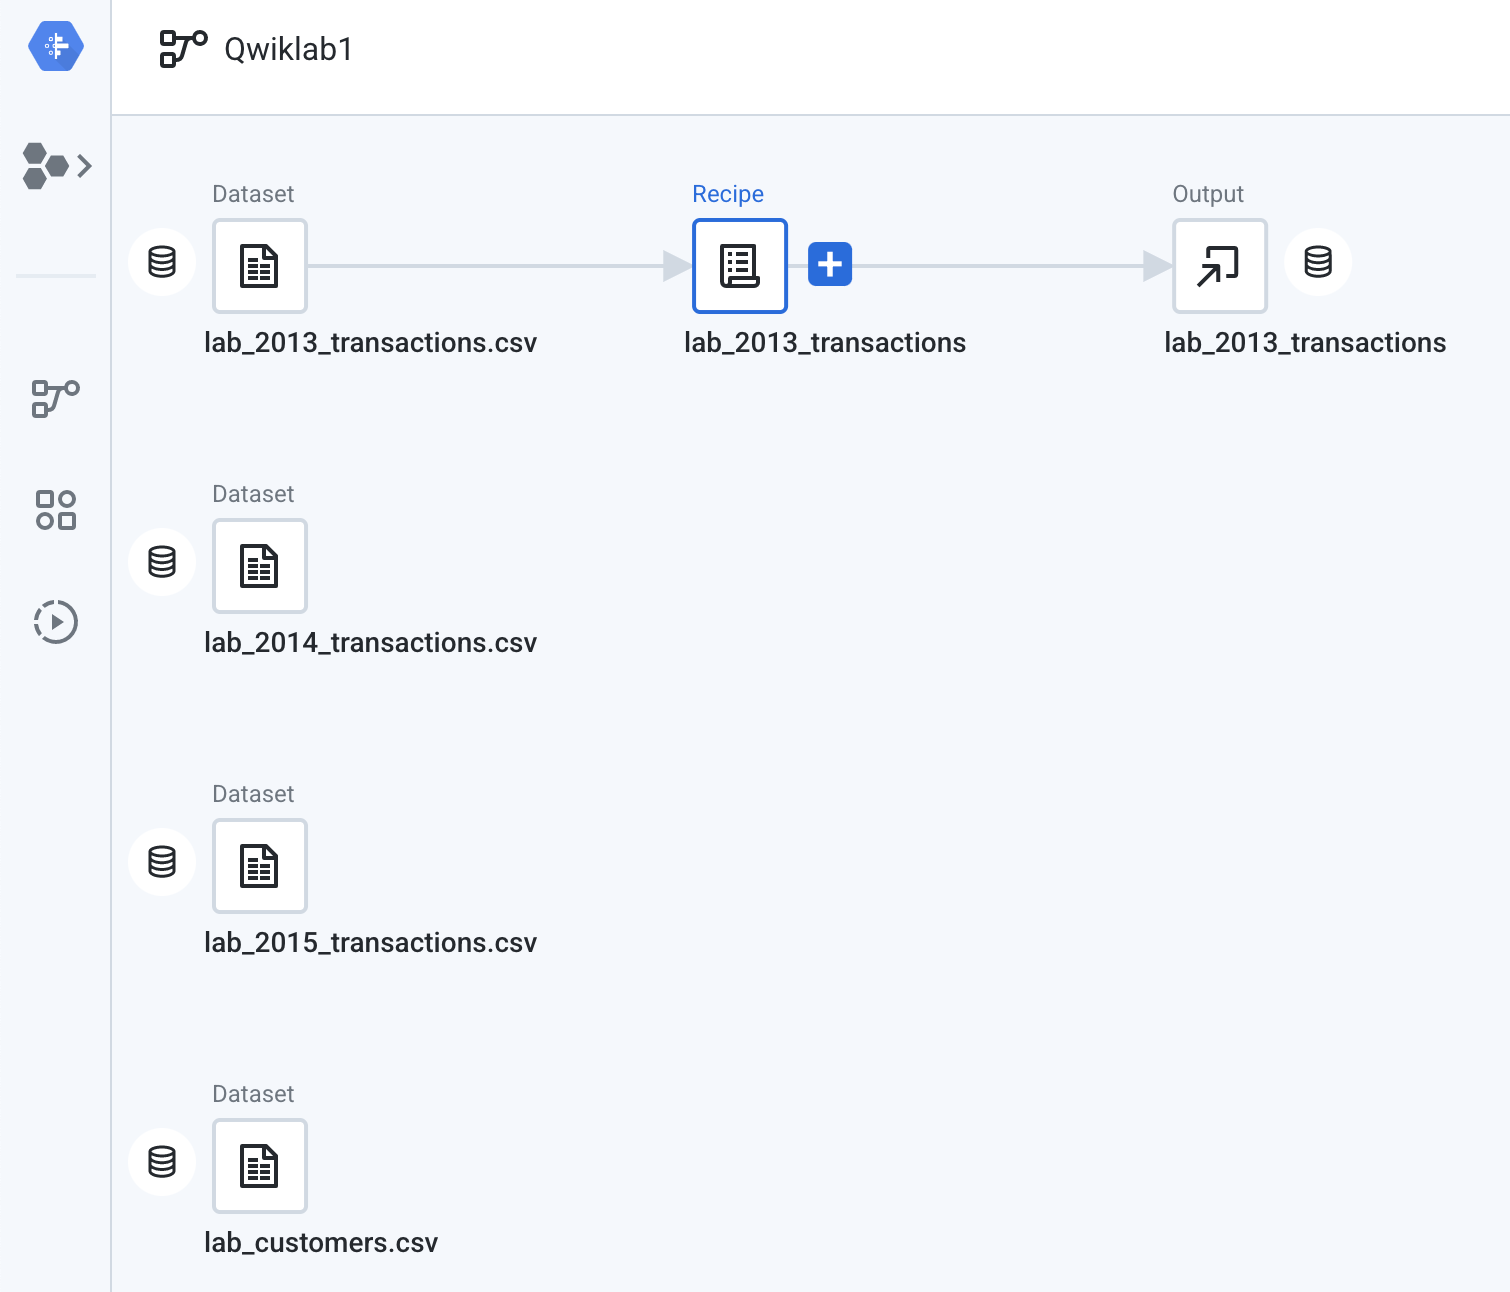
Task 4. Clean customer data
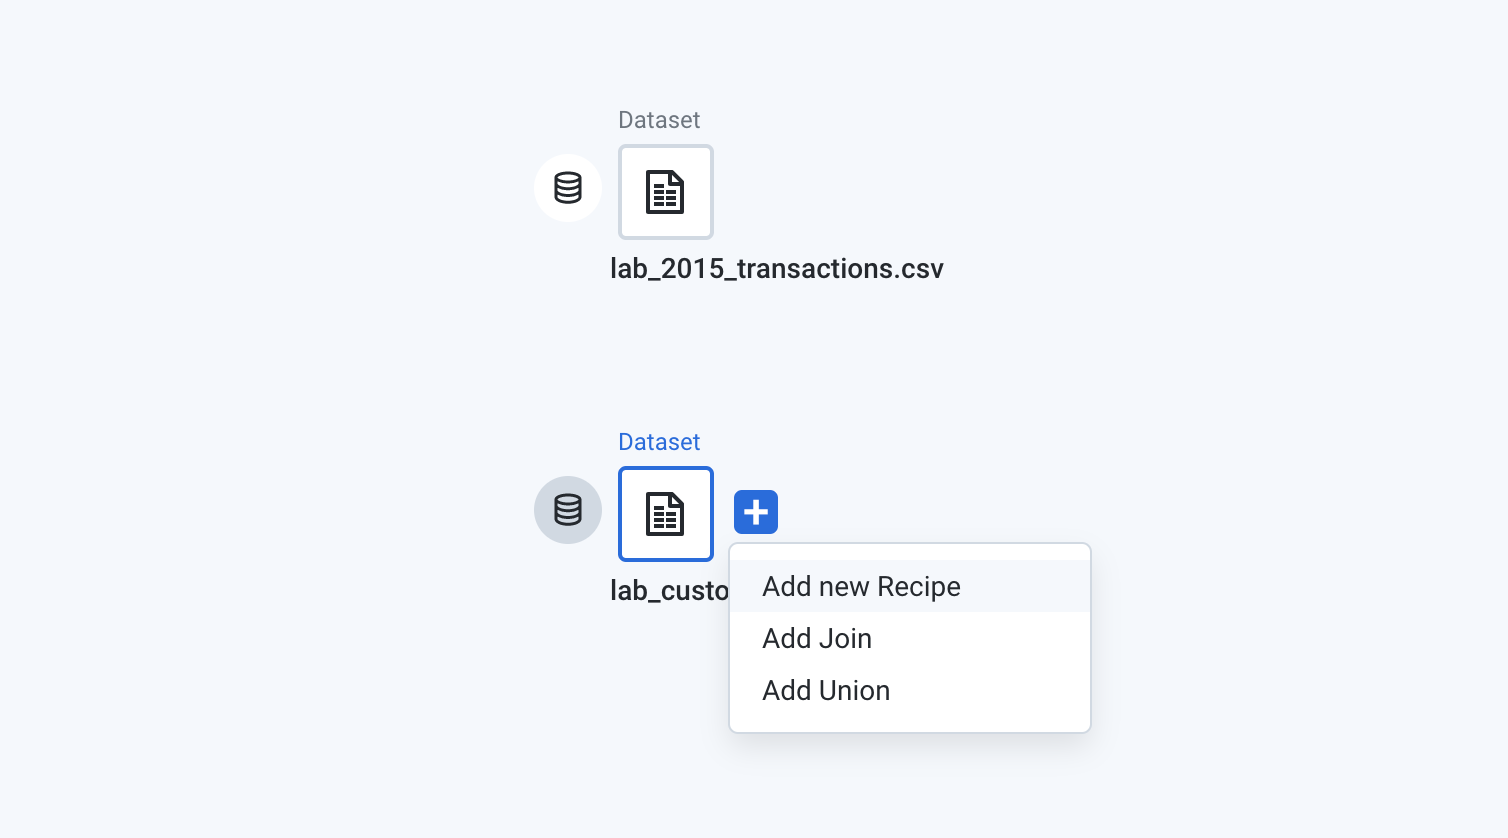
Now that you have the data, the next step is to design a data preparation recipe to clean the customers dataset. From the template, there already is a recipe added using the lab_2013_transactions.csv data. Let’s skip this recipe for now and create our own.
- To create a new recipe:
- Click the plus icon (+) next to the
lab_customers.csv. - Then click Add new Recipe.
- Right-click on this new Recipe node.
- From the drop-down menu, choose Edit name and description.
- Change the name to
lab_customersand click OK.
-
A new Recipe node is created and a panel will open on the right side, displaying information about the recipe, including the data and any existing transformation steps.
-
Hit the blue Edit Recipe button. (Alternatively, you can double click the recipe node itself.)
Cloud Dataprep opens the "Transformer Grid". This is a worksheet-like interface where you can design the steps in your data preparation recipe. The Transformer page is where you build your transformation recipe and see the results applied to the sample. When you are satisfied with what you see, execute the job against your dataset.
Each of the columns have a Name and an icon that specify the inferred data type. Possible data types are shown when you click the icon to the left of the column name:
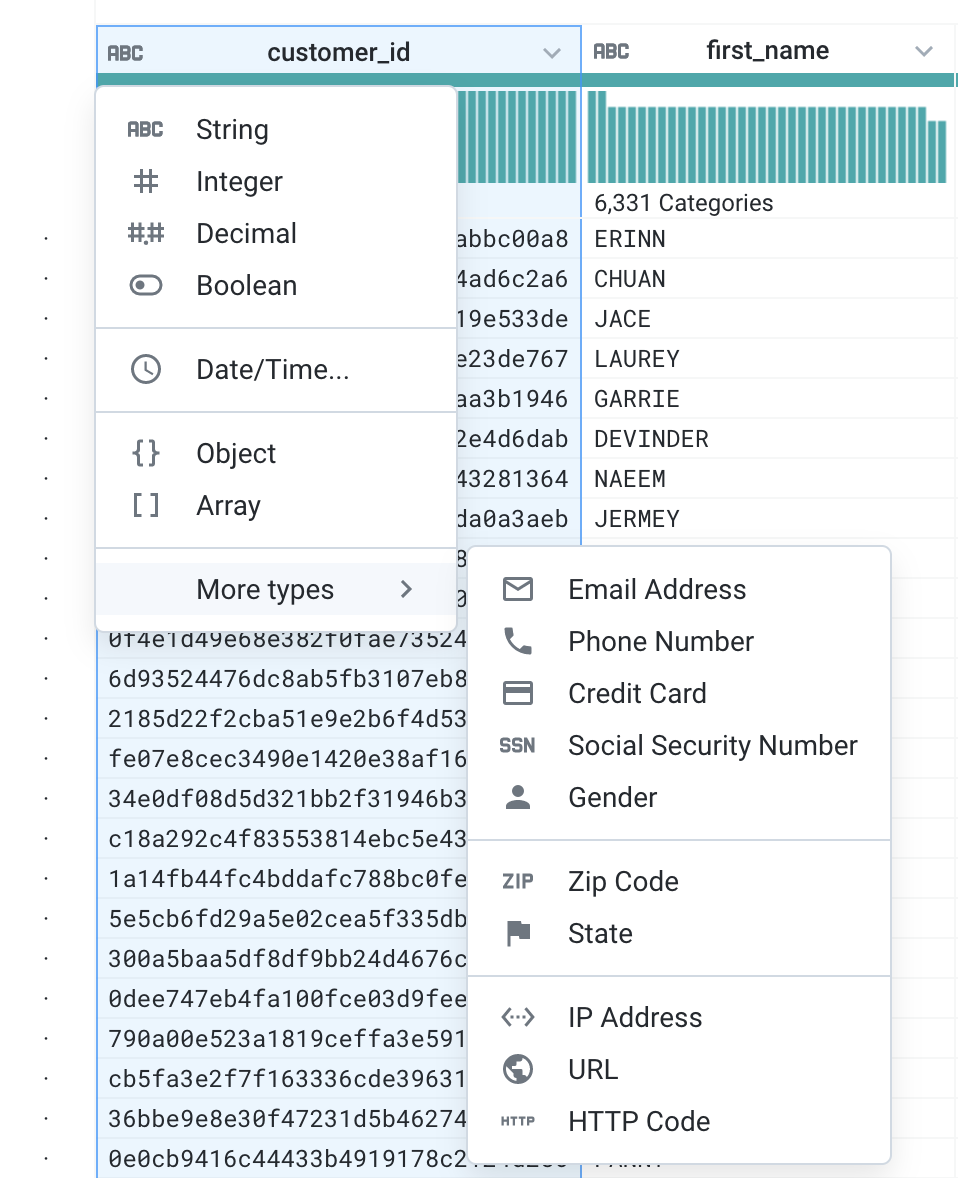
When you click on a column option, a Details panel opens on the right.
This Details panel is dynamic and contains information about whatever you have selected, including column information or suggested transformations. Click X in the top right of the Details panel to close the Details panel for now.
In the following steps, you explore data in the grid view and apply transformation steps to your recipe.
When you open the Transformer Grid, Cloud Dataprep automatically profiles the contents of your dataset and generates column-level histograms and data quality indicators. This profile information can be used to guide your data preparation process.
Apply a filter
- Scroll all the way to the right to the start_date column. Examine the horizontal bar at the top column:
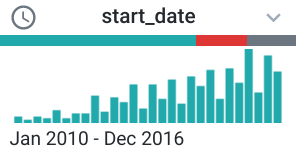
This is the data quality bar. The green part represents valid values, the gray represents missing or null values. A red bar indicates data that does not match the data type. Clicking on the sections of the data quality bar will generate suggestions that contain data quality conditionals. These conditionals test whether each record is valid, empty, or invalid, depending on the section of the bar that you clicked.
Using start_date and end_date as a filter, you will add a transformation to remove contacts where the start_date column is empty.
- Click on the grey part of the data quality bar for the
start_datecolumn.
Cloud Dataprep generates a list of suggested transformations on the right, based on your selection. You can hover your mouse over any of the suggestion cards and Dataprep will show you a preview of how your data will look if the suggestion is applied. If you select a card, Cloud Dataprep updates the grid to show you a preview of this transformation.
- Click Add on the "Delete rows with missing values in
start_date" suggestion card on the right.
The rows that were highlighted in red have been removed from your dataset.
Fill in missing values
Look at the end_date column. Based on the data quality bar, there are a large number of rows with missing values. To easily work with this column, you'll insert an empty value–January 01, 2050–in those empty rows.
- Click the gray section of the data quality bar for the
end_datecolumn.
This will generate another set of suggested transformations. There should be a suggestion to Set missing values to NULL(). In this case, Dataprep does not know what exact value you may want to fill with, so it creates a template for you to modify.
- On any suggestion card, you then click Edit.
This opens the Add Step builder. Cloud Dataprep's suggested transformation has already been populated, but you can make adjustments to the code.
- In the Formula box, replace the
NULL()with'2050/1/1'(with the quotes). The full formula should look like:
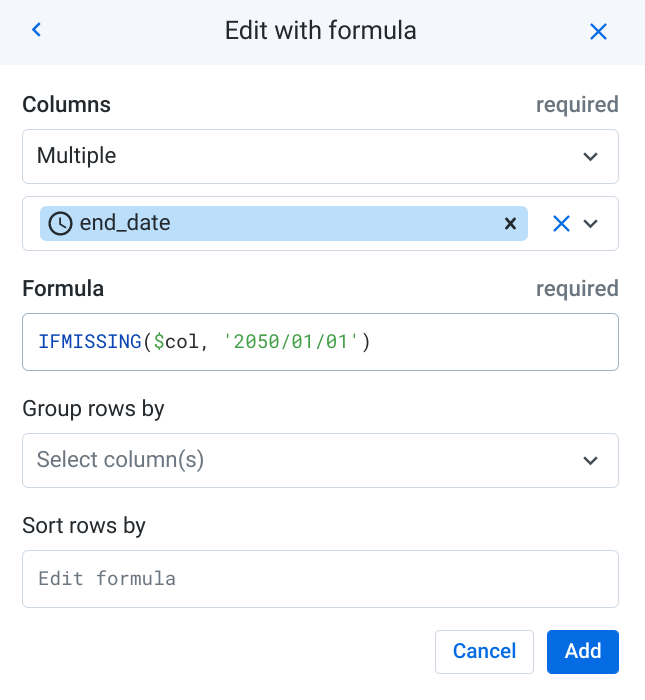
- Click Add.
Now the data quality problems in the lab_customers dataset have been addressed and the gray part of the data quality bar is gone.
Task 5. Union multiple transactions datasets
Now switch gears and work on the transactions datasets.
- Click on the
QWIKLAB1flow name at the top of the screen:

This brings you back to the Flow view.
Create a single dataset that unions the transactions datasets from 2013, 2014, and 2015.
-
Click on the
lab_2013_transactionsdataset. -
Click the plus sign (+), and then click Add new Recipe.
Cloud Dataprep creates a new recipe and wrangled dataset named Untitled recipe.
-
Right-click on this new wrangled dataset. From the drop-down menu, choose Edit name and description.
-
Change the name to
Combined Transactionsand click OK.
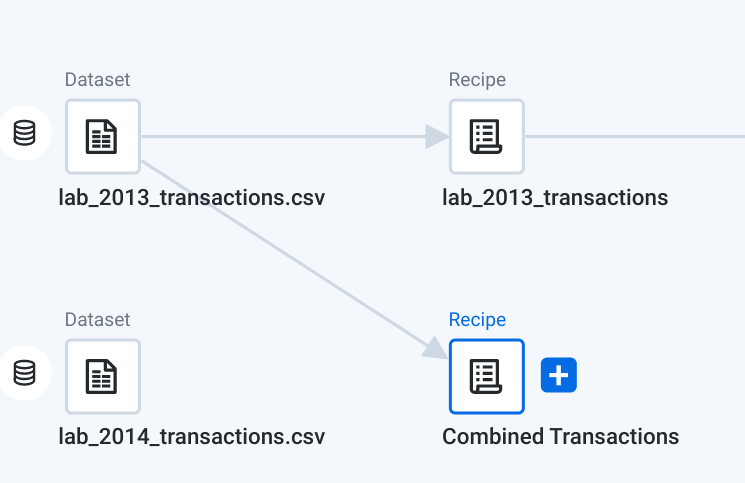
- Double-click Combined Transactions to edit the recipe. This opens the recipe in the Transformer Grid. Notice that the data in the grid is the structured data from the
lab_2013_transactions.csvdataset.
Combine multiple datasets with the same schema using a Union transform.
- Before you make any transformations, look at the bottom left of the Transformer Grid. Here you can see the metadata display:

The metadata shows a quick summary of what data is loaded in the grid. Remember that the data loaded is a sample of the entire dataset, up to 10MB.
- Look at the top of Transformer, near the recipe name. Here you can see the sample that is currently visible.

OR
The sample shown is the initial data from the source. For small datasets (under 10MB), Dataprep loads the entire dataset into the initial data sample.
- Click the Recipe icon at the top.

-
Click Add New Step.
-
Type in "Union" in the search field then click on the result to get to the Union tool.
The Union Output field displays the output schema for your dataset. Each box represents a column. Cloud Dataprep bases the output schema on the schema of the dataset from which you initiated the union transform. In this case, the columns in the "Combined Transactions" dataset determine the columns that will appear in the combined output.
-
Click Add Data.
-
Check the
lab_2014_transactions. In the drop down at the bottom left, selectAlign By Nameand click Apply. -
Click Add to Recipe to combine the datasets. After adding the union to your script, look at the
transaction_datecolumn.
This dataset now includes records from January 2013 through December 2014.
- You have now unioned 2 of 3 datasets together. Check the metadata, you should also see additional rows.

Task 6. Modifying recipe steps
Over the course of working with data, you may often find yourself tweaking or removing certain transformations. Dataprep makes it very easy to edit your work. In this case, you have unioned 2 of the 3 datasets, but instead of adding a brand new step to union the remaining dataset, you can simply edit what you've already done.
- Click the Undo icon to rewind the last action, in this case, the Union step.
Notice that your recipe is now empty. The grid and metadata are also updated to reflect the original state.
-
Click the Redo icon to bring back the Union step.
-
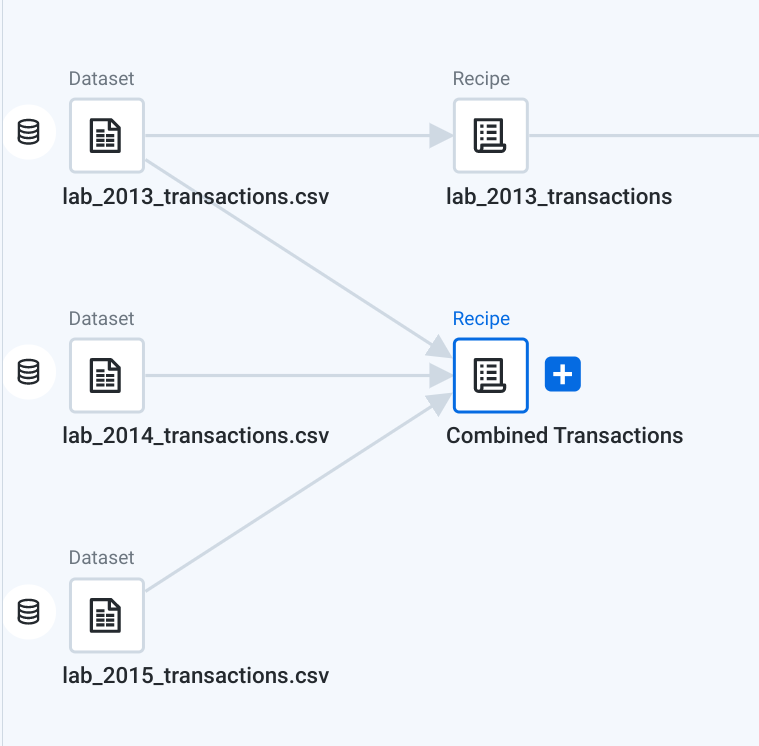
In the Recipe panel, right click the Union step and choose Edit.
-
This will open up the Union tool again. This time, click Add data again and check the
lab_2015_transactions. In the drop down at the bottom left, selectAlign By Nameand click Apply. -
Examine the column-to-column mappings. Click Add to Recipe to combine all three datasets.
-
After adding the union to your script, look at the
transaction_datecolumn.
This dataset now includes records from January 2013 through December 2015. How many rows now show in the metadata?
- Click on the
QWIKLAB1flow name to return to the Flow View.
The flow visualization is updated to show how the three transactions datasets combine to form the Combined Transactions dataset:
Task 7. Join transactions data to customers data
Now that the datasets are combined, you will enrich the transactions data with information about where each purchase was made. To do this, join the customer data to the transactions data. When performing a join, treat the larger dataset as the master dataset, or the "left side" of the join. The smaller dataset should be the detail dataset, or the "right side" of the join. In Cloud Dataprep, the dataset from which you initiate a join automatically becomes the master dataset.
-
Double-click Combined Transactions to edit the recipe again.
-
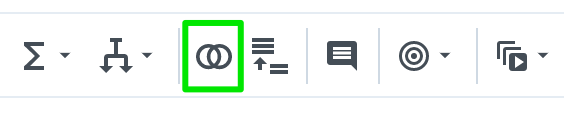
Click on the Join icon in the Transformer toolbar to open the Join tool.
-
Click on the
lab_customersdataset to bring in the other dataset, then click Accept. -
On the next screen, edit the Join keys and conditions. On the left is a preview of the join key matches. On the right are options to edit the join type, join keys and the preview statistics of the join. Dataprep will try to automatically infer the correct join keys based on common values between the datasets.
Optionally, you can edit the join keys. Hover in the Join keys section, then click on the pencil (Edit icon) to modify the join key or Add to add additional join keys.
For these datasets, Cloud Dataprep chose an inside join on column customer_id. This means the output dataset will be those records that have the same customer_id.
-
Click Next.
-
On the next screen, you can choose which columns to keep or drop after the join. In the Output Columns panel, put a check next to the following fields to add those columns to the Join:
customer_id (current)transaction_dateticket_priceproductaddress_stateaddress_zipregionstart_dateend_date
All unchecked columns will be dropped. Your results will look like this:
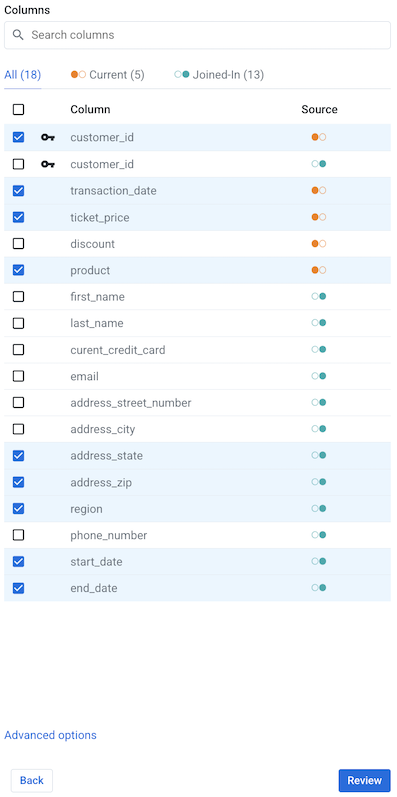
- Click Review to preview the result of your join in the Transformer Grid.
- Click Add to Recipe.
Task 8. Create new columns and rename
As a final step, you will want to do some additional cleanup of the data for your report. You will need to create some columns with the necessary values that you want to visualize by.
Let’s see another way of authoring Transformations in Dataprep - from the column menus.
- Click the drop-down arrow next to transaction_date > Extract > Datetime > Year (YYYY).
A new formula builder opens, pre-populated with the selected actions. A preview is also generated in the grid.
- Click Add.
Notice that a new column is created, called year_transaction_date. In the previous step, you could have named the new column while editing the transformation. If you leave out the name, Dataprep will generate a new column based on the transformation step you took, or as column# if no source columns were selected.
-
You will manually rename this column. Click the drop-down arrow next to year_transaction_date > Rename.
-
Enter
activity_yearin the field. Click Add to accept the changes.
Note that you can rename multiple columns with this transformation by hitting Add to add more mappings.
Task 9. Publish the results to BigQuery
You just finished preparing your data and you're ready to produce a results file in Cloud Storage. Cloud Dataprep executes your data transformation recipe to produce your output file using the BigQuery engine.
-
Click Run in the top right of the Transformer Grid.
-
In the Run Job dialog, you can configure your job execution settings and output destination. By default, Cloud Dataprep will create a CSV file on Cloud Storage.
-
Hover your mouse over the existing Publishing Action and hit Edit on the right.
-
Click on the BigQuery tab on the left.
-
Select the
Dataprepdatabase, and click the Create a new table button on the right. -
Enter
transactions_by_customeras the new table name and select Append to this table every run as the write option. -
Click Update on the bottom to update the output settings.
-
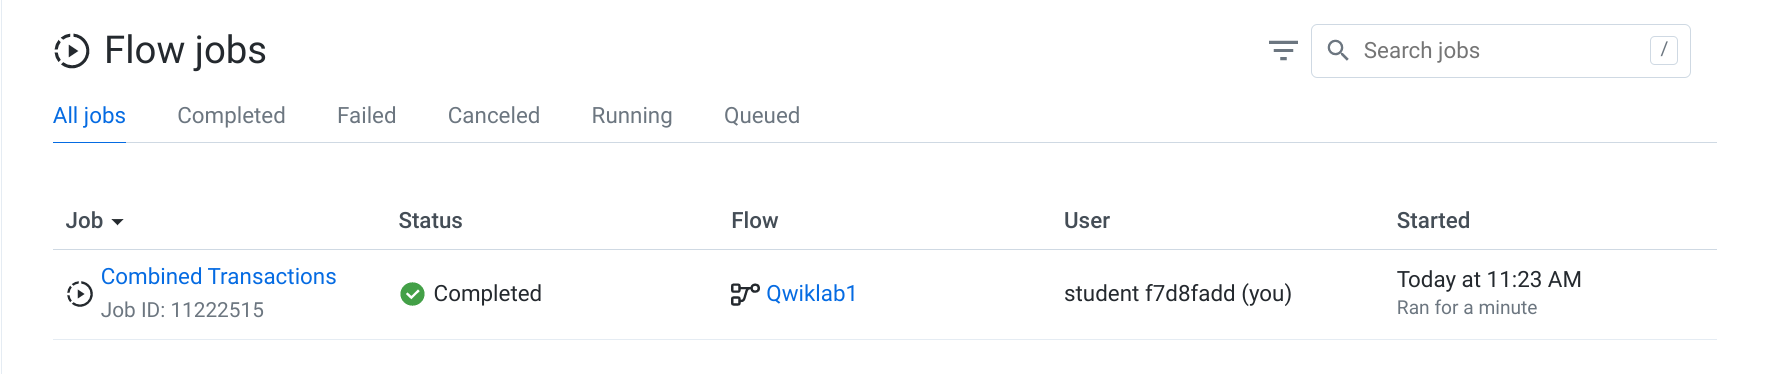
Now click Run to kick off your BigQuery job. This will take a few minutes. You can see the job processing on the Dataprep "Jobs" page. When it completes, you'll see a success message that resembles the following, and your data will be loaded in the new BigQuery table.
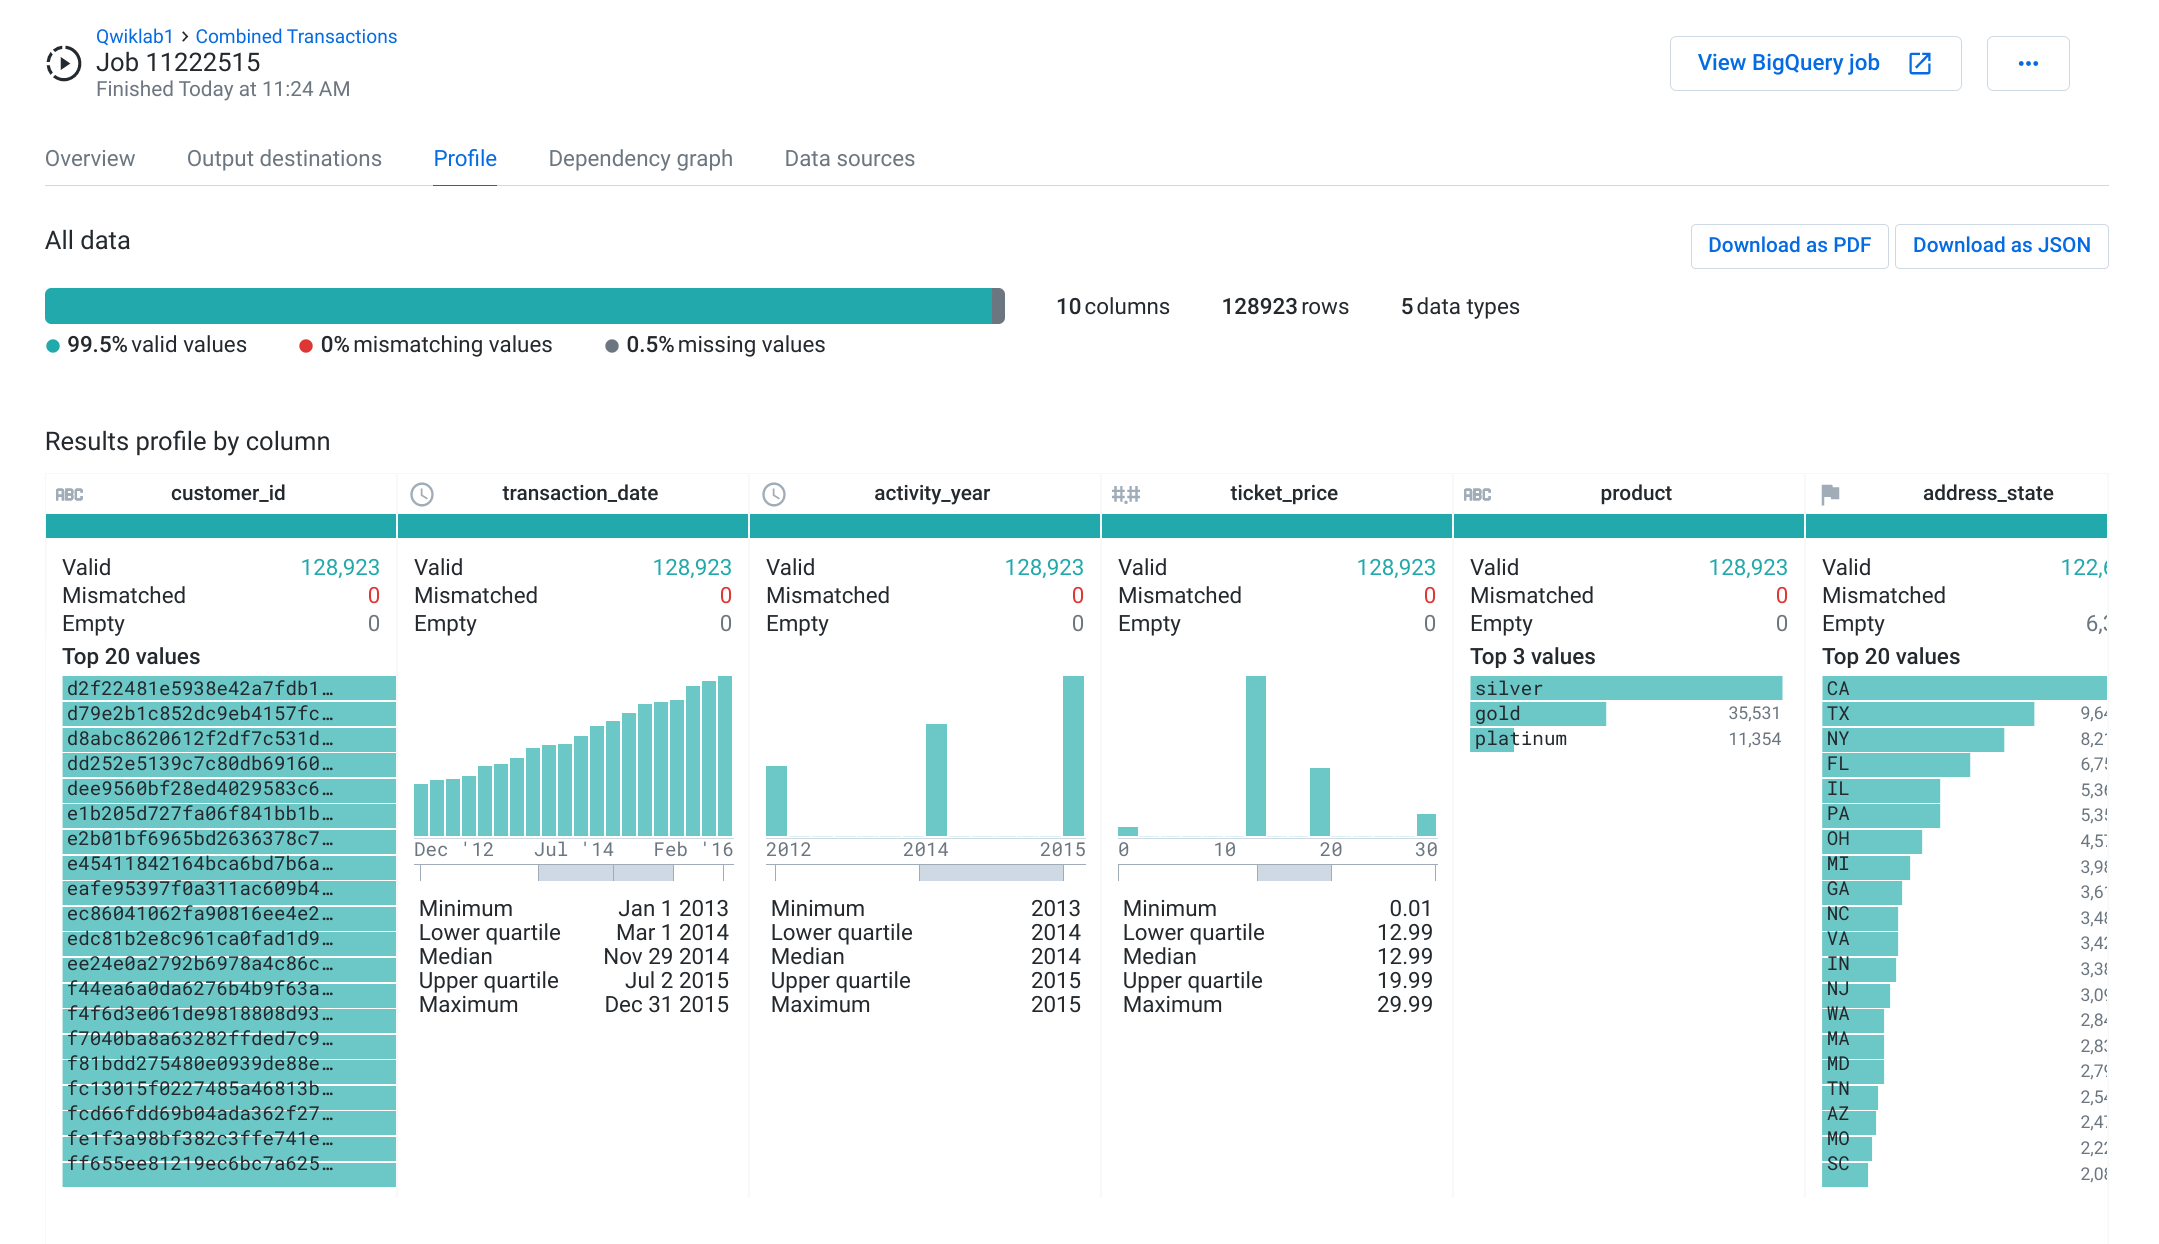
- Hover over the finished job and click Profile to see your data organized. It should resemble the following:
-
Your results are visible by querying BigQuery directly. From the Google Cloud Console, navigate to ANALYTICS > BigQuery. Click on the
Dataprepdataset. -
Enter
select * from Dataprep.transactions_by_customer;into the Query Editor. Click Run to see the data that was published.
Cloud Dataprep is that simple! It's easy to cleanse and enrich multiple data sources using an intuitive, visual interface.
Click Check my progress to verify the objective.
Congratulations!
This concludes the Working With Google Cloud Dataprep lab. In this lab, you started off by creating new flows and transforming data. You then learned how to use the Dataprep UI to filter messy data, union and join multiple files, and create and rename columns. Lastly, you produced a results file and exported it to Google Cloud Storage.
Next steps / learn more
You can continue exploring Dataprep Professional Edition with a free 30-day trial available here. Please make sure to sign out from your temporary lab account and re-sign with your Google Cloud valid email. Advanced features, such as additional connectivity, pipeline orchestration, and adaptive data quality are also available in the Premium edition that you can explore in the Google Cloud Marketplace.
Read the how-to guides to learn how to discover, cleanse, and enhance data with Google Dataprep.
Google Cloud training and certification
...helps you make the most of Google Cloud technologies. Our classes include technical skills and best practices to help you get up to speed quickly and continue your learning journey. We offer fundamental to advanced level training, with on-demand, live, and virtual options to suit your busy schedule. Certifications help you validate and prove your skill and expertise in Google Cloud technologies.
Manual Last Updated December 27, 2023
Lab Last Tested September 27, 2023
Copyright 2024 Google LLC All rights reserved. Google and the Google logo are trademarks of Google LLC. All other company and product names may be trademarks of the respective companies with which they are associated.