Checkpoints
Configuring instances for primary region
/ 5
Configuring instances for secondary region
/ 5
Reserve IPV4 address, create instance groups and health check
/ 10
Create backend services and add instance group in it
/ 4
Create a URL map and target HTTP proxy to URL map
/ 6
Creating Cross-region Load Balancing
- GSP157
- Overview
- Setup
- Task 1. Configuring instances
- Task 2. Configuring services for load balancing
- Task 3. Configuring the load balancing service
- Task 4. Sending traffic to your instances
- Task 5. Shutting off HTTP access from everywhere but the load balancing service
- Task 6. (Optional) Removing external IPs except for a bastion host
- Congratulations!
GSP157

Overview
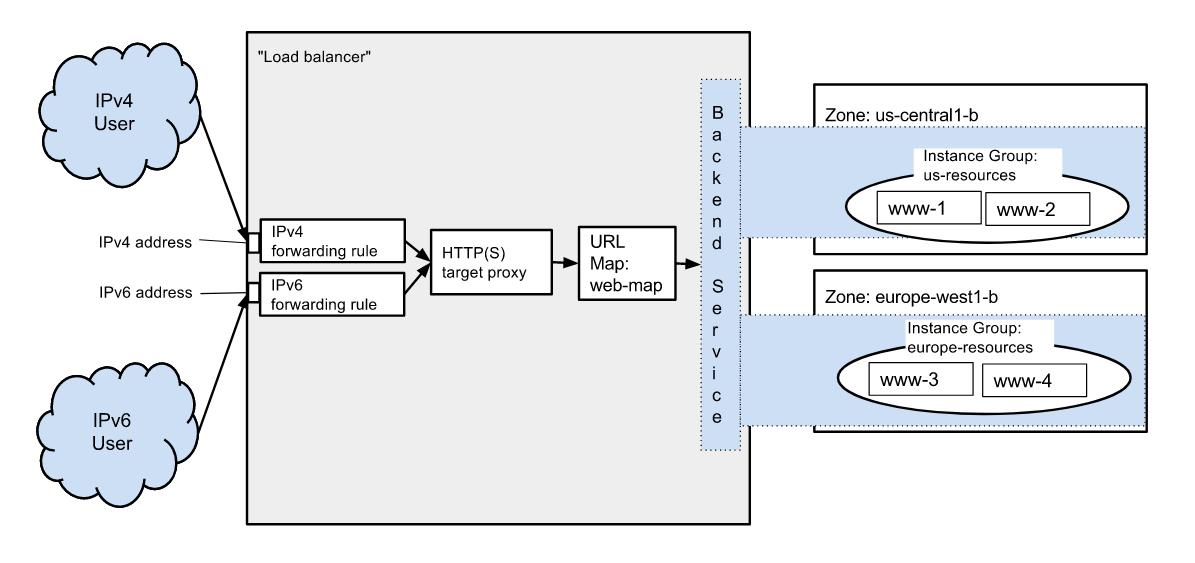
This lab demonstrates how to create an HTTP(S) load balancer that forwards traffic to instances in two different regions. In this lab you create four Compute Engine instances, two each in two different regions. You then configure the rest of the system so that incoming connections are sent to the appropriate instance.
The resources you create connect together as shown here:
Setup
Before you click the Start Lab button
Read these instructions. Labs are timed and you cannot pause them. The timer, which starts when you click Start Lab, shows how long Google Cloud resources will be made available to you.
This hands-on lab lets you do the lab activities yourself in a real cloud environment, not in a simulation or demo environment. It does so by giving you new, temporary credentials that you use to sign in and access Google Cloud for the duration of the lab.
To complete this lab, you need:
- Access to a standard internet browser (Chrome browser recommended).
- Time to complete the lab---remember, once you start, you cannot pause a lab.
How to start your lab and sign in to the Google Cloud console
-
Click the Start Lab button. If you need to pay for the lab, a pop-up opens for you to select your payment method. On the left is the Lab Details panel with the following:
- The Open Google Cloud console button
- Time remaining
- The temporary credentials that you must use for this lab
- Other information, if needed, to step through this lab
-
Click Open Google Cloud console (or right-click and select Open Link in Incognito Window if you are running the Chrome browser).
The lab spins up resources, and then opens another tab that shows the Sign in page.
Tip: Arrange the tabs in separate windows, side-by-side.
Note: If you see the Choose an account dialog, click Use Another Account. -
If necessary, copy the Username below and paste it into the Sign in dialog.
{{{user_0.username | "Username"}}} You can also find the Username in the Lab Details panel.
-
Click Next.
-
Copy the Password below and paste it into the Welcome dialog.
{{{user_0.password | "Password"}}} You can also find the Password in the Lab Details panel.
-
Click Next.
Important: You must use the credentials the lab provides you. Do not use your Google Cloud account credentials. Note: Using your own Google Cloud account for this lab may incur extra charges. -
Click through the subsequent pages:
- Accept the terms and conditions.
- Do not add recovery options or two-factor authentication (because this is a temporary account).
- Do not sign up for free trials.
After a few moments, the Google Cloud console opens in this tab.

Activate Cloud Shell
Cloud Shell is a virtual machine that is loaded with development tools. It offers a persistent 5GB home directory and runs on the Google Cloud. Cloud Shell provides command-line access to your Google Cloud resources.
- Click Activate Cloud Shell
at the top of the Google Cloud console.
When you are connected, you are already authenticated, and the project is set to your Project_ID,
gcloud is the command-line tool for Google Cloud. It comes pre-installed on Cloud Shell and supports tab-completion.
- (Optional) You can list the active account name with this command:
- Click Authorize.
Output:
- (Optional) You can list the project ID with this command:
Output:
gcloud, in Google Cloud, refer to the gcloud CLI overview guide.
These instructions assume you are using an auto mode VPC network or a legacy network. If you are using a custom mode VPC network some of the steps below, such as creating an instance, will require you to specify the subnet range.
Task 1. Configuring instances
Create virtual machine instances in two different regions to receive traffic forwarded from the load balancer. Configure the machine instances for testing and give them all the same tag, which will be used by a firewall rule to allow incoming traffic.
The startup script installs Apache and creates a unique home page for each instance.
- Create the two instances in
region:
Click Check my progress to verify the objective.
- Create the two instances in
region:
Click Check my progress to verify the objective.
- Create a firewall rule to allow external traffic to your virtual machine instances. This rule allows traffic from all sources, which is useful while you're setting up and testing your configuration.
The firewall rule uses the http-tag tag that you created earlier. The firewall rule allows traffic to reach instances with the tag on the designated port:
- Verify that instances are running. List your instances to get their IP addresses from the EXTERNAL_IP column:
- Copy each instance's
External IPand paste it into a new browser tab to test that the instances are running and that the web servers are properly configured and able to respond with the default homepage through the open firewall port.
Task 2. Configuring services for load balancing
Now that your instances are up and running, set up the services needed for load balancing. Create the following:
- A global static external IP address that is the external IP address your customers use to reach your load balancer.
- Instance groups to hold your instances.
- A health check, which polls your instances to see if they are healthy. The load balancer only sends traffic to healthy instances.
To configure these services, perform the following steps:
- Create
IPv4global static external IP address for your load balancer:
- Create an instance group for each of your zones:
- Add the instances you created earlier to the instance groups:
- Create a Health Check:
Task 3. Configuring the load balancing service
Load balancing involves several connected services. In this section, you set up and connect these services:
- Named ports, which the load balancer uses to direct traffic to your instance groups.
- Backend services, which monitor the usage and health of instances. Backend services know whether the instances in the instance group can receive traffic. If they cannot and if there are underutilized instances elsewhere, the load balancer redirects traffic to those instances.
- A URL map, which parses the URL of the request and can forward certain requests to specific backend services based on the host and path of the request URL. In the example, since we are not using content-based forwarding, the URL map will only contain the default mapping.
- One or more SSL certificate resources, if you are using HTTPS, which contains SSL certificate information for the load balancer. You can use multiple SSL certificates and you must create an SSL certificate resource for each certificate.
- An optional SSL policy, if you are using HTTPS.
- A target proxy, which receives the request from the user and forwards it to the URL map. The target proxy is the service that decrypts SSL traffic using the SSL certificate resource. The target proxy can forward traffic to your instances via HTTP or HTTPS.
- Two global forwarding rules, one each for IPv4 and IPv6, which hold the global external IP address resources. Global forwarding rules forward the incoming request to the target proxy.
- For each instance group, define an HTTP service and map a port name to the relevant port:
- Create a backend service and specify its parameters. Set the
--protocolfield toHTTPbecause we are using HTTP to go to the instances. Use thehttp-basic-checkhealth check we created earlier as the health check:
- Add your instance groups as backends to the backend services. A backend defines the capacity (max CPU utilization or max queries per second) of the instance groups it contains. In this example, set the balancing mode to be CPU utilization, the max utilization to be 80%, and the capacity scaling to be 1. Set the capacity scaling to 0 if you wish to drain a backend service:
- Create a default URL map that directs all incoming requests to all your instances:
- Create a target HTTP proxy to route requests to your URL map:
- Look up the static IP addresses you created for your load balancer. You will use them in the next step.
- Create one IPv4 global forwarding rule to route incoming requests to the proxy. Replace
[LB_IP_ADDRESS]in the command with the static IPv4 address you created:
After creating the global forwarding rule, it can take several minutes for your configuration to propagate.
Task 4. Sending traffic to your instances
Now that you have configured your load balancing service, you can start sending traffic to the forwarding rule and watch the traffic be dispersed to different instances.
- Find the IP addresses of your global forwarding rules:
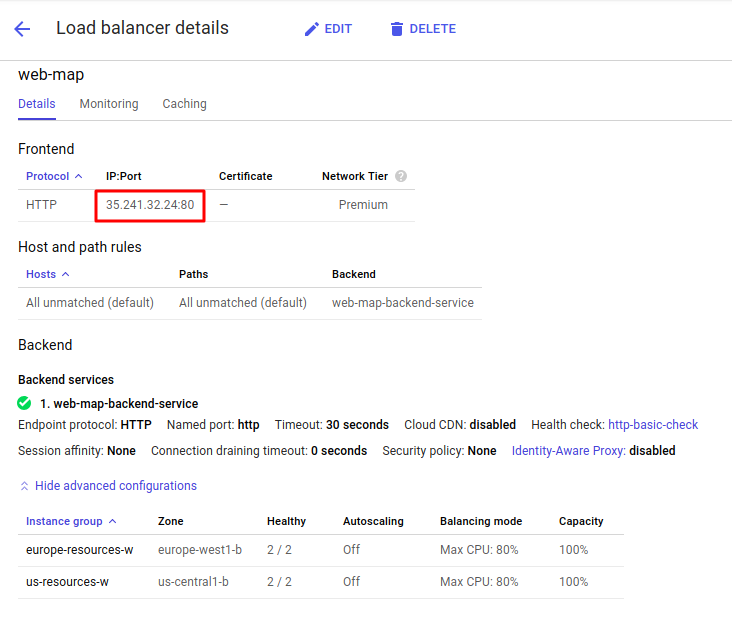
- In the console, click Navigation menu > Network services > Load balancing. On the Load balancing page you'll see a green circle with check mark on the
web-mapline.

-
Click the Load balancer (
web-map) for details. In the Backend section of the page, confirm that instances are healthy by checking the Healthy column. It can take a few moments for the display to indicate that the instances are healthy. -
Once the display shows that the instances are healthy, click advanced menu to access detailed information on the load-balancer.
-
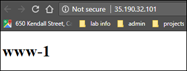
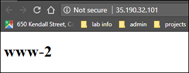
Copy IP address and paste it in browser to display the default content one of the instances in the instance group closest to you.
The load balancer forwards your request to the closest available instance.
In this lab, you created lab instances in the
For example, if your current geographical location is closer to the us-central1 region, you will get a response from the us-central1 region instances.
For more details about zone and regions in Google Cloud please visit Regions and Zones.
- Reload the page multiple times, page content will vary as the load balancer forwards between the two instances in the instance group. For example (you may see the the instances in a different order):
Reload 1:
Reload 2:
Reload 3:
Reload 4:
If you used a self-signed certificate for testing, your browser will display a warning. You will have to explicitly tell your browser to accept the certificate.
You should see responses from the region closest to you. If your response is unsuccessful initially, you might need to wait a few minutes for the configuration to fully load and for your instances to be marked healthy before trying again. Each reload of the page may show the other instance. To simulate a user in a different geography, try using a web proxy to make the requests.
Task 5. Shutting off HTTP access from everywhere but the load balancing service
- Once everything is working, modify your firewall rules so HTTP(S) traffic to your instances can only come from your load balancing service:
- Remove the rule that allows HTTP(S) traffic from other sources:
Test that the load balancer can reach the instances, but that other sources can't.
- Find the IP address of your global forwarding rule:
-
Copy and paste the IP address into your browser to be sure the forwarding works.
-
Now find the IP address of your individual instances and note the addresses in the
EXTERNAL_IPcolumn:
- Copy and paste an address for an instance into your browser.
Since you removed the firewall rule that allows HTTP(S) traffic from other sources, this will fail. Instances accept only traffic from source ranges defined in the allow-lb-and-healthcheck firewall rule.
Task 6. (Optional) Removing external IPs except for a bastion host
HTTP load balancing makes use of the targets internal IPs, not their external IPs. Once you have load balancing working, you can increase security by removing the external IPs from your load balancing targets, then connect through an intermediary instance to perform tasks on the load balanced instances. That way, no one outside your VPC network can access them in any way, except through the load balancer.
You'll need at least one instance in your VPC network that has an external IP address, normally an instance designated for this purpose.
If you accidentally delete all external IP addresses, you can use the Cloud Console to create a new one.
Remove the external IP address from an instance
- Run the following command to remove the external IP address from an instance. Make a note of the name of the instance as shown in the
NAMEfield:
- Delete the access config for the instance. For
NAME, put the name of the instance:
Congratulations!
You've set up and tested a cross-region load balancing function.
Learn more / Next steps
Enroll in a quest! If you liked this lab, check out theNetworking in the Google Cloud or Network Performance and Optimization quests. A quest is a series of related labs that form a learning path. Completing this quest earns you a badge to recognize your achievement. You can make your badge or badges public and link to them in your online resume or social media account. Enroll in a quest and get immediate completion credit. Refer to the Google Cloud Skills Boost catalog for all available quests.
Google Cloud training and certification
...helps you make the most of Google Cloud technologies. Our classes include technical skills and best practices to help you get up to speed quickly and continue your learning journey. We offer fundamental to advanced level training, with on-demand, live, and virtual options to suit your busy schedule. Certifications help you validate and prove your skill and expertise in Google Cloud technologies.
Manual Last Updated January 29, 2024
Lab Last Tested January 29, 2024
Copyright 2024 Google LLC All rights reserved. Google and the Google logo are trademarks of Google LLC. All other company and product names may be trademarks of the respective companies with which they are associated.