Prüfpunkte
Create a virtual machine
/ 20
Install necessary software and create a firewall rule
/ 40
Run the sample solution (hello-https)
/ 20
Run the sample solution to capture audio on webpage
/ 20
Speaking with a Webpage - Streaming Speech Transcripts
- GSP125
- Overview
- Setup and requirements
- Task 1. Create a virtual machine
- Task 2. Download and set up a working example
- Task 3. Start the HTTPS Java Servlet
- Task 4. Capture audio on a webpage
- Task 5. Stream audio from client to server
- Task 6. Transcribe voice to text
- Task 7. Test your understanding
- Congratulations!
GSP125

Overview
The Google Cloud Speech streaming API enables developers to turn spoken language into text in real time. Using the API in combination with Javascript's Web Audio API and Websockets, a Java servlet can accept streamed speech from a webpage and provide text transcripts of it, enabling any web page to use the spoken word as an additional user interface.
This lab is split into multiple sections, each section introduces a component of the final web application.
The webapp you create takes audio from the client's microphone and streams it to a Java servlet. The Java servlet passes the data to the Cloud Speech API, which streams transcriptions of any speech it detects back to the servlet. The servlet then passes the transcription results to the client, which then displays it on the page.
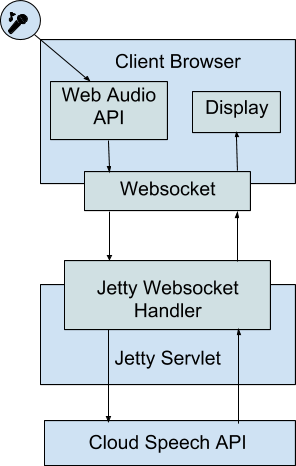
To accomplish this, you need to create several components:
- A Java servlet to serve the static HTML, Javascript, and CSS for the web page.
- The Javascript, HTML, and CSS to connect the webpage to the user's microphone, extract the raw bytes, and stream them to the servlet through a Websocket.
- A servlet Websocket handler to stream the sound bytes it receives from the client to the Cloud Speech API, and streams the transcription results from the Cloud Speech API back to the client.
What you'll do
- Create a virtual machine (VM)
- Start an HTTP Java servlet
- Capture audio on a webpage
- Transcribe voice to text
Prerequisites
This lab assumes familiarity with:
- The Java programming language.
- Java servlets (specifically, the Jetty servlet container). While other servlet containers can be used, the sample solution uses Jetty, making solutions using other containers harder to verify against.
- The Javascript programming language. Code for webpages are done almost exclusively in Javascript, and a lab about a webpage would be hard-pressed to avoid using it.
- The Linux command line. Much of the lab takes place at a Linux command prompt, and familiarity with some common tools and a text editor for that environment makes things easier.
- The Maven project management tool. While in principle, any Java project management tool can be used, the sample solution uses Maven, making solutions using other tools harder to verify against.
Setup and requirements
Before you click the Start Lab button
Read these instructions. Labs are timed and you cannot pause them. The timer, which starts when you click Start Lab, shows how long Google Cloud resources will be made available to you.
This hands-on lab lets you do the lab activities yourself in a real cloud environment, not in a simulation or demo environment. It does so by giving you new, temporary credentials that you use to sign in and access Google Cloud for the duration of the lab.
To complete this lab, you need:
- Access to a standard internet browser (Chrome browser recommended).
- Time to complete the lab---remember, once you start, you cannot pause a lab.
How to start your lab and sign in to the Google Cloud console
-
Click the Start Lab button. If you need to pay for the lab, a pop-up opens for you to select your payment method. On the left is the Lab Details panel with the following:
- The Open Google Cloud console button
- Time remaining
- The temporary credentials that you must use for this lab
- Other information, if needed, to step through this lab
-
Click Open Google Cloud console (or right-click and select Open Link in Incognito Window if you are running the Chrome browser).
The lab spins up resources, and then opens another tab that shows the Sign in page.
Tip: Arrange the tabs in separate windows, side-by-side.
Note: If you see the Choose an account dialog, click Use Another Account. -
If necessary, copy the Username below and paste it into the Sign in dialog.
{{{user_0.username | "Username"}}} You can also find the Username in the Lab Details panel.
-
Click Next.
-
Copy the Password below and paste it into the Welcome dialog.
{{{user_0.password | "Password"}}} You can also find the Password in the Lab Details panel.
-
Click Next.
Important: You must use the credentials the lab provides you. Do not use your Google Cloud account credentials. Note: Using your own Google Cloud account for this lab may incur extra charges. -
Click through the subsequent pages:
- Accept the terms and conditions.
- Do not add recovery options or two-factor authentication (because this is a temporary account).
- Do not sign up for free trials.
After a few moments, the Google Cloud console opens in this tab.

Task 1. Create a virtual machine
Compute Engine is a service that allows you to start VMs on Google's infrastructure. In this lab, you create and use a VM to run a servlet written in Java 8 that hosts the website and use the Cloud Speech API to provide dynamic transcriptions to the client. For the purposes of this lab, you also use the VM to run your code.
-
To create a new VM, click the Navigation menu (
) > Compute Engine > VM instances.
-
Click Create instance and set the following options:
|
Parameter |
Value |
Description |
|
Name |
speaking-with-a-webpage |
Name of VM |
|
Zone |
|
Geographic location of your VM |
|
Machine type |
Default |
|
|
Boot disk |
Change > Debian GNU/Linux 11 (bullseye) Leave the Boot disk type set to default |
Determines operating system loaded onto the machine |
|
Identity and API access > Service Account |
Default |
|
|
Access scopes |
Allow full access to all Cloud APIs |
Determines which Cloud Platform APIs the VM has access to by default. |
|
Firewall |
Check Allow HTTP traffic Check Allow HTTPS traffic |
Allows you to connect to webpages hosted on this VM through the default ports |
- Click Create.
After a few minutes, your VM is up and running! View your VM and its details in the VM instances list. Notice the SSH button to use in the next step, and the External IP to use later in this lab.
- Connect to it by clicking the SSH button to its right. If prompted, click Authorize.
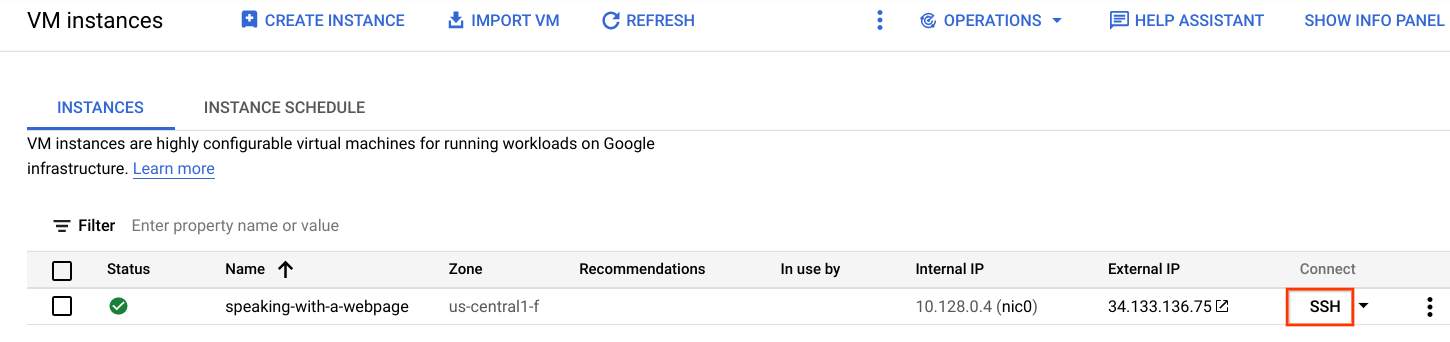
A new window opens and connects you to your VM, providing a command prompt. Use this interface for the rest of this lab.
Test completed task
Click Check my progress to verify your performed task.
Relevant documentation
Read more about Compute Engine and its different capabilities in the Compute Engine documentation reference.
Task 2. Download and set up a working example
- In the SSH session, install Git and the example here, uses Java 11 and the Maven project management tool to compile and run its code. Install them on your VM:
- Clone the working example to your VM:
This creates the directory, speaking-with-a-webpage, which contains subdirectories for each of the following sections. Each subdirectory builds on the one before it, incrementally adding new functionality:
-
01-hello-https- contains a minimal Jetty servlet with static files and a handler served over HTTPS -
02-webaudio- fills out the client-side Javascript to record audio from the client's microphone and display a visualization to confirm it works -
03-websockets- modifies both the client and the server to communicate with each other through a websocket -
04-speech- modifies the server to send audio to the Cloud Speech API, and send subsequent transcriptions to the Javascript client
The example used for this lab does not use the normal HTTPS port - instead, they use the non-privileged port 8443, for development purposes.
- In order to access this port from your web browser, open your VM's firewall using this gcloud command:
cd ~/speaking-with-a-webpage
git diff --no-index 01-hello-https/ 02-webaudio/
02-https and 03-webaudio directories / steps.
Use the arrow keys, PgUp / PgDn to navigate, and q to quit.
Test completed task
Click Check my progress to verify your performed task.
Task 3. Start the HTTPS Java Servlet
The Java Servlet is the backbone that supports this webapp, as it serves the required client-side HTML, CSS, and Javascript code, and connects to the Cloud Speech API to provide transcriptions.
When accessing a user's microphone from a webpage, browsers require the webpage to communicate over a secure channel to prevent eavesdropping. Because of this, set up your servlet to serve webpages over HTTPS. Since configuring and serving secure web pages is a topic in itself, for this lab use the self-signed certificate and Jetty configuration files in the provided sample solution, which is sufficient for a development environment.
For this section, simply read through and run the provided Maven project in 01-hello-https. Take particular note of the files within the src/ directory, as those are the primary files that are built on in subsequent steps:
- The files in
src/main/webappinclude the Javascript, CSS, and HTML files, that are served statically by Jetty -
TranscribeServlet.javadefines the servlet that handles requests to the path/transcribe
Running the sample solution
The 01-hello-https subdirectory of the provided speaking-with-a-webpage repository contains a Maven servlet project configured for HTTPS. This servlet uses the Jetty servlet framework to serve both static files and a dynamic endpoint. It also uses the blog post above to generate a self-signed certificate using the keytool command, and adds Jetty configuration to support HTTPS.
- Start the servlet. Navigate to
01-hello-https.
- Run the code:
- Then point your web browser to:
https://<your-external-ip>:8443
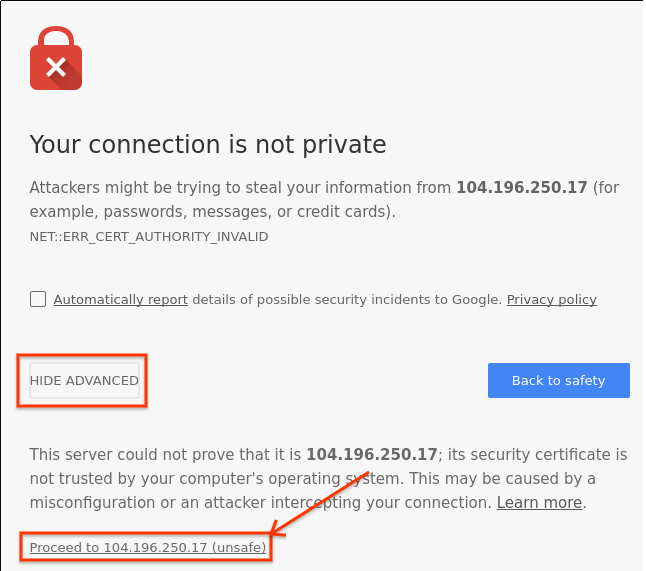
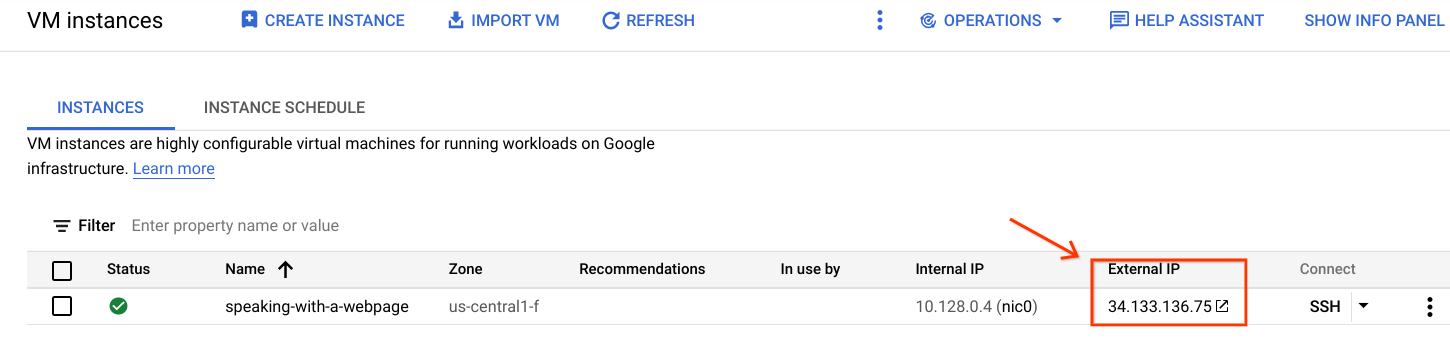 Because the sample servlet is listening on a non-standard port, clicking the External IP link directly does not direct you to your running servlet. You have to add the relevant port, as above, to access your servlet.
When you first access the webapp using the HTTPS URL, your browser will likely warn you that the connection is not private. This is because the sample app uses a self-signed SSL certificate for development. In a production environment, you would need an SSL certificate signed by a Certificate Authority, but for the purposes of this lab, a self-signed SSL certificate suffices. Just be sure not to speak of any secrets with your web page. 😁
Test completed task
Click Check my progress to verify your performed task.
Task 4. Capture audio on a webpage
The Web Audio API allows a webpage to capture audio data from a user's microphone, given their consent. The Cloud Speech API needs this raw data in a certain form, and needs to know the rate at which it's sampled.
Sample solution
The 02-webaudio subdirectory of the provided speaking-with-a-webpage repository builds on the 01-hello-https sample code by adding the Web Audio getUserMedia function to connect the user's microphone to a visualization of the audio. It then adds a ScriptProcessorNode to the audio pipeline to retrieve the raw audio bytes, in preparation for sending it to the server. Since the Cloud Speech API will also eventually need the sampleRate, it retrieves that as well. Start the 02-webaudio app as follows:
-
Press CTRL+C to stop the server.
-
Navigate to the directory that contains
02-webaudio:
- Run the application:
- To access your running webapp, look for the External IP address in your Cloud Console VM Instances page, and point your browser to:
https://<your-external-ip>:8443
01-hello-https) and the current one (02-webaudio) by running:
cd ~/speaking-with-a-webpage
git diff --no-index 01-hello-https/ 02-webaudio/
Test completed task
Click Check my progress to verify your performed task.
- Press CTRL+C to stop the server.
Task 5. Stream audio from client to server
A normal HTTP connection is not ideal for realtime streaming of audio to a server, while receiving transcriptions as they become available. In this section, you create a Web Socket connection from the client to the server, and use it to send along the audio metadata (i.e.,the sample rate) and data to the server, while listening for a response (i.e., the transcript of the data).
Streaming audio bytes
The provided example changes the TranscribeServlet to extend from WebSocketServlet in order to register a WebSocketAdapter. The WebSocketAdapter it defines simply takes the message it's received and sends it back to the client.
On the client, the sample replaces the scriptNode from the previous step with one that sends the data to a socket to be defined later. It then creates that secure Websocket connection to the server. Once both the server and the microphone have connected, it starts listening for messages from the server; then it sends the server the sample rate. When the server echos back the sample rate, the client replaces the listener with the more permanent transcription handler, and connects the scriptNode to begin streaming audio bytes to the server.
- Navigate to the directory containing
03-websockets:
- Run the application:
-
To access your running webapp, look for the External IP address in your Cloud Console VM Instances page, and point your browser to:
https://<your-external-ip>:8443 -
Press CTRL+C to stop the server.
Task 6. Transcribe voice to text
The Google Cloud Speech streaming API allows you to send audio bytes to the API in real time and asynchronously receive transcriptions of any speech it detects. The API expects the bytes to be in a specific format, as determined by the configuration that is sent in the beginning of a request. For this webapp, you send the API raw audio samples in the LINEAR16 format - that is, each sample is a 16-bit signed integer - sent at the sample rate obtained by the client.
Sample solution
The 04-speech subdirectory of the provided speaking-with-a-webpage repository fills out the server code from the 03-websockets step. It incorporates the code from the StreamingRecognizeClient sample code above to connect with, pass along audio bytes to, and receive transcripts from the Cloud Speech API. When it asynchronously receives the transcripts, it uses its connection to the Javascript client to pass those along. The Javascript client simply outputs it to the web page.
- Start the application:
- To access your running webapp, look for the External IP address in your Cloud Console VM Instances page, and point your browser to:
https://<your-external-ip>:8443
Task 7. Test your understanding
Below are multiple-choice questions to reinforce your understanding of this lab's concepts. Answer them to the best of your abilities.
Congratulations!
You have learned how to use gcloud to create a VM and start a Java servlet to capture audio and transcribe to text on a webpage!
Finish your quest
This self-paced lab is part of the Website and Web Application quest. A quest is a series of related labs that form a learning path. Completing this quest earns you a badge to recognize your achievement. You can make your badge or badges public and link to them in your online resume or social media account. Enroll in this quest and get immediate completion credit. Refer to the Google Cloud Skills Boost catalog for all available quests.
Next steps / Learn more
Think about software improvements you could add:
- The client app currently just prints the text out, but it can be used in any number of ways - think of it as just another User Interface. Key words can invoke certain actions, you could integrate the text with a conversation engine, or it can be used as-is for subtitling.
- Integrate the transcriptions with the Cloud Natural Language API, which can extract structure from otherwise unstructured text.
- The Cloud Speech API supports more than 80 languages, which can be chosen through a simple configuration parameter. Try it with another language you speak, or one you're learning!
- The current project setup is suitable mainly for development purposes, and should be changed when deploying it to production. For example, you could use multiple Compute Engine instances in an Instance Group, and use the SSL Load Balancer to provide secure communication between the client and the server.
Google Cloud training and certification
...helps you make the most of Google Cloud technologies. Our classes include technical skills and best practices to help you get up to speed quickly and continue your learning journey. We offer fundamental to advanced level training, with on-demand, live, and virtual options to suit your busy schedule. Certifications help you validate and prove your skill and expertise in Google Cloud technologies.
Manual Last Updated September 20, 2023
Lab Last Tested September 20, 2023
Copyright 2024 Google LLC All rights reserved. Google and the Google logo are trademarks of Google LLC. All other company and product names may be trademarks of the respective companies with which they are associated.