チェックポイント
Fetch data from Bigquery database using the client library.
/ 20
Sending notifications using Javascript.
/ 20
Adding Decentralized Notifications to an Application using Push Protocol
GSP1163

Overview
Push Protocol is the most widely adopted web3 communication middleware, providing technical solutions for fully decentralized communication. Push allows applications, smart contracts, backends, and protocols to communicate on-chain and off-chain through wallet addresses in a multi-chain, gasless, and permission-less manner.
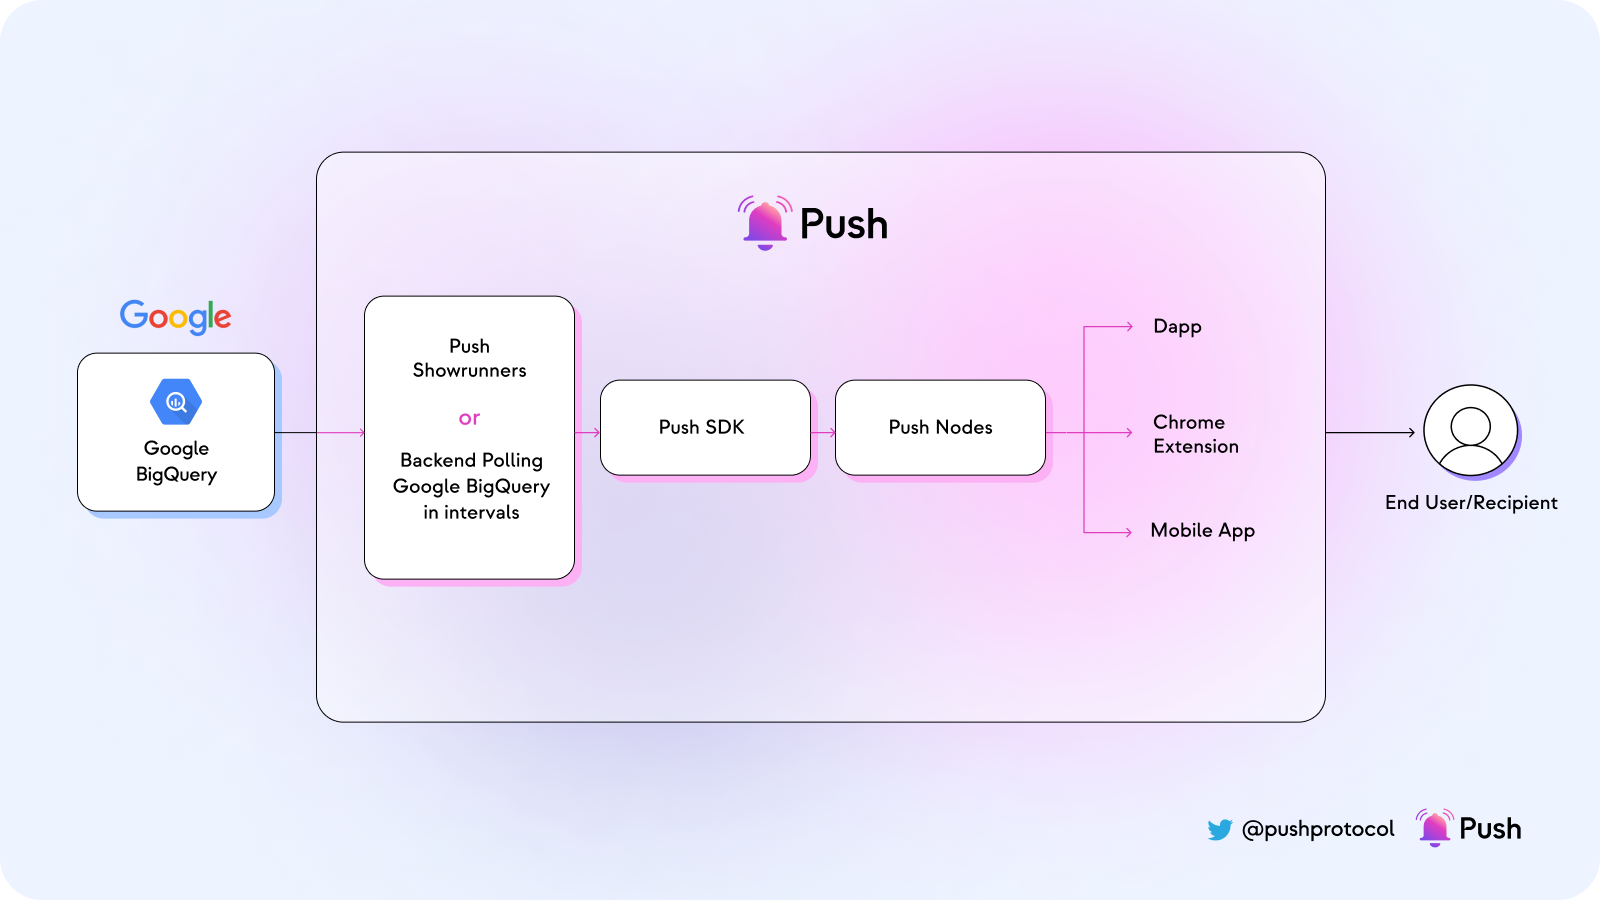
In this lab, you will walk through the process of adding decentralized notifications to your BigQuery-based application.
Objectives
In this lab, you will:
- Set up a channel for users to receive push notifications
- Send notifications to enable direct communications among users using Push SDK
Setup and Requirements
Before you click the Start Lab button
Read these instructions. Labs are timed and you cannot pause them. The timer, which starts when you click Start Lab, shows how long Google Cloud resources will be made available to you.
This hands-on lab lets you do the lab activities yourself in a real cloud environment, not in a simulation or demo environment. It does so by giving you new, temporary credentials that you use to sign in and access Google Cloud for the duration of the lab.
To complete this lab, you need:
- Access to a standard internet browser (Chrome browser recommended).
- Time to complete the lab---remember, once you start, you cannot pause a lab.
Set up MetaMask
-
If you haven't set up MetaMask already, go to MetaMask.io and click the Download button, which will take you to the relevant page to download the extension based on the browser you’re using.
-
Open the MetaMask extension and click on Get Started.
-
If you have an existing wallet, you can import it using the seed phrase or simply create a new one.
-
Follow the rest of the setup process to create your MetaMask wallet. Once it has been properly set up, you can now access your wallet by clicking on the MetaMask icon at the top-right-end corner of your browser.
Task 1. Create Channel on Push Protocol
Creating a channel is the very first step for sending notifications via Push. Having a channel on Push dApp (and smart contracts) allows you to establish a communication pathway with your users in Web3.0.
If you don't already have a Channel, you must create one first.
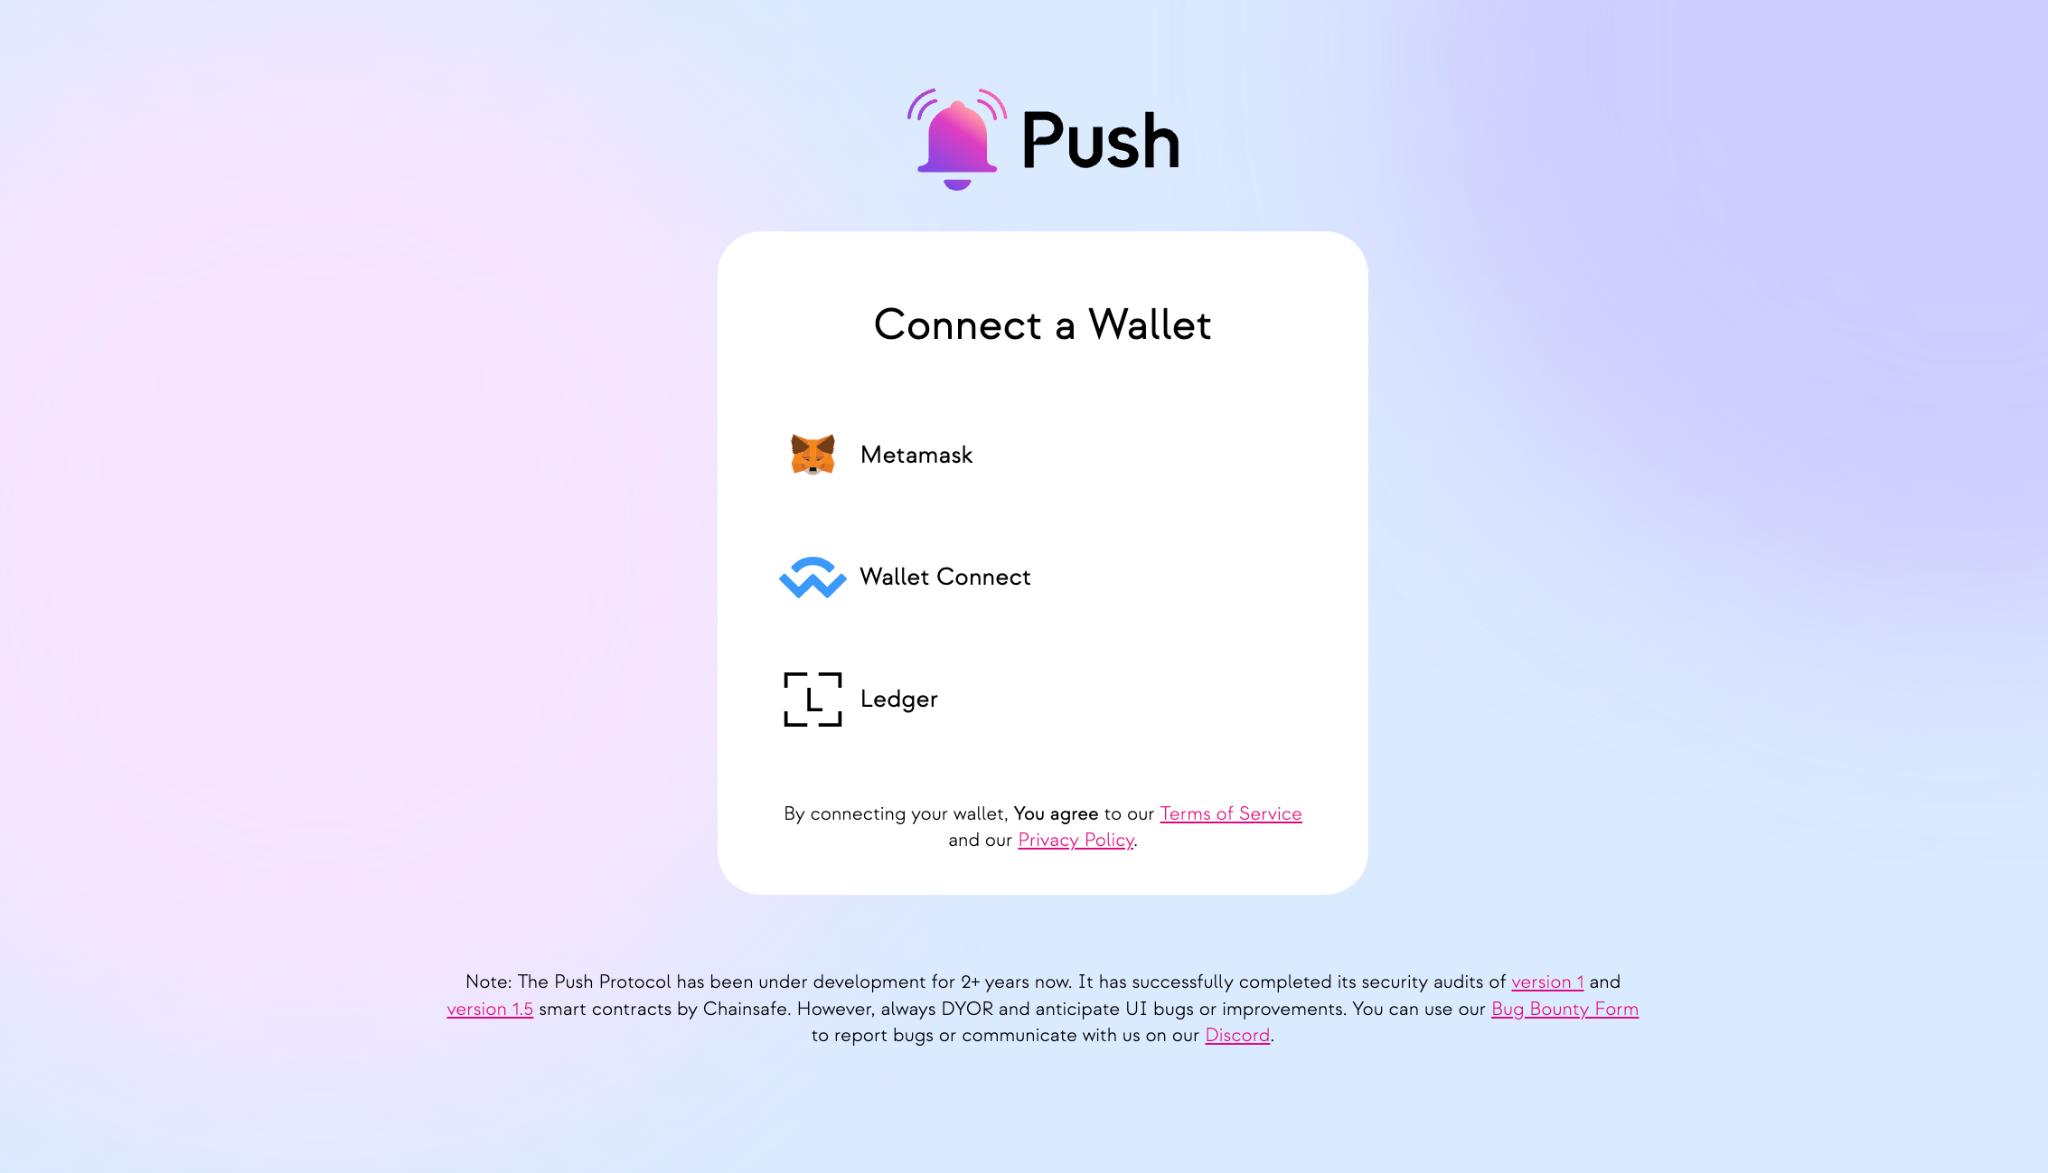
- Head to the Push Staging dapp for creating channel.
- Connect your Metamask wallet or any other supported wallet.
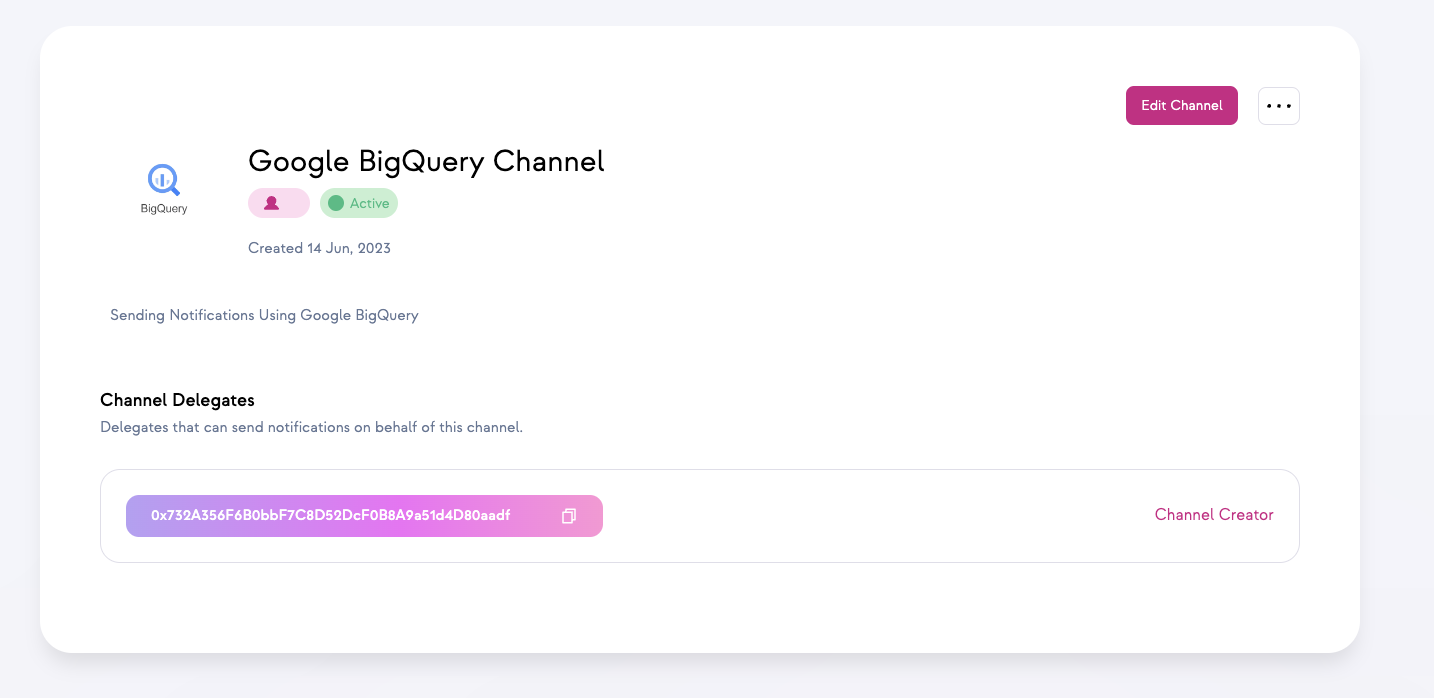
- Once Connected, go to the Developers > Create Channel. Add deatils related to channel such as Channel name, description, website URL and click on the next button. You can use the following details for this demo:
- Channel Name:
Google BigQuery Channel - Network:
Ethereum Goerli - Channel Description:
Sending Notifications using Google BigQuery - Channel Website URL:
https://push.org
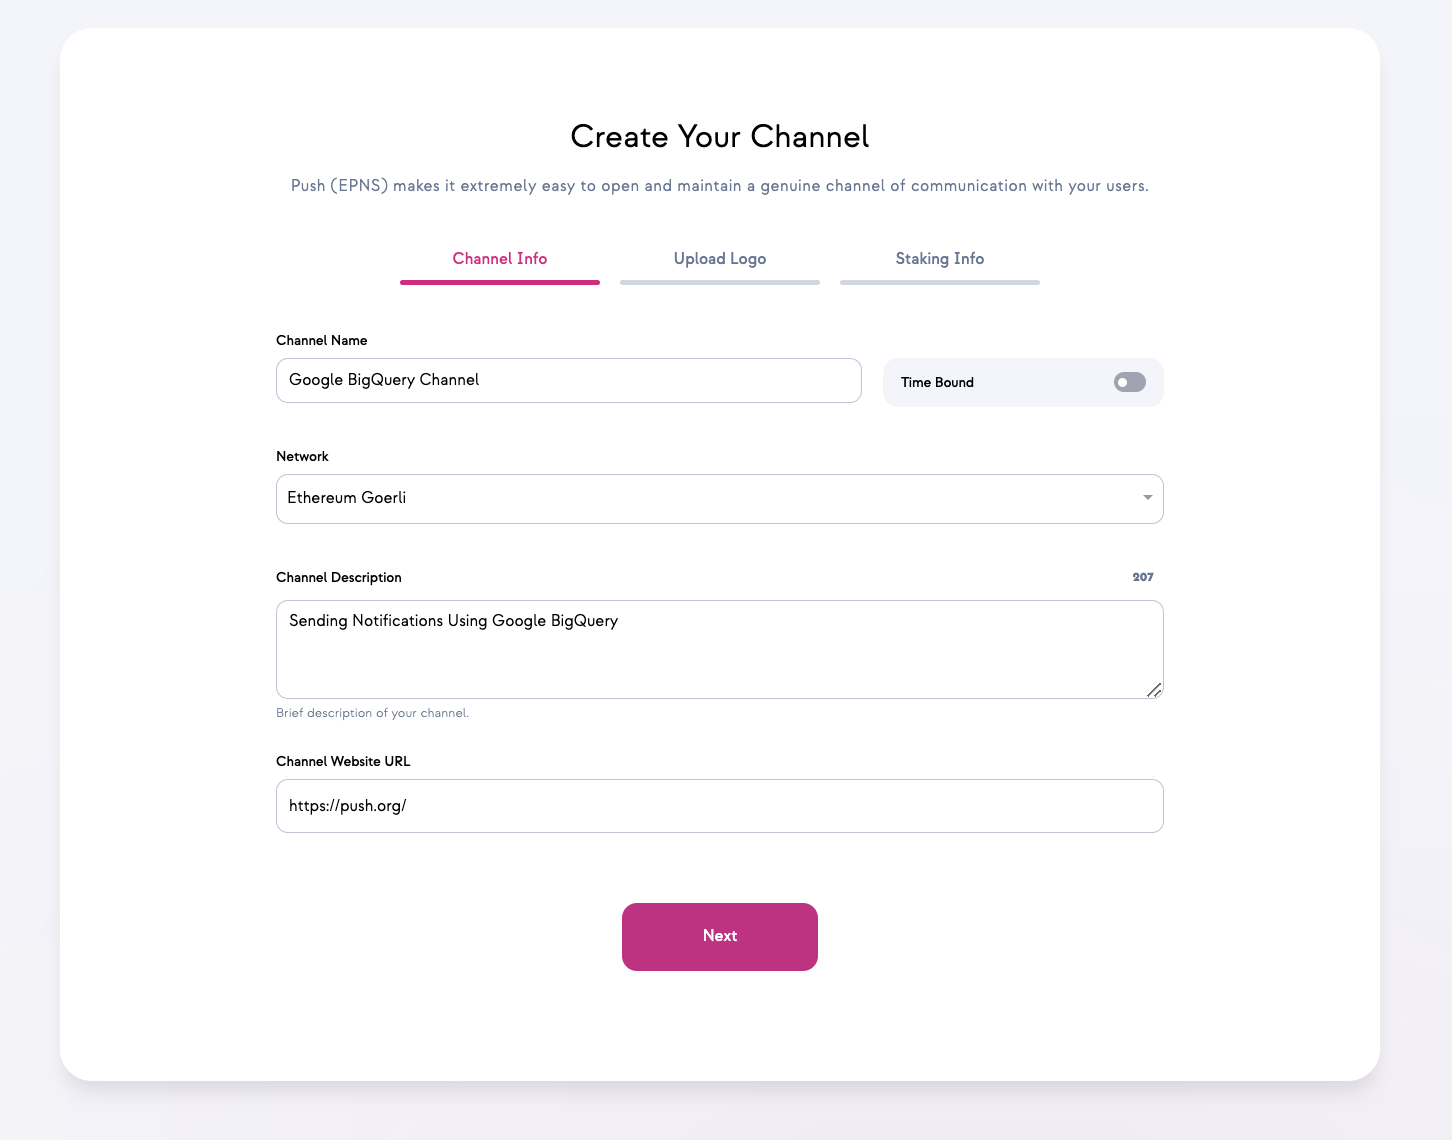
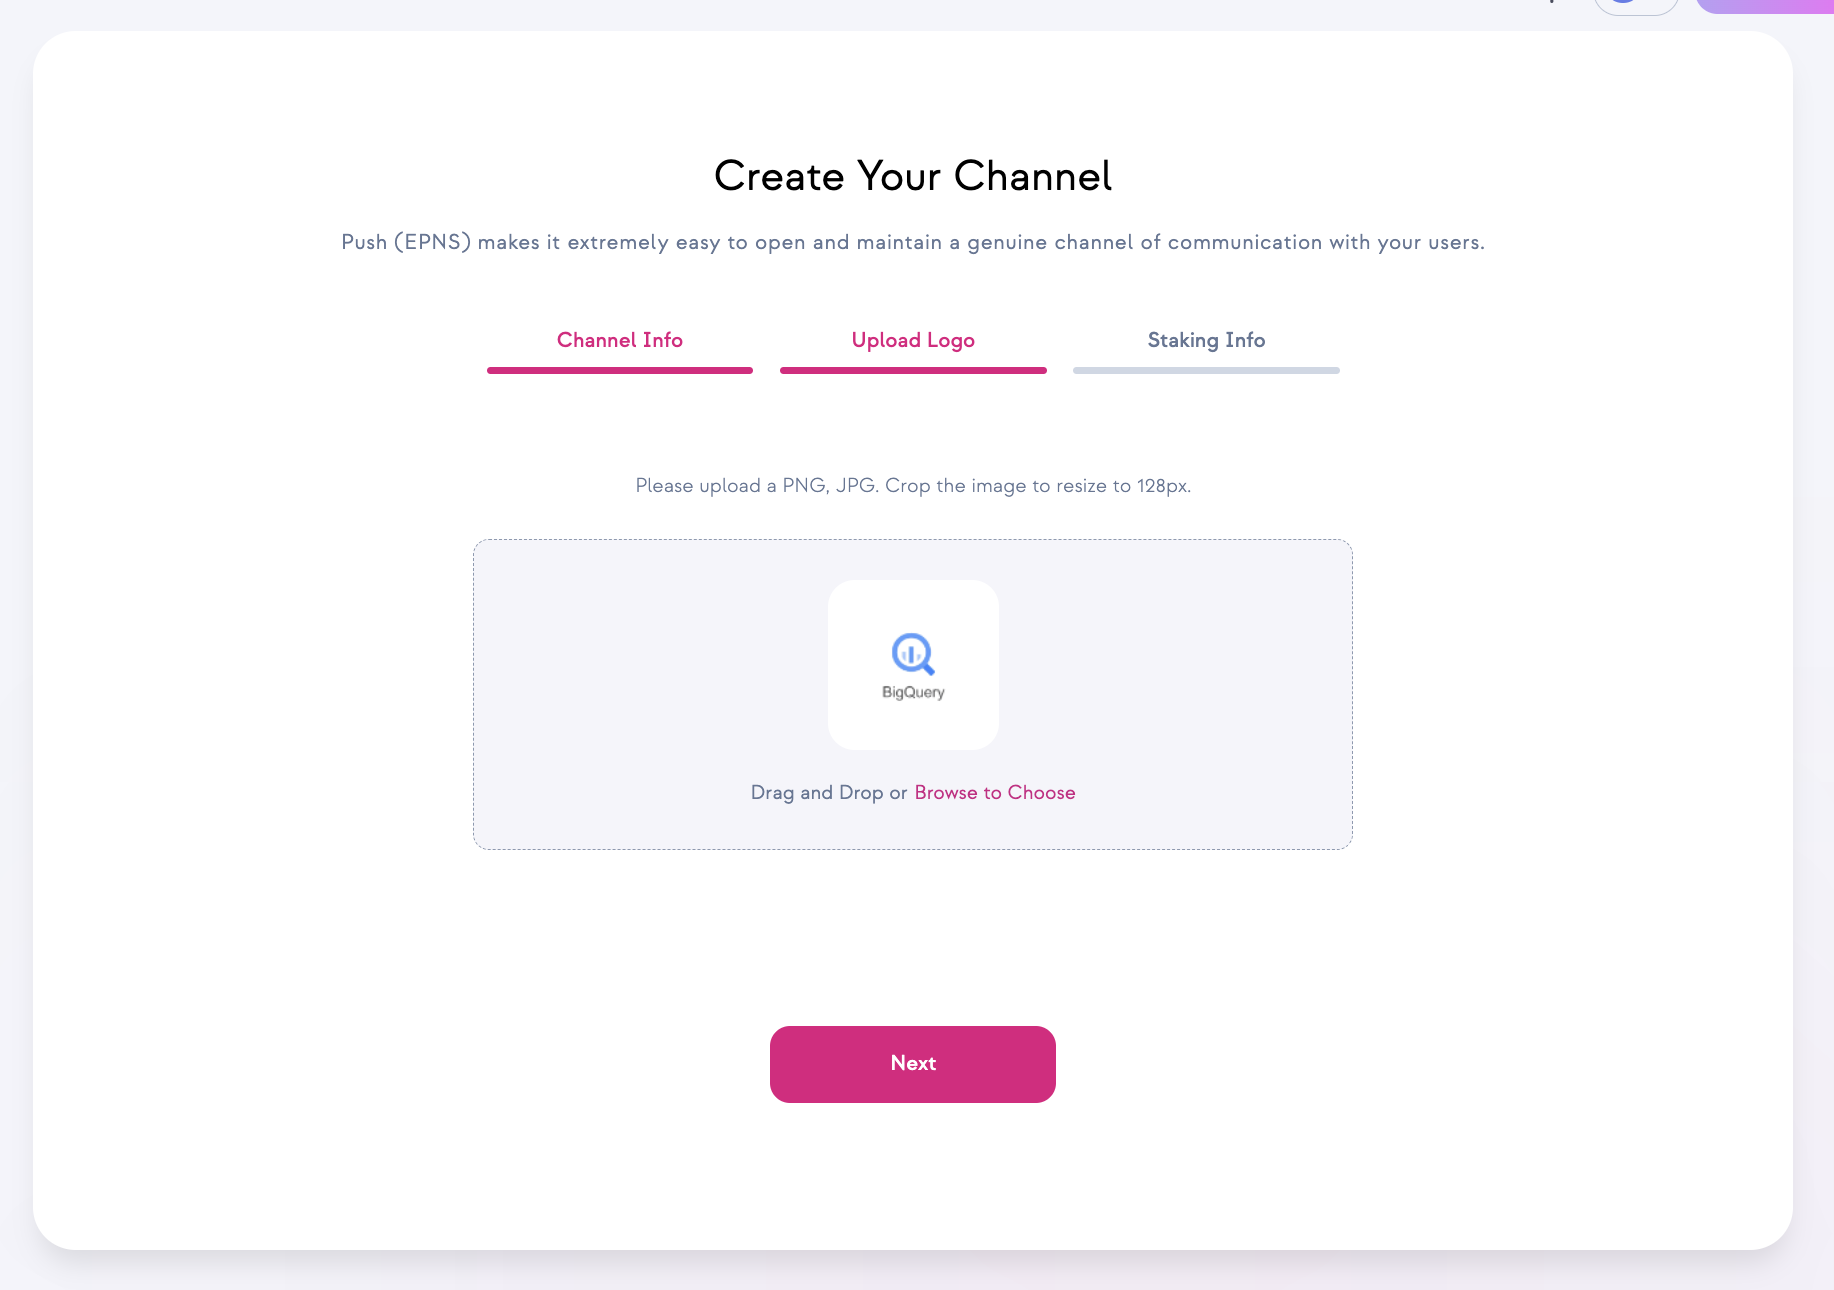
- Upload a channel logo and click on next button.
- Click on Create channel button
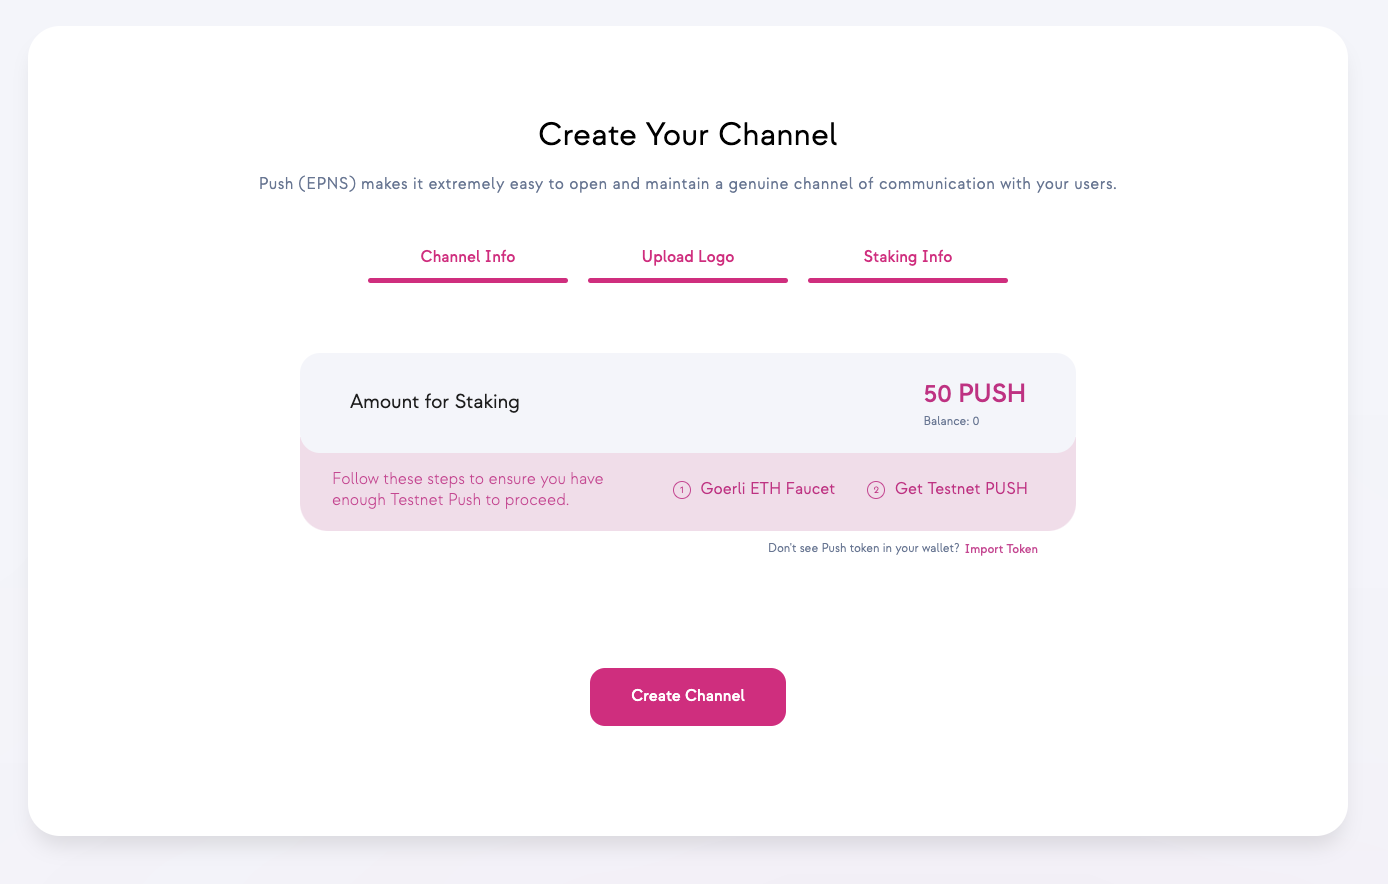
- Sign the transactions asked by wallet.
Approval of PUSH tokens - This transaction ensures that your wallet address has successfully approved the EPNSCore contract to use 50 PUSH tokens on your behalf.
Channel Creation on EPNSCore - Once approved, the 2nd transaction calls the channel creation function on EPNSCore smart contract to create the channel.
- After successful executions of transactions, channel dashboard should be visible, allowing sending notifications on Push Protocol.
Task 2. Use the client library to fetch data.
Now, ssh into the VM and run the commands to fetch data from Bigquery database using the client library.
SSH into the VM
- From the Navigation Menu, under the Compute Engine section, click VM Instances.
- On the same row as lab-server, click SSH to open a ssh window and run the following commands.
- Open the
package.jsonfile and replace the content with the following code:
To query data from the BigQuery database, you'll need to install the BigQuery client library using npm. This library provides a range of tools and features that make it easy to work with BigQuery and retrieve data from your database.
- To install the BigQuery client library, run the following command in the Cloud Shell:
The SQL query used below fetches the hash and gas price of a transaction from a public BigQuery database.
- Open the
server.jsfile and replace the content with the following code:
- Run the above script mentioned in
server.jsfile to query the data using the following command in SSH.
Expected Sample Output:
The expected output contains the queried data in JSON format according to the sqlQuery made to the database. The below output consists of 2 properties:
hash - The transaction hash
gas_price - Gas price of the transaction
Click Check my progress to verify the objective.
The data to be sent as a notification is now ready. There are different ways to send notifications out. You can find more details from the Push SDK here.
You are now all set to start sending the notifications.
Task 3. Sending notifications using Javascript
In this section you'll learn how to send notifications using the Push SDK.
Retrieve your Metamask private key
-
Click on the identicon in the top right.
-
Select the account you'd like to export.
-
On the account page, click on the menu (three dots) in the upper right corner, and then on the Account Details button.
-
Click Export Private Key.
To access your private key, you'll now need to enter your wallet password. Once you've done so, click Confirm to proceed.
Your private key will now be revealed. Click to copy it, and save it somewhere safe.
- Click Done to close the screen.
Send notifications
Now you will need to install the Push Protocol REST API and ethers library in the project directory. @pushprotocol/restapi allows developers to send notifications by communicating with Push Nodes. In addition to the Push Protocol REST API, ethers library consists of various functions which can be used for interacting with the Ethereum Blockchain and its ecosystem.
- Run the following command in the SSH to install the libraries:
Now you will import PushAPI from restapi package in server.js file and use the PushAPI.payloads.sendNotification function to send notifications. More details about the function can be found in the Push Documentation.
- Add the following import statements to the top of the
server.jsfile:
- Next, add the following code to the sendNotification function in
server.jsfile. Replace<your wallet/channel address>with your wallet address.
- Run the above script mentioned in
server.jsfile to send notifications.
- Navigate to the Push Protocol dashboard and click on the Inbox tab. You should see the blockchain data notifications that you just sent!

Click Check my progress to verify the objective.
Receiving notifications is a critical component as it make or breaks the user experience. You can use Push extension/ Push App for users to receive notifications, or simply integrate these notifications into your own platform such as any dApp, Mobile App, Wallet Extension or Web 2.5 platforms like creating a Telegram, Twitter, Email, Discord bots, etc.
Additionally, you can leverage BigQuery data by adding functionalities like chat, video chat, screen sharing, etc. A concrete example of it would be adding a help desk, customer care and a chat section for better sharing of BigQuery data. Learn about Push Chat here.
Congratulations!
Congratulations! In this lab, you learned how to use BigQuery to query blockchain data and send notifications using Push Protocol. You're all set to take the user experience of your dApp to the next level using BigQuery and Push Protocol. The complete source code for this tutorial can be found in the Google BigQuery Demo GitHub repository.
Next steps / Learn more
- Learn how to add customer service bots to any app you are building
- Learn how to add video chat and screen sharing to any social apps
Google Cloud training and certification
...helps you make the most of Google Cloud technologies. Our classes include technical skills and best practices to help you get up to speed quickly and continue your learning journey. We offer fundamental to advanced level training, with on-demand, live, and virtual options to suit your busy schedule. Certifications help you validate and prove your skill and expertise in Google Cloud technologies.
Manual Last Updated: July 8, 2023
Lab Last Tested: July 8, 2023
Copyright 2024 Google LLC All rights reserved. Google and the Google logo are trademarks of Google LLC. All other company and product names may be trademarks of the respective companies with which they are associated.