Checkpoints
Create a continuous export pipeline to Pub/Sub
/ 20
Export findings to BigQuery dataset
/ 50
Export findings to GCS bucket and create BigQuery table
/ 30
Analyzing Findings with Security Command Center
GSP1164

Overview
Security Command Center (SCC) is a security monitoring platform that helps users:
- Discover security-related misconfigurations of Google Cloud resources.
- Report on active threats in Google Cloud environments.
- Fix vulnerabilities across Google Cloud assets.
In this lab, you learn about Security Command Center by exploring the service’s analyzed assets and export features.
What you'll do
In this lab, you learn how to:
- Create a continuous export pipeline to Pub/Sub.
- Export and analyze SCC findings with BigQuery.
Prerequisites
It is recommended the learner has familiarity with the following before starting this lab:
- Fundamental understanding of cloud computing concepts.
- Familiarity with the Google Cloud console.
- Familiarity with severity classifications for findings is recommended, but not required.
- Familiarity with Pub/Sub and BigQuery is recommended, but not required.
Setup and requirements
Before you click the Start Lab button
Read these instructions. Labs are timed and you cannot pause them. The timer, which starts when you click Start Lab, shows how long Google Cloud resources will be made available to you.
This hands-on lab lets you do the lab activities yourself in a real cloud environment, not in a simulation or demo environment. It does so by giving you new, temporary credentials that you use to sign in and access Google Cloud for the duration of the lab.
To complete this lab, you need:
- Access to a standard internet browser (Chrome browser recommended).
- Time to complete the lab---remember, once you start, you cannot pause a lab.
How to start your lab and sign in to the Google Cloud console
-
Click the Start Lab button. If you need to pay for the lab, a pop-up opens for you to select your payment method. On the left is the Lab Details panel with the following:
- The Open Google Cloud console button
- Time remaining
- The temporary credentials that you must use for this lab
- Other information, if needed, to step through this lab
-
Click Open Google Cloud console (or right-click and select Open Link in Incognito Window if you are running the Chrome browser).
The lab spins up resources, and then opens another tab that shows the Sign in page.
Tip: Arrange the tabs in separate windows, side-by-side.
Note: If you see the Choose an account dialog, click Use Another Account. -
If necessary, copy the Username below and paste it into the Sign in dialog.
{{{user_0.username | "Username"}}} You can also find the Username in the Lab Details panel.
-
Click Next.
-
Copy the Password below and paste it into the Welcome dialog.
{{{user_0.password | "Password"}}} You can also find the Password in the Lab Details panel.
-
Click Next.
Important: You must use the credentials the lab provides you. Do not use your Google Cloud account credentials. Note: Using your own Google Cloud account for this lab may incur extra charges. -
Click through the subsequent pages:
- Accept the terms and conditions.
- Do not add recovery options or two-factor authentication (because this is a temporary account).
- Do not sign up for free trials.
After a few moments, the Google Cloud console opens in this tab.

Activate Cloud Shell
Cloud Shell is a virtual machine that is loaded with development tools. It offers a persistent 5GB home directory and runs on the Google Cloud. Cloud Shell provides command-line access to your Google Cloud resources.
- Click Activate Cloud Shell
at the top of the Google Cloud console.
When you are connected, you are already authenticated, and the project is set to your Project_ID,
gcloud is the command-line tool for Google Cloud. It comes pre-installed on Cloud Shell and supports tab-completion.
- (Optional) You can list the active account name with this command:
- Click Authorize.
Output:
- (Optional) You can list the project ID with this command:
Output:
gcloud, in Google Cloud, refer to the gcloud CLI overview guide.
Scenario

Cymbal Bank is an American retail bank with over 2,000 branches in all 50 states. It offers comprehensive debit and credit services that are built on top of a robust payments platform. Cymbal Bank is a digitally transforming legacy financial services institution.
Cymbal Bank was founded in 1920 under the name Troxler. Cymbal Group acquired the company in 1975 after it had been investing heavily in Cymbal Group's proprietary ATMs. As the bank grew into a national leader, they put strategic emphasis on modernizing the customer experience both in-person at their branches and digitally through an app they released in 2014. Cymbal Bank employs 42,000 people nationwide and, in 2019, reported $24 billion in revenue.
Cymbal Bank is interested in integrating a centralized security monitoring platform to help monitor threats and remediate vulnerabilities across their Google Cloud resources in their corporate banking applications. As a Cloud Security Engineer, you are tasked with learning about Security Command Center's export and analytics features so you can deliver a presentation to the CTO on the services' benefits.
Task 1: Create a continuous export pipeline to Pub/Sub.
Security Command Center can export security findings to external resources using several methods, including:
- Continuous exports to a BigQuery dataset.
- Continuous exports to Pub/Sub.
- One-time exports to CSV files.
- One-time exports to Cloud Storage buckets as JSON files.
In this task, you will configure continuous exports of findings to Pub/Sub.
Continuous exports to Pub/Sub are usually used for forwarding findings to external security management systems such as Splunk or QRadar.
In this task, you will export your findings to a Pub/Sub topic and then simulate an application by fetching the messages from a Pub/Sub subscription.
Before we start configuring an SCC export, we need to create a Pub/Sub topic and subscription.
- Open the navigation menu and under the Analytics header, click Pub/Sub > Topics.
- Click the Create Topic button located near the top of the page.
- Enter in export-findings-pubsub-topic for the Topic ID.
- Keep the other default settings and click Create.
This will automatically kick off the creation of both a Pub/Sub topic and an associated subscription.
-
Click Subscriptions from the left-hand menu.
-
Click on export-findings-pubsub-topic-sub.
This will provide you with a dashboard of statistics and metrics related to the messages published in this subscription.
-
Open the navigation menu and select Security > Security Command Center > Overview > Settings.
-
Click on the Continuous Exports tab.
-
Click the Create Pub/Sub Export button.
-
For the continuous export name, enter in export-findings-pubsub.
-
For the continuous export description, enter in Continuous exports of Findings to Pub/Sub and BigQuery.
-
For the project name, select the
Project ID of the project you are working in (do not select Qwiklabs Resources). -
From the "Select a Cloud Pub/Sub Topic" dropdown, select export-findings-pubsub-topic.
-
Set the findings query to the following:
This query ensures that all new ACTIVE and NOT MUTED findings will be forwarded to the newly created Pub/Sub topic.
- Now click Save.
You have now successfully created a continuous export from Security Command Center to Pub/Sub. You will now create new findings and check how they are exported to Pub/Sub.
-
Open a new Cloud Shell session (
-
Run the following command to create a new virtual machine:
- Ensure you receive a similar output:
ERROR: (gcloud.compute.instances.create) You do not currently have an active account selected., re-run the command again.This command will create a new VM instance with a Public IP address and a default Service Account attached.
This activity will immediately generate three new vulnerability findings:
- Public IP address
- Default service account used
- Compute secure boot disabled
-
Open the navigation menu and under the Analytics header, click Pub/Sub > Subscriptions.
-
Select the export-findings-pubsub-topic-sub subscription.
-
Select the Messages tab from the center of the Console.
-
Click the Enable ack messages checkbox.
-
Click on the Pull button.
You should see messages in this subscription that relate to the public IP address, default service account used, and compute secure boot disabled vulnerabilities.
By pulling the messages from the Pub/Sub subscription you have simulated behavior of an application that can forward these messages to another security monitoring system like Splunk.
In the next task, you will learn how to export and analyze SCC findings with BigQuery.
Click Check my progress to verify the objectives.
Task 2: Export and Analyze SCC findings with BigQuery
SCC findings can also be exported to a BigQuery dataset. This might be useful for building analytical dashboards used for checking what type of findings appear in your organization most often.
As of now, configuring continuous exports can only be set using the Command Line Interface (not in the Console).
- In your Cloud Shell session, run the following command to create a new BigQuery dataset:
- We have not used an SCC command line interface in this project yet, so we need to enable the SCC service in this project:
- Now create a new export by entering this command:
- Ensure you receive a similar output message:
Once new findings are exported to BigQuery, SCC will create a new table. You will now initiate new SCC findings.
- Run the following commands to create 3 new service accounts without any IAM permissions and create 3 user-managed service account keys for them.
Once new findings are created in SCC, they will be exported to BigQuery. For storing them, the export pipeline will create a new table “findings”.
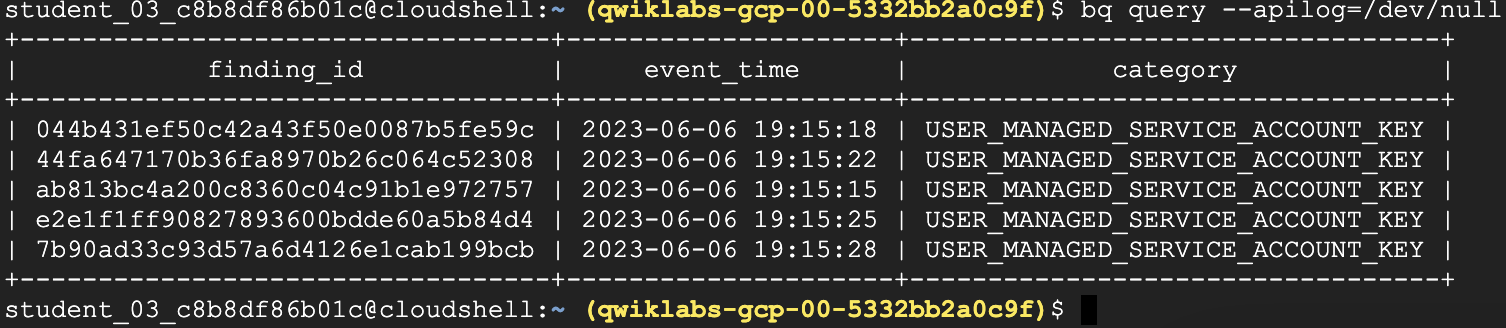
- Fetch from BigQuery information about newly created finding using BigQuery CLI:
- Soon after you should receive the following output:
Very often Security Command Center is enabled in pre-existing and mature Google Cloud infrastructure.
As soon as the SCC is enabled, it starts scanning existing vulnerabilities and eventually might report thousands of findings on existing infrastructure.
The SCC interface might not provide the best way to sort and filter those findings, so exporting these findings to a BigQuery database is a common practice for running analytics against findings.
Direct exporting of findings to BigQuery is not supported yet. Instead, you can use a Google Cloud Storage bucket as interim storage.
Click Check my progress to verify the objectives.
To export existing findings to a BigQuery interface, we will need to export them first to a GCS bucket.
-
Open the navigation menu and select Cloud Storage > Buckets.
-
Click the Create button.
-
Every bucket name in Google Cloud must be unique. Set the bucket name to scc-export-bucket-
. -
Click Continue.
-
Set Location type to Region.
-
Choose
for the location. -
Do not change any other settings and click Create.
-
Press the Confirm button when asked about Enforce public access prevention on this bucket.
-
Open the navigation menu and select Security > Security Command Center > Findings.
-
Click the Export button.
-
From the dropdown list, select Cloud Storage.
-
For the project name, select the Project ID
(do not select Qwiklabs Resources). -
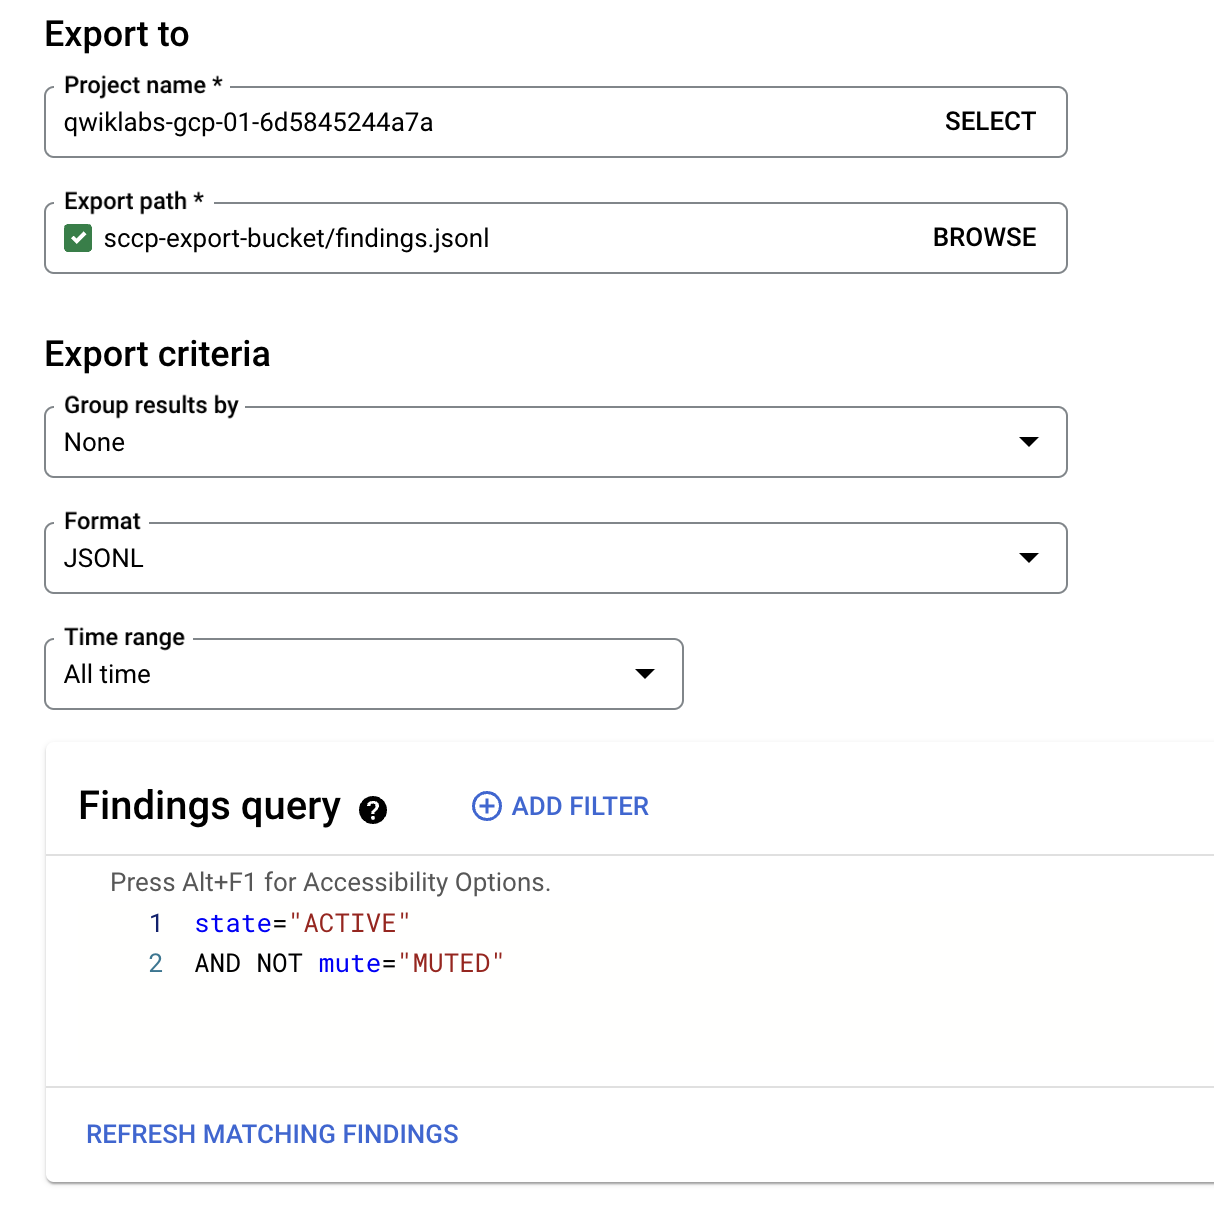
Then select the Export path by clicking the BROWSE button.
-
Click the arrow next to the scc-export-bucket-
button. -
Set the filename to
findings.jsonlthen click SELECT. -
In the Format drop-down list select JSONL.
-
Change the Time Range to All time.
-
Do not modify the default findings query.
-
Final "Export to" form might look similar to:
-
Now click the Export button.
-
Open the navigation menu and select BigQuery > BigQuery Studio.
-
From the left-hand "Explorer" menu, click on the +ADD button.
-
In a new "Add" window click on the "Google Cloud Storage" and the set the following parameters:
| Setting | Value |
|---|---|
| Create table from | Google Cloud Storage |
| Select the file from GCS bucket | scc-export-bucket- |
| File format | JSONL |
| Dataset | continuous_export_dataset |
| Table | old_findings |
| Schema | Enable the "Edit as text" toggle |
- Now paste in the following schema:
-
Then click the CREATE TABLE button.
-
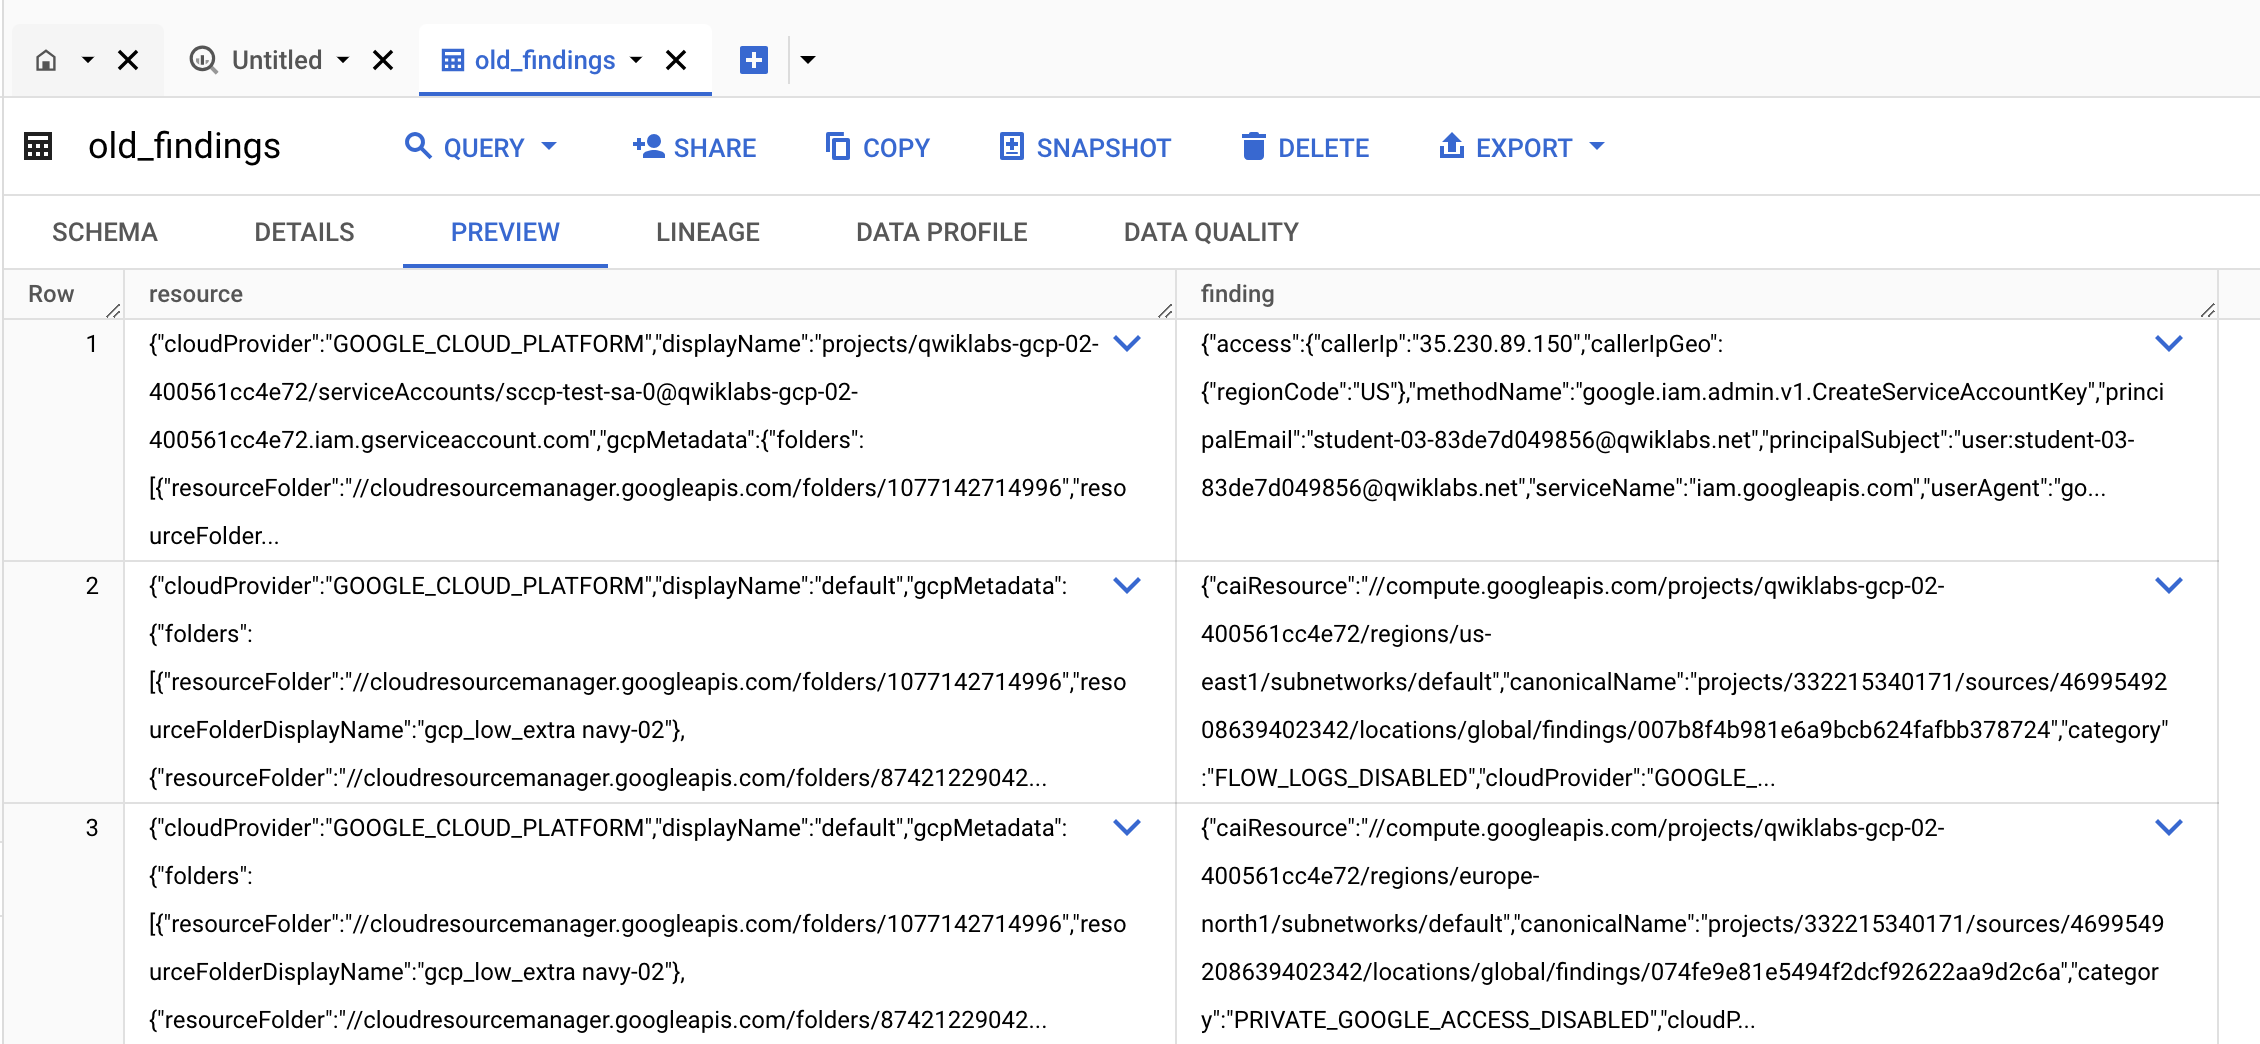
When the new table is created, click the link GO TO TABLE.
-
Click the preview tab and confirm you can view your existing findings:
Click Check my progress to verify the objectives.
Congratulations!
Throughout this lab, you learned about Security Command Center's analyzed assets and export features.
Next steps / Learn more
- Check out the lab titled Identify Application Vulnerabilities with Security Command Center.
Google Cloud training and certification
...helps you make the most of Google Cloud technologies. Our classes include technical skills and best practices to help you get up to speed quickly and continue your learning journey. We offer fundamental to advanced level training, with on-demand, live, and virtual options to suit your busy schedule. Certifications help you validate and prove your skill and expertise in Google Cloud technologies.
Manual Last Updated April 26, 2024
Lab Last Tested March 18, 2024
Copyright 2024 Google LLC All rights reserved. Google and the Google logo are trademarks of Google LLC. All other company and product names may be trademarks of the respective companies with which they are associated.