Checkpoints
Build the infrastructure
/ 25
Adding tags to the compute resource
/ 25
Change the infrastructure for machine-type
/ 25
Destroy the infrastructure
/ 25
Infrastructure as Code with Terraform
Overview
In this lab, you will use Terraform to create, update, and destroy Google Cloud resources. You will start by defining Google Cloud as the provider.
You will then create a VM instance without mentioning the network to see how terraform parses the configuration code. You will then edit the code to add network and create a VM instance on Google Cloud.
You will explore how to update the VM instance. You will edit the existing configuration to add tags and then edit the machine type. You will then execute terraform commands to destroy the resources created.
Objectives
In this lab you will learn how to perform the following tasks:
- Verify Terraform installation
- Define Google Cloud as the provider
- Create, change, and destroy Google Cloud resources by using Terraform
Task 1. Sign in to the Cloud Console
For each lab, you get a new Google Cloud project and set of resources for a fixed time at no cost.
-
Sign in to Qwiklabs using an incognito window.
-
Note the lab's access time (for example,
1:15:00), and make sure you can finish within that time.
There is no pause feature. You can restart if needed, but you have to start at the beginning. -
When ready, click Start lab.
-
Note your lab credentials (Username and Password). You will use them to sign in to the Google Cloud Console.
-
Click Open Google Console.
-
Click Use another account and copy/paste credentials for this lab into the prompts.
If you use other credentials, you'll receive errors or incur charges. -
Accept the terms and skip the recovery resource page.
Task 2. Check Terraform Installation
-
On the Google Cloud menu, click Activate Cloud Shell (
). If a dialog box appears, click Continue.
-
If prompted, click Continue.
-
Confirm that Terraform is installed by running the following command:
The output should look like this (do not copy; this is example output):
Terraform comes pre-installed in Cloud Shell. With Terraform already installed, you can directly create some infrastructure.
Task 3. Add Google Cloud provider
- Create the
main.tffile:
-
Click Open Editor on the toolbar of Cloud Shell. Click Open in a new window to leave the Editor open in a separate tab.
-
Copy the following code in the
main.tffile.
- Click File > Save.
- Switch to the Cloud Shell and run the
terraform initcommand.
The output should look like this (do not copy; this is example output):
Task 4. Build the infrastructure
Let us try creating a compute instance without specifying the network parameter and see how terraform processes such configuration.
- Switch to the editor window. Within the
main.tffile, enter the following code block.
-
Save the main.tf file by clicking File > Save.
-
Now run the following command to preview if the compute engine will be created.
- The configuration fails with the following error. This is because you cannot configure a compute engine without a network.
- Now add the network by including the following code segment to the
google_compute_instanceblock.
The final code in main.tf file will look like this:
- Save the main.tf file by clicking File > Save.
- Now run the
terraform plancommand to preview if the compute engine will be created.
Click Authorize when prompted.
The output should look like this (do not copy; this is example output):
- Apply the desired changes by running the following command.
- Confirm the planned actions by typing
yes.
The output should look like this (do not copy; this is example output):
Click Check my progress to verify the compute engine created.
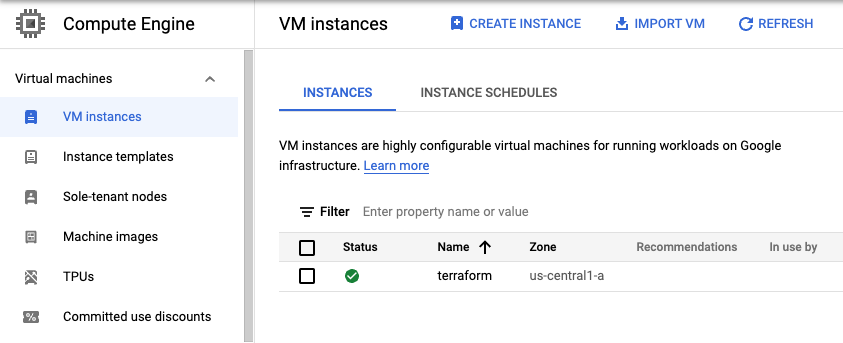
Verify on Cloud Console
In the Cloud Console, verify that the resources were created.
-
In the Cloud Console, on the Navigation menu (
), click Compute Engine > VM instances.
-
View the terraform instance created.
Task 5. Change the infrastructure
In this task, we will be performing 2 types of changes to the infrastructure:
- Adding network tags
- Editing the machine-type
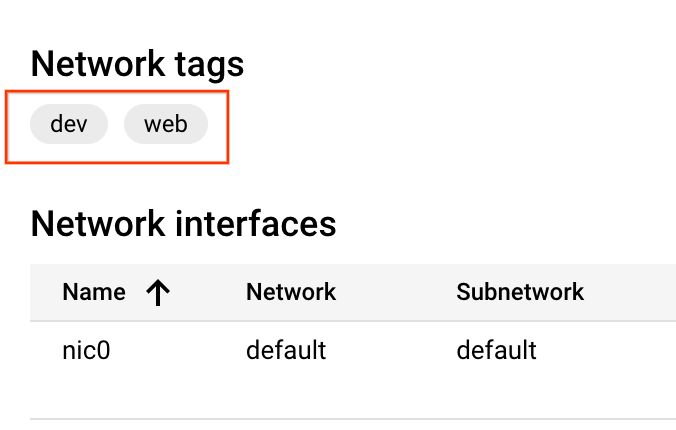
Adding tags to the compute resource
In addition to creating resources, Terraform can also make changes to those resources.
- Add a
tagsargument to the instance we just created so that it looks like this:
- Run
terraform plan
- Run
terraform applyto update the instance.
The output should look like this (do not copy; this is example output):
The prefix ~ means that Terraform will update the resource in-place.
- Respond
yeswhen promoted, and Terraform will add the tags to your instance.
Click Check my progress to verify the tags were added.
Editing the machine type without stopping the VM
Machine type of a VM cannot be changed on a running VM. Let us see how terraform processes the change in machine type for a running VM.
- Navigate to main.tf and edit the machine_type argument of terraform instance from
e2-microtoe2-mediumso that it looks like this:
- Run
terraform plan
- Run
terraform applyagain to update the instance.
The terraform apply fails with a warning as shown below. (do not copy; this is example output)
- The machine-type cannot be changed on a running VM. To ensure the VM stops before updating the
machine_type, setallow_stopping_for_update argumenttotrueso that the code looks like this:
- Run
terraform plan
- Run
terraform applyagain to update the instance.
-
Respond
yeswhen promoted. -
Verify the change in machine-type and the tags added by navigating to the VM Instances on the Cloud Console and clicking the terraform instance created.
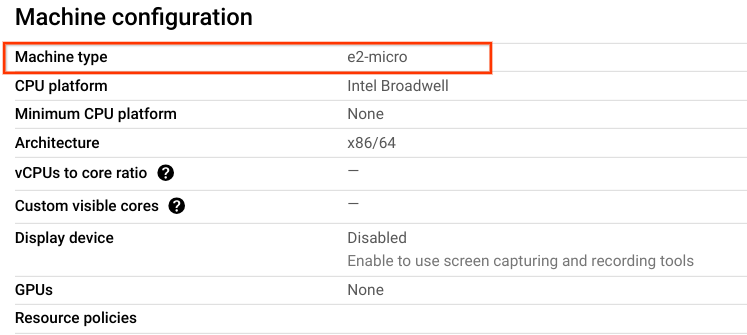
Click Check my progress to verify the compute engine terraform machine type is e2-medium.
Task 6. Destroy the infrastructure
You have now seen how to build and change infrastructure. Before moving on to creating multiple resources and showing resource dependencies, you will see how to completely destroy your Terraform-managed infrastructure.
- Execute the following command. Answer
yesto execute this plan and destroy the infrastructure:
The - prefix indicates that the instance and the network will be destroyed.
- Verify that the instance terraform no longer exists by navigating to the VM Instances on the Cloud Console.
Click Check my progress to verify the infrastructure was destroyed.
Congratulations!
In this lab, you learned how to:
- Verify Terraform installation
- Define Google Cloud as the provider
- Create, change, and destroy Google Cloud resources by using Terraform
End your lab
When you have completed your lab, click End Lab. Google Cloud Skills Boost removes the resources you’ve used and cleans the account for you.
You will be given an opportunity to rate the lab experience. Select the applicable number of stars, type a comment, and then click Submit.
The number of stars indicates the following:
- 1 star = Very dissatisfied
- 2 stars = Dissatisfied
- 3 stars = Neutral
- 4 stars = Satisfied
- 5 stars = Very satisfied
You can close the dialog box if you don't want to provide feedback.
For feedback, suggestions, or corrections, please use the Support tab.
Copyright 2022 Google LLC All rights reserved. Google and the Google logo are trademarks of Google LLC. All other company and product names may be trademarks of the respective companies with which they are associated.