Points de contrôle
Create Artifact Registry repository
/ 20
Create an Attestor
/ 10
Add a KMS key
/ 10
Create a GKE cluster and update the policies
/ 10
Add a signing step
/ 25
Deploy a signed image
/ 10
Deploy an unsigned image
/ 15
Gating Deployments with Binary Authorization
- GSP1183
- Overview
- Setup and requirements
- Task 1. Create Artifact Registry repository
- Task 2. Image Signing
- Task 3. Adding a KMS key
- Task 4. Creating a signed attestation
- Task 5. Admission control policies
- Task 6. Automatically signing images
- Task 7. Authorizing signed images
- Task 8. Blocked unsigned Images
- Congratulations!
GSP1183

Overview
Binary Authorization is a deploy-time security control that ensures only trusted container images are deployed on Google Kubernetes Engine (GKE) or Cloud Run. With Binary Authorization, you can require images to be signed by trusted authorities during the development process and then enforce signature validation when deploying. By enforcing validation, you can gain tighter control over your container environment by ensuring only verified images are integrated into the build-and-release process.
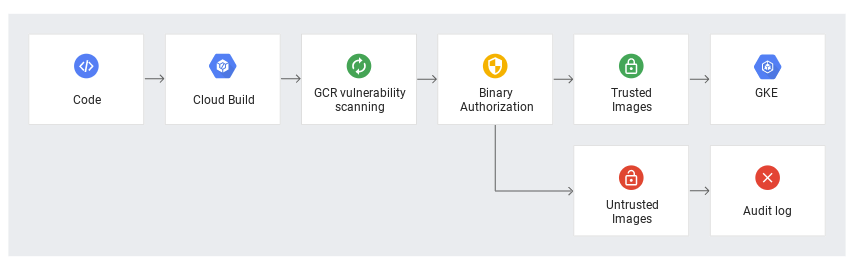
The following diagram shows the components in a Binary Authorization/Cloud Build setup:
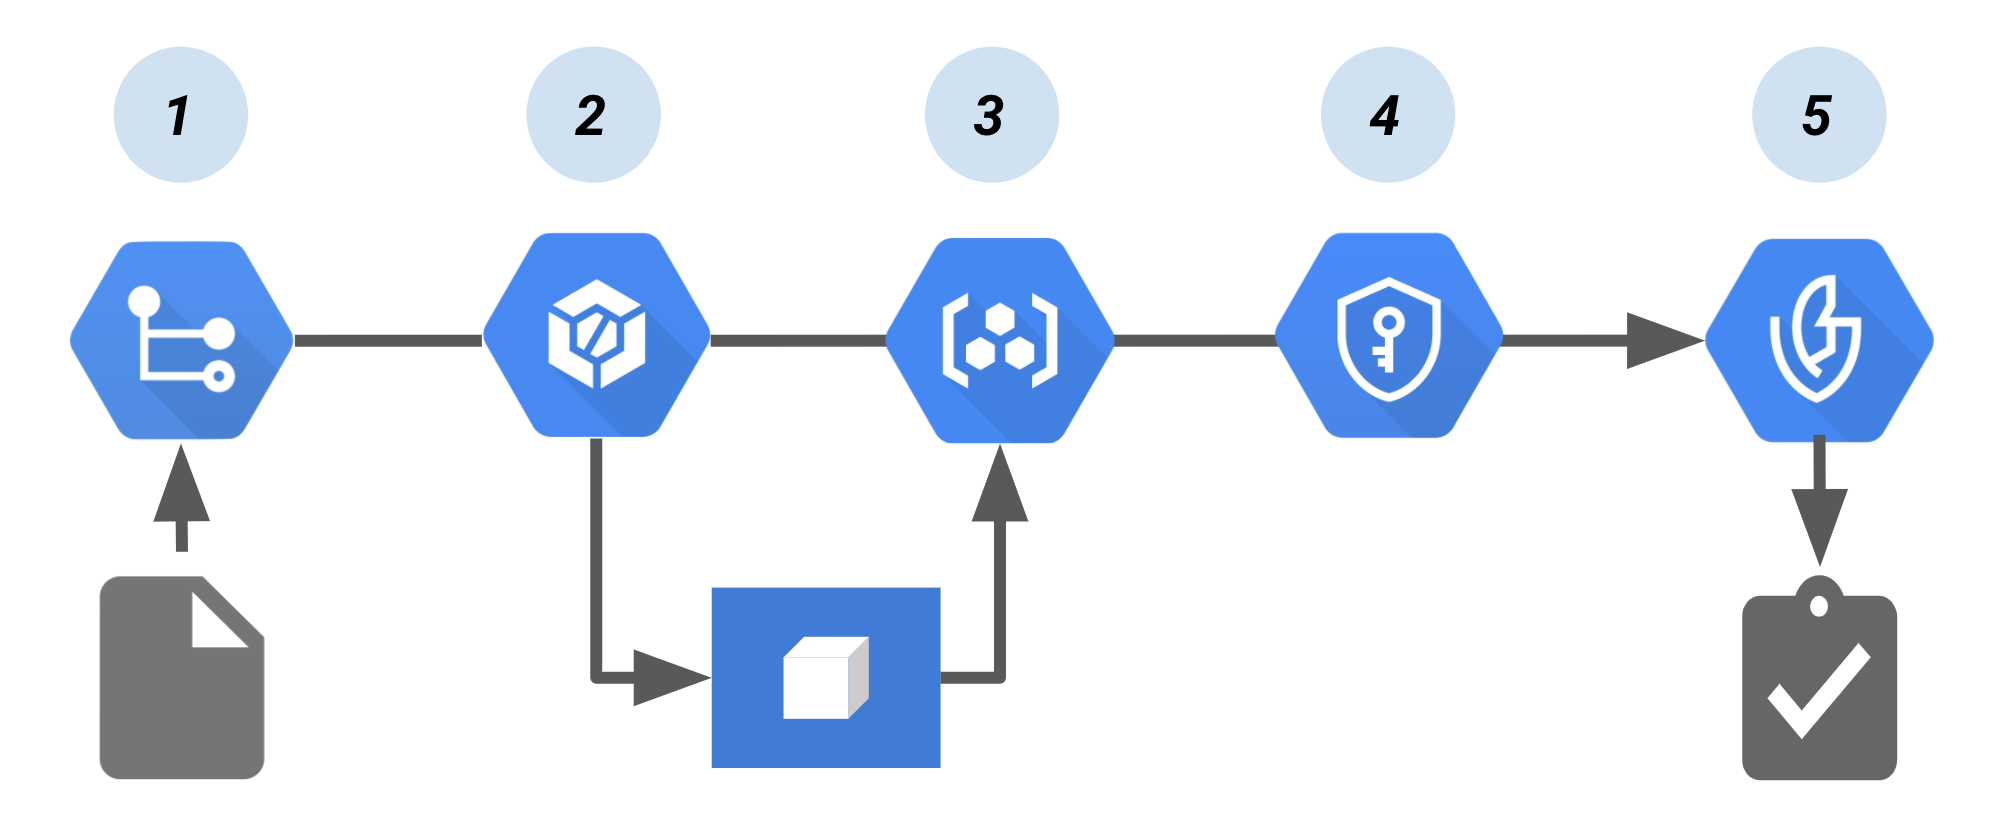
In this pipeline:
- Code to build the container image is pushed to a source repository, such as Cloud Source Repositories.
- A continuous integration (CI) tool, Cloud Build builds and tests the container.
- The build pushes the container image to Container Registry or another registry that stores your built images.
- Cloud Key Management Service, which provides key management for the cryptographic key pair, signs the container image. The resulting signature is then stored in a newly created attestation.
- At deploy time, the attestor verifies the attestation using the public key from the key pair. Binary Authorization enforces the policy by requiring signed attestations to deploy the container image.
In this lab you will learn about the tools and techniques to secure deployed artifacts. This lab focuses on artifacts (containers) after they have been created but not deployed to any particular environment.
What you'll learn
- Image Signing
- Admission Control Policies
- Signing Scanned Images
- Authorizing Signed Images
- Blocked unsigned Images
Setup and requirements
Before you click the Start Lab button
Read these instructions. Labs are timed and you cannot pause them. The timer, which starts when you click Start Lab, shows how long Google Cloud resources will be made available to you.
This hands-on lab lets you do the lab activities yourself in a real cloud environment, not in a simulation or demo environment. It does so by giving you new, temporary credentials that you use to sign in and access Google Cloud for the duration of the lab.
To complete this lab, you need:
- Access to a standard internet browser (Chrome browser recommended).
- Time to complete the lab---remember, once you start, you cannot pause a lab.
How to start your lab and sign in to the Google Cloud Console
-
Click the Start Lab button. If you need to pay for the lab, a pop-up opens for you to select your payment method. On the left is a panel populated with the temporary credentials that you must use for this lab.
-
Copy the username, and then click Open Google Console. The lab spins up resources, and then opens another tab that shows the Sign in page.
Tip: Open the tabs in separate windows, side-by-side.
-
In the Sign in page, paste the username that you copied from the left panel. Then copy and paste the password.
Important: You must use the credentials from the left panel. Do not use your Google Cloud Training credentials. If you have your own Google Cloud account, do not use it for this lab (avoids incurring charges).
-
Click through the subsequent pages:
- Accept the terms and conditions.
- Do not add recovery options or two-factor authentication (because this is a temporary account).
- Do not sign up for free trials.


After a few moments, the Cloud Console opens in this tab.
Activate Cloud Shell
Cloud Shell is a virtual machine that is loaded with development tools. It offers a persistent 5GB home directory and runs on the Google Cloud. Cloud Shell provides command-line access to your Google Cloud resources.
In the Cloud Console, in the top right toolbar, click the Activate Cloud Shell button.

Click Continue.

It takes a few moments to provision and connect to the environment. When you are connected, you are already authenticated, and the project is set to your PROJECT_ID. For example:

gcloud is the command-line tool for Google Cloud. It comes pre-installed on Cloud Shell and supports tab-completion.
You can list the active account name with this command:
(Output)
(Example output)
You can list the project ID with this command:
(Output)
(Example output)
Environment Setup
In Cloud Shell, set your project ID and the project number for your project. Save them as PROJECT_ID and PROJECT_NUMBER variables.
Enable services
Enable all necessary services:
Task 1. Create Artifact Registry repository
In this lab you will be using Artifact Registry to store and scan your images.
- Create the repository with the following command:
- Configure docker to utilize your gcloud credentials when accessing Artifact Registry:
- Create and change into a work directory:
- Next define a sample image. Create a file called
Dockerfilewith the following contents:
- Create a file called
main.pywith the following contents:
- Use Cloud Build to build and automatically push your container to Artifact Registry.
Click Check my progress to verify the objective.
Task 2. Image Signing
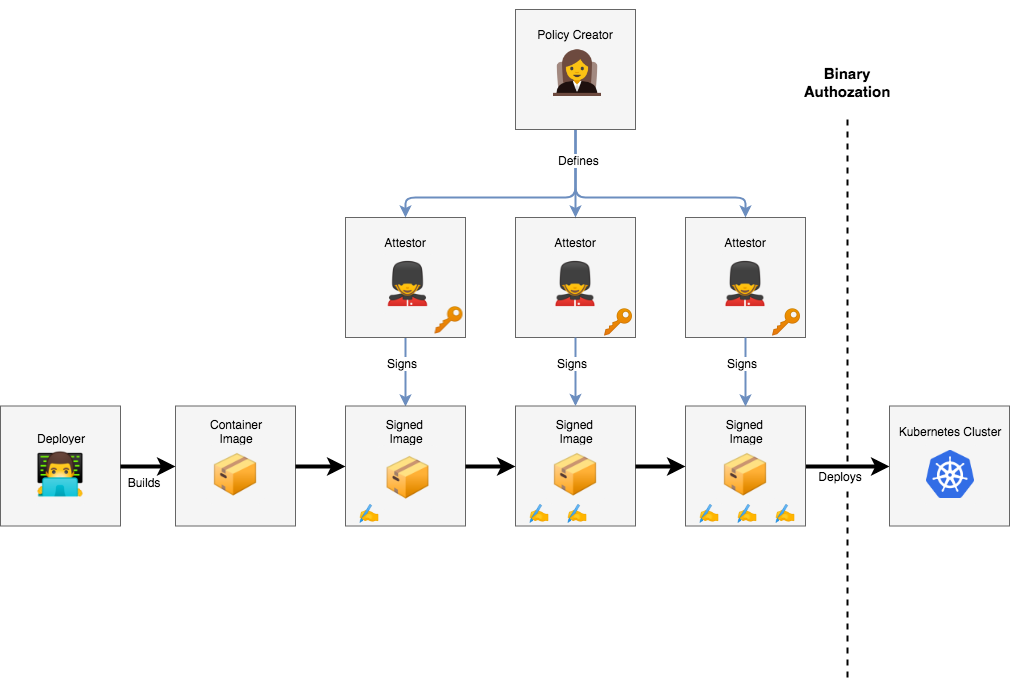
What is an Attestor
- This person/process is responsible for one link in the chain of trust of the system.
- They hold a cryptographic key, and sign an image if it passes their approval process.
- While the Policy Creator determines policy in a high-level, abstract way, the Attestor is responsible for concretely enforcing some aspect of the policy.
- This can be a real person, like a QA tester or a manager, or a bot in a CI system.
- The security of the system depends on their trustworthiness, so it's important that their private keys are kept secure.
Each of these roles can represent an individual person or a team of people in your organization. In a production environment, these roles would likely be managed by separate Google Cloud Platform projects, and access to resources would be shared between them in a limited fashion using Cloud IAM.
Attestors in Binary Authorization are implemented on top of the Cloud Container Analysis API, so it is important to describe how that works before going forward. The Container Analysis API was designed to allow you to associate metadata with specific container images.
As an example, a Note might be created to track the Heartbleed vulnerability. Security vendors would then create scanners to test container images for the vulnerability, and create an Occurrence associated with each compromised container.
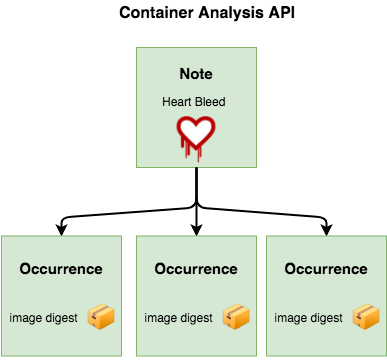
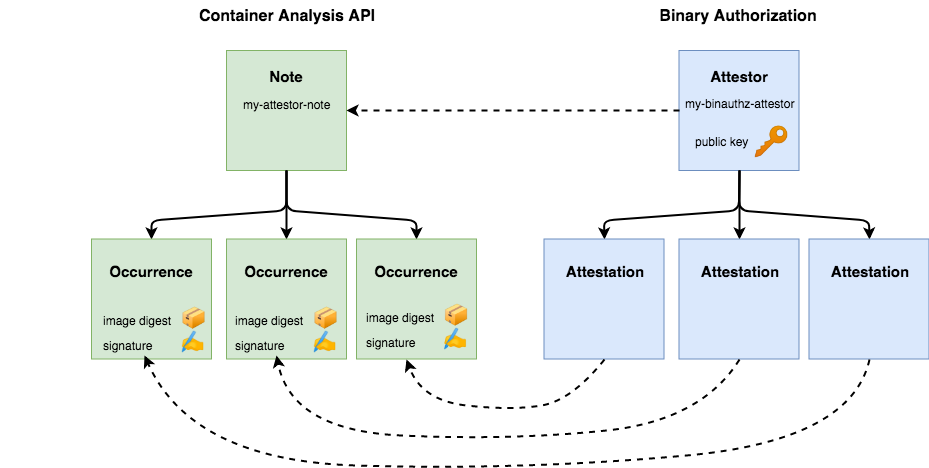
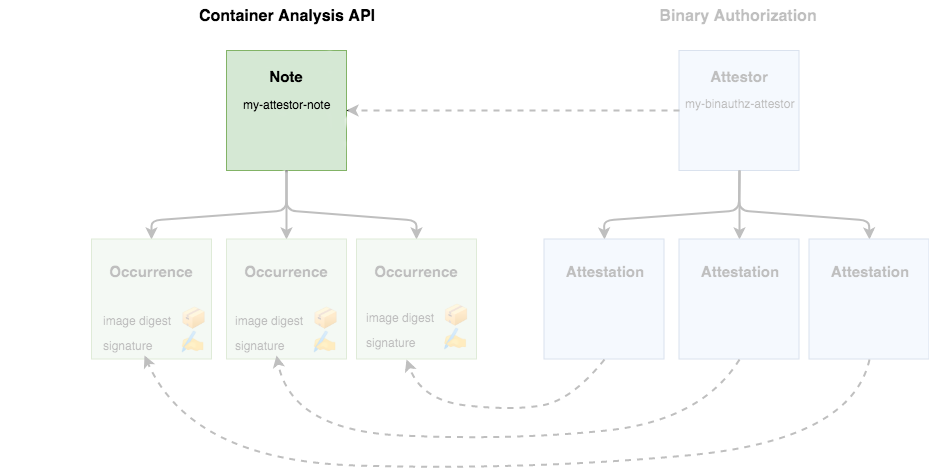
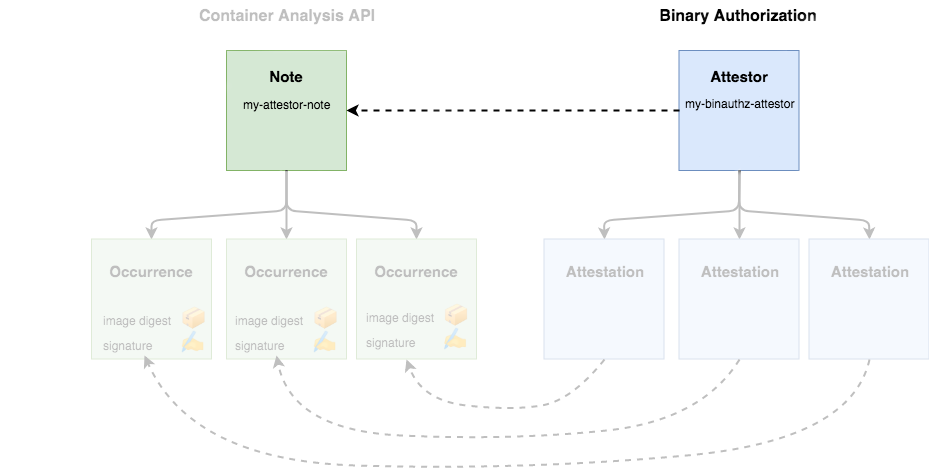
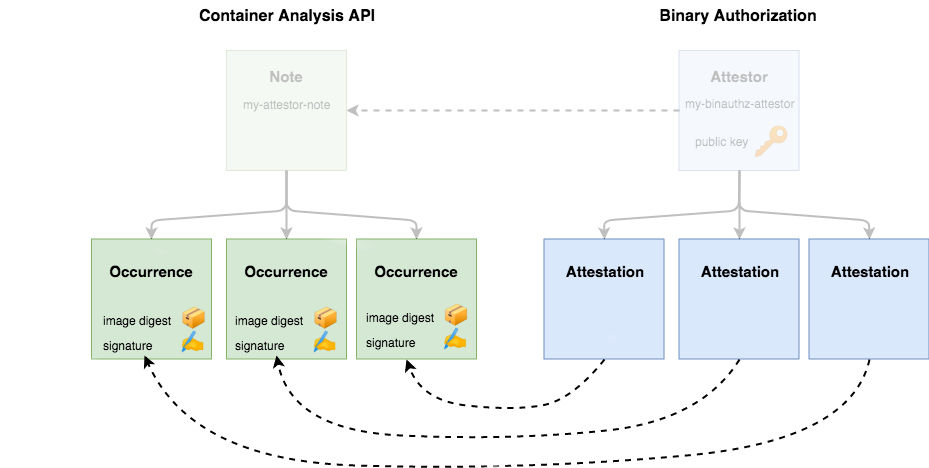
Along with tracking vulnerabilities, Container Analysis was designed to be a generic metadata API. Binary Authorization utilizes Container Analysis to associate signatures with the container images they are verifying. A Container Analysis Note is used to represent a single attestor, and Occurrences are created and associated with each container that attestor has approved.
The Binary Authorization API uses the concepts of "attestors" and "attestations", but these are implemented using corresponding Notes and Occurrences in the Container Analysis API.
Create an Attestor Note
An Attestor Note is simply a small bit of data that acts as a label for the type of signature being applied. For example one note might indicate vulnerability scan, while another might be used for QA sign off. The note will be referred to during the signing process.
- Create a note:
- Store the note
- Verify the note
Your Note is now saved within the Container Analysis API.
- Creating an Attestor
Attestors are used to perform the actual image signing process and will attach an occurrence of the note to the image for later verification. To make use of your attestor, you must also register the note with Binary Authorization:
- Create Attestor
- Verify Attestor
The last line indicates NUM_PUBLIC_KEYS: 0 you will provide keys in a later step.
Cloud Build automatically creates the built-by-cloud-build attestor in your project when you run a build that generates images. So the above command returns two attestors, vulnz-attestor and built-by-cloud-build. After images are successfully built, Cloud Build automatically signs and creates attestations for them.
- The Binary Authorization service account will need rights to view the attestation notes. Provide the access to the IAM Role with the following API call:
- Use the file to create the IAM Policy:
Click Check my progress to verify the objective.
Task 3. Adding a KMS key
Before you can use this attestor, your authority needs to create a cryptographic key pair that can be used to sign container images. This can be done through Google Cloud Key Management Service (KMS).

- First, add some environment variables to describe the new key:
- Create a keyring to hold a set of keys:
- Create a new asymmetric signing key pair for the attestor
You should see your key appear on the KMS page of theCloud console.
- Now, associate the key with your attestor through the gcloud
binauthzcommand:
- If you print the list of authorities again, you should now see a key registered:
Click Check my progress to verify the objective.
Task 4. Creating a signed attestation
At this point you have the features configured that enable you to sign images. Use the Attestor you created previously to sign the Container Image you've been working with.
An attestation must include a cryptographic signature to state that the attestor has verified a particular container image and is safe to run on your cluster.
- To specify which container image to attest, run the following to determine its digest:
- Now, you can use gcloud to create your attestation. The command takes in the details of the key you want to use for signing, and the specific container image you want to approve:
In Container Analysis terms, this will create a new occurrence, and attach it to your attestor's note.
- To ensure everything worked as expected, run the following to list your attestations:
Task 5. Admission control policies
Binary Authorization is a feature in GKE and Cloud Run that provides the ability to validate rules before a container image is allowed to run. The validation executes on any request to run an image be it from a trusted CI/CD pipeline or a user manually trying to deploy an image. This capability allows you to secure your runtime environments more effectively than CI/CD pipeline checks alone.
To understand this capability you will modify the default GKE policy to enforce a strict authorization rule.
- Create the GKE cluster with binary authorization enabled:
- Allow Cloud Build to deploy to this cluster:
Allow All policy
First verify the default policy state and your ability to deploy any image
- Review existing policy:
- Notice that the enforcement policy is set to
ALWAYS_ALLOW
evaluationMode: ALWAYS_ALLOW
- Deploy Sample to verify you can deploy anything:
- Verify the deploy worked:
You will see the following output:

- Delete deployment:
Deny All policy
Now update the policy to disallow all images.
- Export the current policy to an editable file:
- In a text editor, open the
policy.yaml' file and change theevaluationModefrom `ALWAYS_ALLOWtoALWAYS_DENY:
Ensure the edited policy YAML file appears as follows:
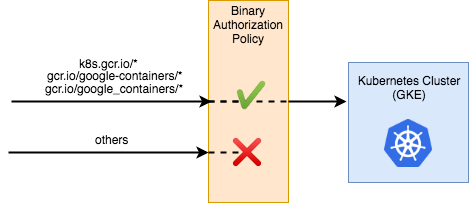
This policy is relatively simple. The globalPolicyEvaluationMode line declares that this policy extends the global policy defined by Google. This allows all official GKE containers to run by default. Additionally, the policy declares a defaultAdmissionRule that states that all other pods will be rejected. The admission rule includes an enforcementMode line, which states that all pods that are not conformant to this rule should be blocked from running on the cluster.
For instructions on how to build more complex policies, look through the Binary Authorization documentation.
- In Cloud Shell run the following to apply the new policy:
Wait a few seconds for the change to propagate.
- Attempt a sample workload deployment:
- Deployment fails with the following message:
Revert the policy to allow all
Before moving on to the next section, revert the policy changes.
- In a text editor, change the
evaluationModefromALWAYS_DENYto ALWAYS_ALLOW.
The edited policy YAML file should appear as follows:
- Apply the reverted policy:
Click Check my progress to verify the objective.
Task 6. Automatically signing images
You've enabled image signing, and manually used the Attestor to sign your sample image. In practice you will want to apply attestations during automated processes such as CI/CD pipelines.
In this section you will configure Cloud Build to attest images automatically.
Roles needed
- Add Binary Authorization Attestor Viewer role to Cloud Build Service Account:
- Add Cloud KMS CryptoKey Signer/Verifier role to Cloud Build Service Account (KMS-based Signing):
- Add Container Analysis Notes Attacher role to Cloud Build Service Account:
Provide access for Cloud Build Service Account
Cloud Build will need rights to access the on-demand scanning api.
- Provide access with the following commands:
Prepare the Custom Build Cloud Build Step
You'll be using a Custom Build step in Cloud Build to simplify the attestation process. Google provides this Custom Build step which contains helper functions to streamline the process. Before use, the code for the custom build step must be built into a container and pushed to Cloud Build.
- To do this, run the following commands:
Add a signing step to your cloudbuild.yaml
Add the attestation step into your Cloud Build pipeline.
- Review the signing step below.
Review only. Do Not Copy
- Write a
cloudbuild.yamlfile with the complete pipeline below:
- Run the build:
Review the build in Cloud Build History
In the Cloud console navigate to Cloud Build > Build history page and review that latest build and the successful execution of the build steps.
Click Check my progress to verify the objective.
Task 7. Authorizing signed images
Now you will update GKE to use Binary Authorization for validating the image has a signature from the Vulnerability scanning before allowing the image to run.
Update GKE Policy to Require Attestation
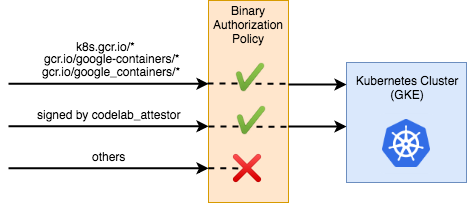
Require images are signed by your Attestor by adding clusterAdmissionRules to your GKE BinAuth Policy
Currently, your cluster is running a policy with one rule: allow containers from official repositories, and reject all others.
- Overwrite the policy with the updated config using the command below:
- You should now have a new file on disk, called
updated_policy.yaml. Now, instead of the default rule rejecting all images, it first checks your attestor for verifications.
- Upload the new policy to Binary Authorization:
Deploy a signed image
- Get the image digest for the good image:
- Use the digest in the Kubernetes configuration:
- Deploy the app to GKE
In the Cloud console navigate to Kubernetes Engine > Workloads and review the successful deployment of the image.
Click Check my progress to verify the objective.
Task 8. Blocked unsigned Images
Build an Image
- Use local docker to build the image to your local cache:
- Push the unsigned image to the repo:
- Get the image digest for the bad image:
- Use the digest in the Kubernetes configuration:
- Attempt to deploy the app to GKE
Review the workload in the console and note the error stating the deployment was denied:
Click Check my progress to verify the objective.
Congratulations!
You've learned how to create an Attestor to sign images to validate rules before a container image is allowed to run. You learned how to write a policy to inform Cloud Build to allow or deny access to the GKE cluster, and you have used Binary Authorization with Google Cloud KMS to validate image signatures, and prevent unsigned images access to the Kubernetes cluster.
What's next:
- Securing image deployments to Cloud Run and Google Kubernetes Engine | Cloud Build Documentation
- Quickstart: Configure a Binary Authorization policy with GKE | Google Cloud
Google Cloud Training & Certification
...helps you make the most of Google Cloud technologies. Our classes include technical skills and best practices to help you get up to speed quickly and continue your learning journey. We offer fundamental to advanced level training, with on-demand, live, and virtual options to suit your busy schedule. Certifications help you validate and prove your skill and expertise in Google Cloud technologies.
Manual Last Updated March 28, 2024
Lab Last Tested March 28, 2024
Copyright 2023 Google LLC All rights reserved. Google and the Google logo are trademarks of Google LLC. All other company and product names may be trademarks of the respective companies with which they are associated.