Checkpoints
Get the sample code and build a Docker image for the application
/ 20
Deploy Web Application
/ 20
Deploy Kubernetes Cluster
/ 20
Load testing master
/ 20
Load testing workers
/ 20
Distributed Load Testing Using Kubernetes
- GSP182
- Overview
- Setup and requirements
- Task 1. Set project and zone
- Task 2. Get the sample code and build a Docker image for the application
- Task 3. Deploy web application
- Task 4. Deploy Kubernetes cluster
- Task 5. Load testing master
- Task 6. Deploy locust-master
- Task 7. Load testing workers
- Task 8. Execute tests
- Congratulations!
GSP182

Overview
In this lab you will learn how to use Kubernetes Engine to deploy a distributed load testing framework. The framework uses multiple containers to create load testing traffic for a simple REST-based API. Although this solution tests a simple web application, the same pattern can be used to create more complex load testing scenarios such as gaming or Internet-of-Things (IoT) applications. This solution discusses the general architecture of a container-based load testing framework.
System under test
For this lab the system under test is a small web application deployed to Google App Engine. The application exposes basic REST-style endpoints to capture incoming HTTP POST requests (incoming data is not persisted).
Example workloads
The application that you'll deploy is modeled after the backend service component found in many Internet-of-Things (IoT) deployments. Devices first register with the service and then begin reporting metrics or sensor readings, while also periodically re-registering with the service.
Common backend service component interaction looks like this:
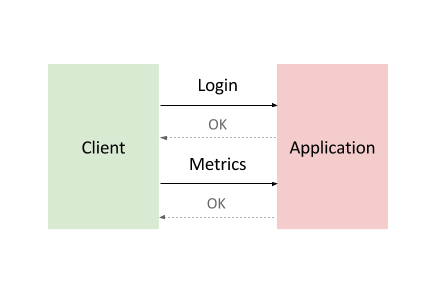
To model this interaction, you'll use Locust, a distributed, Python-based load testing tool that is capable of distributing requests across multiple target paths. For example, Locust can distribute requests to the /login and /metrics target paths.
The workload is based on the interaction described above and is modeled as a set of Tasks in Locust. To approximate real-world clients, each Locust task is weighted. For example, registration happens once per thousand total client requests.
Container-based computing
-
The Locust container image is a Docker image that contains the Locust software.
-
A
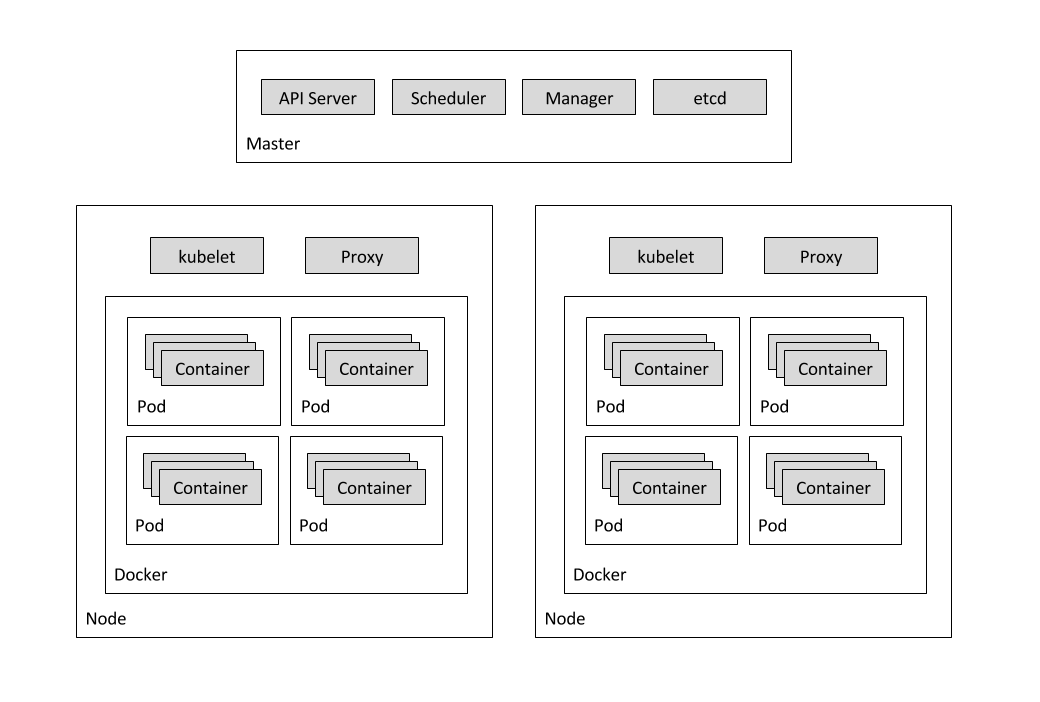
container clusterconsists of at least one cluster master and multiple worker machines called nodes. These master and node machines run the Kubernetes cluster orchestration system. For more information about clusters, see the Kubernetes Engine documentation -
A
podis one or more containers deployed together on one host, and the smallest compute unit that can be defined, deployed, and managed. Some pods contain only a single container. For example, in this lab, each of the Locust containers runs in its own pod. -
A
Deployment controllerprovides declarative updates for Pods and ReplicaSets. This lab has two deployments: one forlocust-masterand other forlocust-worker.
Services
A particular pod can disappear for a variety of reasons, including node failure or intentional node disruption for updates or maintenance. This means that the IP address of a pod does not provide a reliable interface for that pod. A more reliable approach would use an abstract representation of that interface that never changes, even if the underlying pod disappears and is replaced by a new pod with a different IP address. A Kubernetes Engine service provides this type of abstract interface by defining a logical set of pods and a policy for accessing them.
In this lab there are several services that represent pods or sets of pods. For example, there is a service for the DNS server pod, another service for the Locust master pod, and a service that represents all 10 Locust worker pods.
The following diagram shows the contents of the master and worker nodes:
What you'll learn
- Create a system under test i.e. a small web application deployed to Google App Engine.
- Use Kubernetes Engine to deploy a distributed load testing framework.
- Create load testing traffic for a simple REST-based API.
Prerequisites
- Familiarity with App Engine and Kubernetes Engine Google Cloud services.
- Familiarity with standard Linux text editors such as Vim, Emacs or Nano.
Setup and requirements
Before you click the Start Lab button
Read these instructions. Labs are timed and you cannot pause them. The timer, which starts when you click Start Lab, shows how long Google Cloud resources will be made available to you.
This hands-on lab lets you do the lab activities yourself in a real cloud environment, not in a simulation or demo environment. It does so by giving you new, temporary credentials that you use to sign in and access Google Cloud for the duration of the lab.
To complete this lab, you need:
- Access to a standard internet browser (Chrome browser recommended).
- Time to complete the lab---remember, once you start, you cannot pause a lab.
How to start your lab and sign in to the Google Cloud console
-
Click the Start Lab button. If you need to pay for the lab, a pop-up opens for you to select your payment method. On the left is the Lab Details panel with the following:
- The Open Google Cloud console button
- Time remaining
- The temporary credentials that you must use for this lab
- Other information, if needed, to step through this lab
-
Click Open Google Cloud console (or right-click and select Open Link in Incognito Window if you are running the Chrome browser).
The lab spins up resources, and then opens another tab that shows the Sign in page.
Tip: Arrange the tabs in separate windows, side-by-side.
Note: If you see the Choose an account dialog, click Use Another Account. -
If necessary, copy the Username below and paste it into the Sign in dialog.
{{{user_0.username | "Username"}}} You can also find the Username in the Lab Details panel.
-
Click Next.
-
Copy the Password below and paste it into the Welcome dialog.
{{{user_0.password | "Password"}}} You can also find the Password in the Lab Details panel.
-
Click Next.
Important: You must use the credentials the lab provides you. Do not use your Google Cloud account credentials. Note: Using your own Google Cloud account for this lab may incur extra charges. -
Click through the subsequent pages:
- Accept the terms and conditions.
- Do not add recovery options or two-factor authentication (because this is a temporary account).
- Do not sign up for free trials.
After a few moments, the Google Cloud console opens in this tab.

Activate Cloud Shell
Cloud Shell is a virtual machine that is loaded with development tools. It offers a persistent 5GB home directory and runs on the Google Cloud. Cloud Shell provides command-line access to your Google Cloud resources.
- Click Activate Cloud Shell
at the top of the Google Cloud console.
When you are connected, you are already authenticated, and the project is set to your Project_ID,
gcloud is the command-line tool for Google Cloud. It comes pre-installed on Cloud Shell and supports tab-completion.
- (Optional) You can list the active account name with this command:
- Click Authorize.
Output:
- (Optional) You can list the project ID with this command:
Output:
gcloud, in Google Cloud, refer to the gcloud CLI overview guide.
Task 1. Set project and zone
- Define environment variables for the
project id,regionandzoneyou want to use for the lab.
Task 2. Get the sample code and build a Docker image for the application
- Get the source code from the repository by running:
- Move into the directory:
- Update the python version in
app.yamlfile:
- Move back to the directory
distributed-load-testing-using-kubernetes.
- Build docker image and store it in container registry:
Example Output:
Click Check my progress to verify the objective.
Task 3. Deploy web application
The sample-webapp folder contains a simple Google App Engine Python application as the "system under test".
- To deploy the application to your project use the
gcloud app deploycommand:
After running the command, you'll be prompted with the following.
From the list of regions, you can choose us-central enter "10" as the input for the prompt.
locust-master and locust-worker deployments which is already stored in TARGET variable.
Click Check my progress to verify the objective.
Task 4. Deploy Kubernetes cluster
- Create the Google Kubernetes Engine cluster using the
gcloudcommand shown below:
Example output:
Click Check my progress to verify the objective.
Task 5. Load testing master
The first component of the deployment is the Locust master, which is the entry point for executing the load testing tasks described above. The Locust master is deployed with a single replica because we need only one master.
The configuration for the master deployment specifies several elements, including the ports that need to be exposed by the container (8089 for web interface, 5557 and 5558 for communicating with workers). This information is later used to configure the Locust workers.
The following snippet contains the configuration for the ports:
Task 6. Deploy locust-master
- Replace
[TARGET_HOST]and[PROJECT_ID]inlocust-master-controller.yamlandlocust-worker-controller.yamlwith the deployed endpoint and project-id respectively.
- Deploy Locust master:
- To confirm that the
locust-masterpod is created, run the following command:
- Next, deploy the
locust-master-service:
This step will expose the pod with an internal DNS name (locust-master) and ports 8089, 5557, and 5558. As part of this step, the type: LoadBalancer directive in locust-master-service.yaml will tell Google Kubernetes Engine to create a Compute Engine forwarding-rule from a publicly available IP address to the locust-master pod.
- To view the newly created forwarding-rule, execute the following:
Example output:
Click Check my progress to verify the objective.
Task 7. Load testing workers
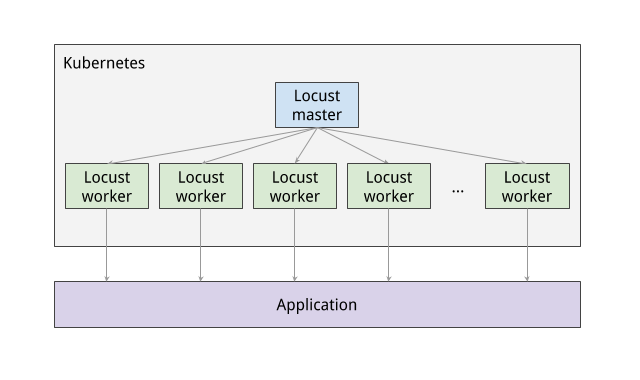
The next component of the deployment includes the Locust workers, which execute the load testing tasks described above. The Locust workers are deployed by a single deployment that creates multiple pods. The pods are spread out across the Kubernetes cluster. Each pod uses environment variables to control important configuration information such as the hostname of the system under test and the hostname of the Locust master.
After the Locust workers are deployed, you can return to the Locust master web interface and see that the number of slaves corresponds to the number of deployed workers.
The following snippet contains the deployment configuration for the name, labels, and number of replicas:
Deploy locust-worker
- Now deploy
locust-worker-controller:
- The
locust-worker-controlleris set to deploy 5locust-workerpods. To confirm they were deployed, run the following:
Scaling up the number of simulated users will require an increase in the number of Locust worker pods. To increase the number of pods deployed by the deployment, Kubernetes offers the ability to resize deployments without redeploying them.
- The following command scales the pool of Locust worker pods to
20:
- To confirm that pods have launched and are ready, get the list of
locust-workerpods:
The following diagram shows the relationship between the Locust master and the Locust workers:
Click Check my progress to verify the objective.
Task 8. Execute tests
- To execute the Locust tests, get the external IP address by following command:
- Click the link and navigate to Locust master web interface.
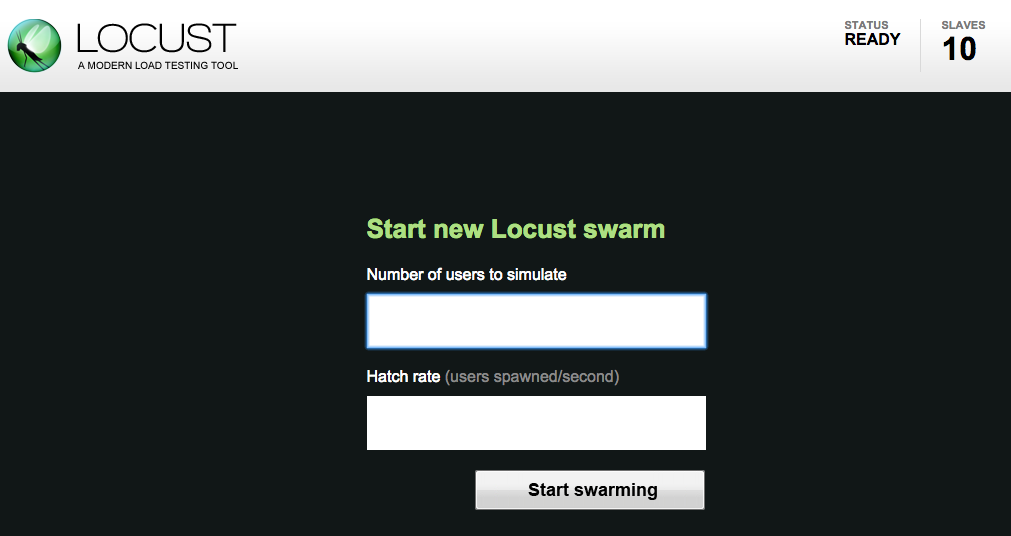
The Locust master web interface enables you to execute the load testing tasks against the system under test.
-
To begin, specify the total number of users to simulate and a rate at which each user should be spawned.
-
Next, click Start swarming to begin the simulation. For example you can specify Number of users to simulate as 300 and Hatch rate as 10.
-
Click Start swarming.
As time progresses and users are spawned, statistics aggregate for simulation metrics, such as the number of requests and requests per second.
- To stop the simulation, click Stop and the test will terminate. The complete results can be downloaded into a spreadsheet.
Congratulations!
You used Kubernetes Engine to deploy a distributed load testing framework.
Next steps / Learn more
- Check out the lab titled Continuous Delivery Pipelines with Spinnaker and Kubernetes Engine.
Google Cloud training and certification
...helps you make the most of Google Cloud technologies. Our classes include technical skills and best practices to help you get up to speed quickly and continue your learning journey. We offer fundamental to advanced level training, with on-demand, live, and virtual options to suit your busy schedule. Certifications help you validate and prove your skill and expertise in Google Cloud technologies.
Manual Last Updated March 28, 2024
Lab Last Tested March 28, 2024
Copyright 2024 Google LLC All rights reserved. Google and the Google logo are trademarks of Google LLC. All other company and product names may be trademarks of the respective companies with which they are associated.